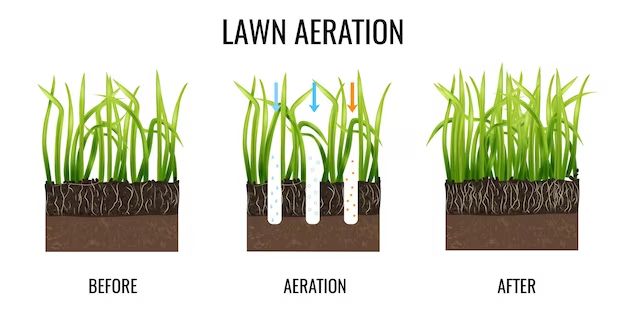
Aerating your lawn is an important part of lawn care and maintenance. It helps loosen compacted soil, allowing air, water and nutrients to better reach the roots of your grass. This helps promote healthy growth and a lush, green lawn.
There are a few different ways to aerate your lawn. Using a core aerator machine is one of the most effective methods. This machine will pull plugs of soil out of your lawn, leaving behind holes for air, water and nutrients to reach the roots. However, hiring an aerator or buying your own can be expensive.
A liquid lawn aerator is a cost-effective and easy alternative. You simply spray or apply the liquid product to your lawn. The ingredients in the aerator help break down organic matter and loosen soil to achieve results similar to core aeration. It’s an easy DIY project you can tackle in an afternoon.
In this article, we’ll walk through everything you need to know to make your own liquid lawn aerator at home with common ingredients.
Page Contents
Benefits of Liquid Aeration
Liquid lawn aerators provide a few key benefits:
- Cost-effective – Making your own liquid aerator at home is much cheaper than renting or buying an aerator machine.
- Easy to apply – You simply mix the ingredients together and spray or sprinkle onto your lawn. No heavy equipment required.
- Improves soil structure – The ingredients in liquid aerator help break up compacted soil and organic matter.
- Increases nutrient availability – With less compacted soil, nutrients are able to better reach grass roots.
- Enhances root growth – Loosened soil enables deeper root growth.
- Enhances water absorption – With a less compacted structure, water can permeate down to roots better.
Liquid aeration leads to a healthier, more robust lawn. The great news is making your own liquid aerator is simple and affordable.
Ingredients Needed
Creating a liquid lawn aerator requires just a few simple ingredients you likely already have on hand:
- Beer or soda – The sugars in beer and soda help feed beneficial microbes in the soil that produce natural aeration and loosening. Flat beer or soda works best.
- Liquid dish soap – A small amount of any liquid dish soap will help break surface tension in the soil.
- Molasses – Molasses also helps feed microorganisms in the soil. Unsulfured molasses is best.
- Optional: Epsom salts – Epsom salts provide magnesium, which helps strengthen grass plants. This is optional.
That’s it! With just a few common household items, you can make an effective liquid aerator for your lawn.
Step-by-Step Instructions
Making your own liquid lawn aerator takes about 5 minutes. Follow these simple steps:
- Gather your ingredients – flat beer or soda, liquid dish soap, molasses and Epsom salts (optional).
- Measure out the amounts needed. For best results, use:
- 2 12oz cans of beer or soda
- 2 ounces liquid dish soap
- 2 ounces molasses
- 2 ounces Epsom salts (optional)
- Pour the beer and soda into a watering can, bucket or tank sprayer. Any container that allows you to spray or sprinkle the mixture will work.
- Add in the liquid dish soap. Swish the container around to mix.
- Stir in the molasses until well incorporated.
- If using Epsom salts, add them in now. Mix to fully dissolve the salts.
- You’re ready to apply the liquid aerator!
Be sure to mix up a fresh batch each time, as the sugars will start to ferment if left too long.
How to Apply
Applying your liquid lawn aerator is simple:
- Spray or sprinkle onto your lawn in the early morning or evening when temperatures are cooler.
- Completely saturate the lawn, applying evenly across the whole area.
- Use approximately 2-4 gallons per 1000 sq ft of lawn.
- Allow the mixture to soak into the soil; no need to water it in.
- For best results, apply every 2-4 weeks throughout the growing season.
The sugars and soap will work to start breaking up compaction and improve soil structure right away. Over repeated applications, you should notice less compacted soil and better grass health.
Optional Add-Ins
For an extra nutritional boost, consider adding the following to your liquid aerator recipe:
- Yeast – Sprinkle in a packet of yeast to feed microbes.
- Compost tea – Steep some compost in water for added microbes.
- Molasses – An extra dose of molasses provides more food for microbes.
- Humic acid – Helps break up mineral deposits in soil.
- Seaweed extract – Provides micronutrients and enhances soil health.
Experiment by adding a couple tablespoons of any of these amendments to your normal recipe.
Troubleshooting
Having issues with your liquid aerator? Here are some troubleshooting tips:
Grass seems unchanged
It can take multiple applications, spread over the entire growing season, to start seeing results. Be patient and keep applying every 2-4 weeks.
Weeds are taking over
The aerator is improving the soil structure, allowing weeds to establish. Follow up your applications by overseeding with grass seed to crowd out weeds.
Lawn is turning yellow
Too much sugar from the beer or molasses could be leading to fungal issues. Cut back on amounts or frequency of application.
Ground feels excessively wet
Use less product per application and allow the soil to dry fully between applications.
Pet or child got into the mixture
Rinse them off with fresh water. The small amount of dish soap can cause irritation. Call poison control if ingested.
Safety Tips
When making and applying your liquid aerator, keep these safety tips in mind:
– Wear gloves, eye protection and closed toe shoes when mixing.
– Store leftover mixture out of reach of children and pets.
– Rinse skin immediately if the aerator gets on you.
– Avoid spraying near wells, bodies of water or drainage areas.
– Reapply after heavy rains to replace washed away product.
– Use caution on slopes and uneven terrain when spraying.
Following basic safety practices will ensure you and your lawn stay healthy.
Frequently Asked Questions
How soon will I see results from liquid aeration?
You should notice a difference in soil compaction within 2-4 weeks of regular applications. However, it can take several months of continued use to correct years of soil compaction issues. Be patient!
When should I apply liquid aerator?
The best times are early spring to wake up the soil and mid-fall to prepare for winter. But you can apply anytime during the growing season as needed.
Will liquid aeration hurt my grass?
When used as directed, liquid lawn aerator will not harm grass. In fact, it helps improve grass health by nourishing the soil. Too strong of a mixture can potentially burn grass, so follow recipe amounts.
How often should I apply liquid aerator?
Every 2-4 weeks is ideal during the growing season. You can use it more frequently for very compacted soils. Let the ground dry between applications.
What type of beer or soda should I use?
The flattest beer or soda you have will work best. Avoid carbonated beverages. Cheap beer or soda works just fine.
Conclusion
By making your own liquid lawn aerator with simple household ingredients, you can easily and affordably treat soil compaction issues. Regular applications will lead to a lush, healthy lawn by improving soil structure and increasing nutrient availability.
With just a bit of beer, soda, molasses and dish soap, you can unlock your lawn’s full potential right from your own backyard.
Aerating your lawn no longer requires heavy equipment and labor. This inexpensive DIY liquid aerator is a great solution for any homeowner seeking better grass growth through improved soil health. Try out this easy recipe to give your lawn some love!