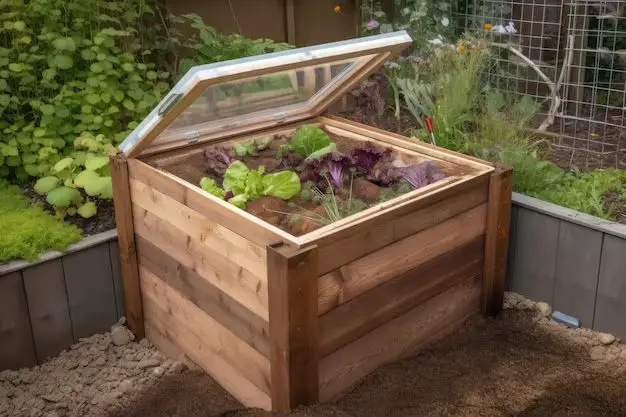
A self watering raised bed is a great way to grow plants and vegetables without having to water them manually every day. The bed is elevated above ground level, which improves drainage and allows you to control the soil quality. A reservoir is built into the bottom of the bed to hold water, and a wicking system draws water up into the soil so the plant roots can access it as needed. This means you only need to fill the reservoir periodically instead of watering daily.
Self watering raised beds are advantageous because they:
– Reduce the amount of watering and maintenance required
– Provide consistent moisture to plant roots
– Prevent over and under watering problems
– Allow you to control soil quality and drainage
– Make gardening accessible for those with limited mobility
– Keep plants up off wet ground and improve drainage
Building a self watering raised bed is a straightforward project that can be customized to fit your space and needs. With basic DIY skills and easily sourced materials, you can create a functional and aesthetically pleasing addition to your yard or garden. This article provides complete instructions for constructing a simple wooden raised bed with a sub-irrigated reservoir.
Page Contents
Planning Your Raised Bed
When planning your raised bed build, the first considerations are size and location. Think about available space in your yard and how big of a bed you’d like to have. Standard sizes are 4×4 feet, 4×8 feet, or 3×6 feet, but it can be customized to your space. Determine the amount of sun the area receives – at least 6 hours per day is best for most vegetables. Make sure to follow local building codes for placement and height restrictions.
It’s also important to plan for accessibility. Place it near a water source for convenient filling and close to a hose or spigot. Ensure there is enough space around the bed for you to comfortably reach in and tend plants from all sides. Building near a wall or fence can allow you to access the bed from just one or two sides.
Before constructing, use stakes and string to mark out the exact shape and orientation of your raised bed based on available space. Having this visual layout will help ensure your DIY build goes smoothly.
Materials Needed
Constructing a raised bed is a simple project that doesn’t require elaborate tools or skills. Here are the materials needed:
– Untreated wood boards or timbers – cedar and redwood are naturally rot-resistant woods. You’ll need enough boards to build your frame to the desired size, typically 2-3 inches thick.
– Landscape fabric – this will line the bottom and sides of your bed before adding soil.
– Weed barrier fabric – lines bottom underneath the planting soil to block weeds.
– Wicking material – coconut coir fiber or nylon rope work well, used to draw water up from reservoir.
– Drainage material – coarse sand or gravel, used to fill reservoir below soil.
– Planting soil – good quality topsoil or vegetable gardening mix.
– Corner brackets – stabilize the structure and keep bed square (optional).
– Screws or nails – 3-4 inch exterior grade to assemble the wooden frame.
– PVC materials – used to create sub-irrigation watering system. This includes:
– Main water delivery line – 1/2 or 3/4 inch PVC pipe
– Water distribution lines – 1/4 inch drip irrigation tubing
– Fittings – tees, elbows, and ends as needed
– Emitters – to regulate water flow into soil
– Cap for water inlet
– Horizontal supports or cross-bracing (optional) – 1×2 boards stabilize walls
Assembling the Raised Bed Frame
Once you have gathered your materials, you can start construction of the raised bed frame:
1. Lay the landscape fabric over your planned area. This will block weeds from growing up into the bed later on.
2. Assemble the four sides of your frame using corner brackets. Cut your boards to the correct length according to dimensions. Use 3-4 screws or nails to attach brackets and lock corners into place.
3. Add horizontal supports or cross-braces between the side boards about halfway down the frame for extra stability (optional).
4. Create a bottom frame to match the dimensions of the inner bottom of your raised bed using the same width boards. This will support the weed barrier, wicking system and soil.
5. Set the assembled outer frame in the desired position on top of the landscape fabric and level it.
6. Place the bottom frame inside the outer frame. It should fit snugly at the corners.
Your basic raised bed frame is now complete! Next you’ll add features for watering.
Installing the Reservoir and Wicking System
The reservoir at the bottom of the bed holds the water that will irrigate plants through a wicking system. Here’s how to create this self-watering system:
1. Line the bottom frame with weed barrier fabric. Make sure it covers the edges. This prevents soil and roots from penetrating into the reservoir below.
2. Cut pieces of your wicking material (coconut coir or rope) to fit the bottom dimensions. Lay them evenly across the weed barrier leaving space between rows.
3. Add your drainage material (gravel or sand) over the wicking layer. This helps disperse water. Fill reservoir layer 2-3 inches deep.
4. Place your main water delivery line down the center on top of the gravel. Cut small pieces of tubing for distribution lines, using elbows and tees to branch off the main line so water reaches all parts of the soil.
5. Connect emitters along the distribution lines which will drip water into the soil. Place one every 6-12 inches. Use end caps to close off lines.
6. Run the PVC pipe to one corner and cap it for your water inlet. Leave excess for attaching to a hose later on.
The reservoir will hold water for the wicking system to absorb and deliver to plant roots. Now you can add soil!
Adding Soil and Planting
With the structure built and irrigation installed, it’s time to fill your raised bed with nutrient-rich soil:
1. Line the inner sides of the outer frame with landscape fabric. This separates the soil from the wood, preventing rotting.
2. Shovel soil into the frame, ensuring no gaps between the fabric and corners. Fill to within 2 inches of the top of the boards.
3. Mix in fertilizer or compost and rake smooth for planting. Shape surface according to if seeds or transplants will be planted.
4. Arrange seeds or plant starts based on instructions for spacing. Some can be planted in rows while others are spaced across the entire bed.
5. Water thoroughly until water drains out from the reservoir. Your wicking system is working!
6. Add mulch on top of soil to prevent water evaporation and weed growth. Wood chips or straw work well.
Your self watering raised bed is now ready for growing! Monitor soil moisture and refill the reservoir as needed through the water inlet pipe. Some maintenance like weeding, pruning and fertilizing will be needed, but the built-in irrigation reduces daily watering. Enjoy the convenience of raised bed gardening!
Customizing Your Raised Garden Bed
One of the great things about building your own raised bed is the ability to customize features to suit your needs:
– Size and layout – Construct beds of varying shapes, lengths and widths to fit your space. Use multiple beds together for larger gardens.
– Materials – Use naturally rot-resistant cedar, redwood or composite decking boards for durable, long-lasting beds. Or try more budget-friendly pine.
– Bottom layers – Add extra layers of landscape fabric to prevent weeds. Use porous weed barrier cloth to improve drainage.
– Pathways – Leave space between beds for walking paths. Use gravel, wood chips, or pavers to keep feet clean.
– Trellises and cages – Add wood or wire supports along the sides or across beds for climbing plants like peas, beans, tomatoes and cucumbers.
– Irrigation system – Use soaker hoses or drip tape instead of PVC. Increase or decrease number of emitters as needed. Have multiple reservoirs in extra long beds.
– Covers – Use plastic sheeting, fabric row covers, tunnels or cloches over beds to extend growing seasons.
– Height – For accessibility, keep beds low to the ground. For deep root crops, make extra deep beds up to 24 inches tall.
– Decor – Paint or stain boards for aesthetics. Add trim, lattice, or trellises for visual interest. Plant flowers, herbs and ornamentals along with edibles.
The possibilities are endless when you build it yourself! Add functional and decorative touches to create your perfect raised beds.
Cost of Building a Raised Bed
One advantage of DIY raised bed projects is the relatively low cost, especially compared to purchasing pre-made garden beds. The specific cost will vary based on size, materials and features included.
Some typical estimates for materials:
– Untreated pine boards – $2-4 per foot
– Cedar boards – $4-8 per foot
– Corner brackets – $5-10 per set
– Landscape fabric – $20-30 for roll
– Weed barrier – $15-25
– Coconut coir mat – $50-100
– Sand or gravel – $2-5 per bag
– Soil – $30-50 per cubic yard
For a basic 4×8 foot pine bed with irrigation, expect a total cost around $150-300. Bells and whistles like automatic watering, fancier wood or composite decking, and added decor will increase the overall project budget.
Compared to $500-1000+ for a prefabricated raised bed of the same size, building your own is clearly the more budget-friendly option in most cases. Plus you can customize to fit your exact gardening needs.
Benefits of Raised Garden Beds
Raised beds provide a number of unique advantages over traditional in-ground gardening:
– Contained space – Clear boundaries prevent plants from spreading or roots from invading lawn. Beds create defined areas for planting different crops together.
– Customized soil – Fill beds with improved soil mixes augmented with organic material for better drainage and nutrients. Achieve optimal growing medium not possible with native ground soil.
– Accessibility – Raised height makes gardening easier for those who have trouble bending or kneeling. Beds can be designed to accommodate wheelchairs.
– Improved drainage – Elevation prevents waterlogged soil. Gravity helps excess moisture drain out the bottom. Good for problem areas.
– Earlier planting – Soil warms faster in spring for 3-4 week head start on growing season over regular gardens. Extend your harvest into winter.
– High productivity – Intensive planting takes advantage of vertical space. Higher yields from successive plantings compared to rows.
– Weed control – Use barriers to block weed growth. Keep unwanted plants from spreading via contained soil and defined edges.
– Reduced pests – Raised above ground with defined boundaries limits deleterious garden pests. Improves disease prevention.
Raised beds make growing vegetables, herbs and flowers easier and more productive for gardeners of every skill level.
Challenges of Raised Beds
Raised gardening beds do have some drawbacks and challenges to consider as well:
– Bending over required for planting and harvesting. Can be difficult for those with back issues. Using waist-high beds minimizes this concern.
– Daily water requirements. Self-watering beds help, but regular beds take more frequent watering as soil drains faster.
– Soil drying out. Closer to sun and wind, raised bed soil dries quickly. Much more moisture monitoring is needed.
– Drainage problems. Excess water must have a place to go. Locate beds away from structures and slope for drainage.
– Wood decay. Regular rot-resistant wood will still deteriorate over time. Use thick boards and refresh sides periodically.
– Cost. Purchasing quality wood, soil, and construction materials can get expensive, especially for larger beds.
– Space constraints. Gardens require several feet of space around beds for access. Plan for adequate room to move between beds.
– Wildlife access. Fencing may be needed to keep pets and critters from disturbing sensitive beds.
With smart design and proper care, raised beds can thrive and serve as an accessible, highly productive gardening method.
Conclusion
Constructing your own raised garden bed with built-in watering capabilities is a straightforward weekend project that will yield bountiful gardening results. Follow the steps outlined for planning materials, assembling the frame, installing irrigation, filling with rich soil, and planting your crops. Consider customizations like size, shape, materials and features to meet your exact needs.
Raised beds offer many benefits like better drainage, customized soil, high yields, and weed and pest control compared to traditional gardens. The main challenges to address are accessibility, frequent watering, and potential wood rot over time. Proper site planning and using quality construction techniques will lead to a successful DIY raised bed that provides a convenient, lush growing environment for your backyard or patio.