Joining two pieces of wood is one of the fundamental skills in woodworking. A dovetail joint is a popular method for joining the corners of cabinets and drawers. Dovetails are very strong and they also look great when done well. While there are many complex types of dovetail joints, in this article we will focus on a simple through dovetail that can be made with just a handsaw, chisel, and mallet.
Page Contents
What is a Dovetail Joint?
A dovetail joint is a type of interlocking joint used to connect two pieces of material. It gets its name from the unique dovetail shape created by precisely cutting angled ‘tails’ into one piece that fit into corresponding ‘pins’ on the other piece.
This wedge shape creates a very strong joint due to the way the ‘tails’ resist being pulled apart when force is applied. Dovetail joints are commonly used in furniture drawer construction and for joining cabinet corners.
Benefits of Dovetail Joints
- Very strong – resists pulling apart under tension
- Interlocking shape resists racking (skewing of joint)
- Attractive appearance – well executed dovetails are a sign of quality woodworking
- Doesn’t require special clamps – the wedge shape holds itself together
- Allows for some wood movement across the joint
While there are many types of dovetail joints, we will be learning how to make a simple ‘through dovetail’ in this tutorial. This is one of the easiest forms of the joint and only requires basic tools.
Tools and Materials Needed
You don’t need any advanced tools or expensive jigs to make basic through dovetails. Here is what you’ll need:
- Wood for the joint – softwoods like pine work well
- Handsaw – a backsaw works best, but a sharp handsaw can also be used
- Chisel – 1/2″ is a good size
- Mallet or wooden hammer
- Ruler or measuring tape
- Pencil
- (Optional) Dovetail marker or sliding bevel gauge
For this project we are using 3/4″ thick pine boards approximately 5″ wide. This allows us to make a joint that is similar in size to what you’d find on a small drawer or jewelry box.
Cutting the Tails
We will start by cutting the ‘tail’ portion of the joint into one of the boards. For a basic through dovetail this is a fairly simple angled cut on each side of the board.
The angle of this cut is not critical, but a 1:6 (one unit horizontal for every 6 vertical) works well for softwoods. A dovetail marker makes quick work of marking the angles, but you can also use a bevel gauge or even estimate the line.
Cut just outside the lines with a dovetail saw, angling slightly inwards so the kerf (width of the saw cut) ends right at the line.

Use a chisel to carefully pare away the waste wood right up to the line. Working from both sides helps prevent tear-out splintering on the back side.
Test the fit and use the chisel or file to fine-tune as needed. You want a tight fit where the tails must be tapped in place with a mallet.
Cutting the Pins
With the tails cut, we now need to cut the ‘pins’ on the mating board. To get a precise fit, we will use the tails themselves as a guide.
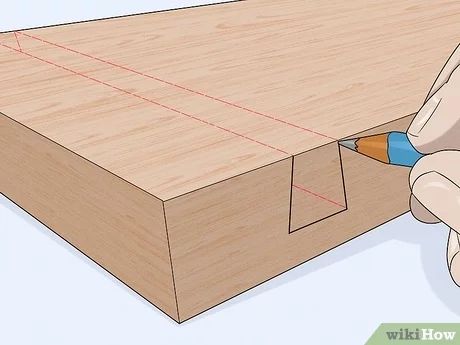
Start by marking the depth of cut for the pins. This should allow for about 1/16″ gap at the bottom. Transfer these lines across the entire board.
Now clamp the tail board on, with the tails centered across the pin board. Trace the outline of each dovetail precisely.

Cut the pins using a dovetail saw, staying just outside the lines. Make these cuts perpendicular to the board, angling very slightly towards the waste side.
Use a sharp chisel to carefully pare away the waste until the pins fit neatly into the tails. Test the fit and trim as needed for a tight joint.
Gluing and Clamping
With both boards cut, the joint can now be permanently glued. For the best strength, use a high quality wood glue like Titebond. Apply glue into the pins and tails and firmly press together by hand. Then clamp tightly or tap together with a mallet.
Wipe away any excess glue squeeze-out and allow to dry overnight before removing clamps. The wood glue will form a bond stronger than the wood itself!

Tips for Better Results
Here are some helpful tips to improve your dovetailing:
Use sharp tools
Sharp chisels and hand saws make much quicker and cleaner cuts. Dull tools tear the wood fibers resulting in sloppy joints.
Work with straight boards
Wood must be flat and straight or the joint won’t come together correctly. Plane or sand out any cupping or twist first.
Cut tail angles precisely
Consistent and even tail angles allow for a tight interlocking shape. Use a dovetail marker for accuracy.
Remove waste wood carefully
Pare away waste slowly and deliberately to avoid cutting into the shoulder next to the tails and pins.
Fit joints before gluing
Dry fit the boards together to check for fit. Make fine adjustments before applying glue for permanent assembly.
Conclusion
While it takes some practice, a simple through dovetail joint can be made with basic hand tools and a bit of care. Following the steps outlined here will have you making strong and attractive dovetail joints in no time.
For more advanced dovetailing, there are jigs and fixtures that help with precision and repeatability. But don’t overlook mastering this most fundamental dovetail joint by hand first.
With some sharp tools, quality boards, attention to detail, and a bit of patience, you’ll find hand-cut dovetails very satisfying and great looking. Just take your time, check your measurements twice, and enjoy the craft!