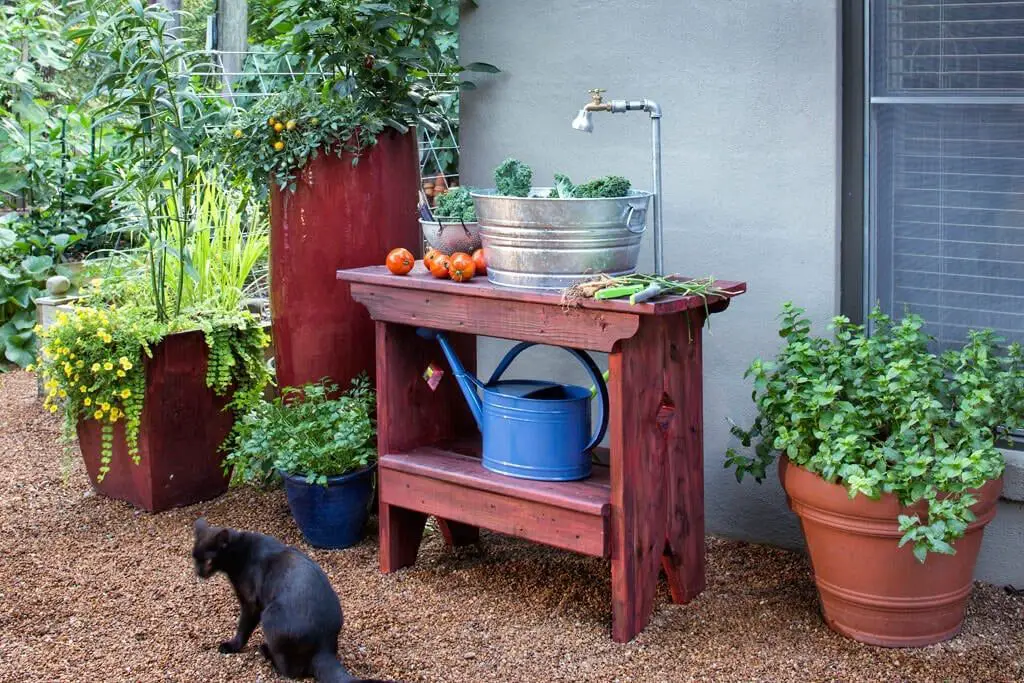
Having an outdoor sink can be incredibly convenient for washing up after working in the yard, cleaning garden tools, or rinsing off dirty kids. Rather than running back inside to use the kitchen sink, an outdoor sink connected to a hose allows you to quickly wash up right where you are. Making your own simple outdoor sink is a weekend DIY project that doesn’t require much time, effort, or money.
Page Contents
What You’ll Need
Constructing a basic outdoor sink requires just a few key items:
- A basin – This can be a plastic bin, bucket, or other container that will hold water.
- A board – A wide board cut to fit across your basin will function as the countertop.
- Brackets – L-shaped metal brackets are used to attach the basin and countertop.
- Faucet – You’ll need an outdoor spigot or sink faucet to connect to the hose.
- Hose & hose fittings – To supply the sink with water.
- Drain pipe – A flexible plastic pipe to drain wastewater.
- Sealant – Caulk or plumber’s putty seals leaks between joints.
You may also want corrugated roof panels, decorative stones, or plants to create an attractive outdoor sink station. Make sure to assemble all materials and tools before starting the project.
Choosing a Sink Basin
The first step is selecting an appropriate basin container for your outdoor sink. Here are some options:
- Plastic storage bin – Choose one at least 12 inches deep. Make sure it’s sturdy but lightweight.
- Insulated cooler – The insulation will prevent freezing in cold weather. Look for one about 20 qt or larger.
- Metal bucket – Galvanized steel buckets are very durable for heavy use.
- Small plastic sink – Check recycling centers or secondhand stores for old bathroom sinks.
- Concrete mixing tub – These wide tubs work well for gardening purposes.
Consider the size of the basin based on your needs – larger is better for washing pets or cleaning substantial garden tools. Make sure it has a flat bottom so it sits level. Also look for handles or grips on the sides to make dumping wastewater easy.
Creating the Base
The outdoor sink will need a sturdy base to hold the weight of a full basin when in use. Here are two options:
Wood Pallet: Use a standard wood shipping pallet. They provide a flat surface slightly off the ground. Make sure the pallet is in good condition, not rotting or splintering. You can use cinder blocks under the corners to level it if needed.
Wood Platform: Construct a simple rectangular platform from 2×4 lumber. Cut four pieces the length and width you want the finished platform. Use deck screws to join the pieces at the corners. You can attach caster wheels if you want the sink movable.
In either case, make sure the base is wider and longer than your basin container to provide a countertop area. Set the pallet or platform in place before attaching the basin.
Installing the Sink Basin
With the base ready, now you can permanently attach the sink basin. Here is the process:
- Set the basin in place on the pallet or platform. Make sure the edges are centered and it sits level.
- Mark the inside position of the basin on the base with a pencil.
- Use a jigsaw or handsaw to cut a hole along the pencil line markings.
- Place the basin into the hole. It should fit down in snugly, level with the top of the base.
- Attach two L-brackets on each side of the basin, screwed into the base. This will hold the basin securely in place once caulked.
Before going further, test fit your drain pipe and confirm the basin sits flush and stable within the cut-out hole. Once you’ve verified the fit, you can permanently attach it.
Adding the Countertop
With the basin installed, now you need to add a countertop surface around it. Here’s how:
- Cut a board to the size you want for the finished countertop. It should overhang the base by a few inches on each side.
- Place the board on top of the base, over the sink basin. Make sure it sits evenly.
- Mark drain hole locations on the underside of the board where you’ll drill to accommodate the drain pipe.
- Drill drain holes at the marked locations to match up with the basin drain.
- Apply caulk around the basin rim where it meets the countertop. Firmly place the board on top.
- Screw wooden braces at the corners to hold the countertop in place as the caulk dries.
Choose a countertop material that can withstand outdoor weather, like treated lumber, cedar, or redwood boards. Apply waterproof sealant to protect the wood.
Installing the Faucet
The faucet delivers clean water on demand to your outdoor sink station. You have several choices:
- Outdoor sink faucet – Designed for outdoor use, these mini sink faucets screw directly to your countertop or wall near the basin.
- Garden faucet – A basic threaded spigot can be mounted on a pipe to create a gooseneck faucet.
- Hand pump faucet – Attaches to the countertop and pumps water from an undersink reservoir.
- Foot pump faucet – Activates water flow when you press a pedal, leaving hands free.
Pick an outdoor faucet option that will be simple to install and use. Make sure it reaches over your sink basin. If using a reservoir-type hand pump faucet, calculate the needed water capacity and allow space for the holding tank underneath.
Installing the Drain
You’ll need to add a drain system to remove wastewater from your outdoor sink. Here are two options:
Bucket drain:
- Drill a hole near the bottom of the sink basin.
- Attach a bulkhead fitting lined up with the hole.
- Connect a short length of plastic tubing to the fitting.
- Have the tube empty into a 5 gallon bucket placed under the sink.
Landscape drain:
- Drill a hole near the bottom of the sink basin.
- Attach a bulkhead fitting aligned with the hole.
- Connect a longer length of plastic tubing, run it underground, and empty into a gravel drainage pit.
The bucket method captures all wastewater for responsible disposal. The landscape drain allows water to filter through soil. Choose the option that best suits your situation.
Finishing Touches
Once the main sink components are assembled, add finishing touches:
- Caulk around all joints and seams to prevent leaks.
- Consider lining the sink basin with smooth stones for easier cleaning.
- Apply sealant to all wood surfaces to protect from weathering.
- Install corrugated roofing panels supported on posts to create a covering.
- Add decorative planters, shelves, or a drying rack for convenience.
Optional features like lighting, storage, soap dispensers, or shelving will complete your outdoor sink station. Personalize it to suit your space and needs.
Connecting the Water
The final step is connecting your hose to supply water:
- Attach a female hose fitting to the faucet inlet, using plumber’s tape.
- Connect a garden hose from an exterior spigot to the faucet.
- For cold season use, install an inline shutoff valve near the faucet to drain water from the hose.
- Test the water flow and check for leaks before regular use.
Use a heavy duty, drinking water-safe garden hose. Install an optional hose reel nearby to conveniently store and access the hose. Wrap any hose connections with insulation for freeze protection during winter months.
Maintenance
Like any outdoor feature, your DIY sink will require periodic maintenance:
- Reapply sealant on wood surfaces every 1-2 years.
- Check caulk seals and reapply as needed to prevent leaks.
- Drain and disconnect hoses during freezing weather.
- Clear debris from drain fittings as needed.
- Scrub surfaces with baking soda to remove stains and odors.
Practice good cleaning habits, like drying the sink after use and clearing out food and waste. Keeping your outdoor sink station maintained will allow it to serve your needs for many years.
Conclusion
Installing your own outdoor sink provides a convenient cleaning station when working or playing outside your home. Choose a durable basin container that fits your space with countertop room. Mount an outdoor faucet nearby and provide drainage for wastewater. Connect to an exterior spigot with a flexible hose to complete your setup. Maintain the sink properly and you’ll enjoy the added convenience for years to come. An outdoor sink with hose capabilities lets you wash up quickly so you can go right back to enjoying patio and garden time.