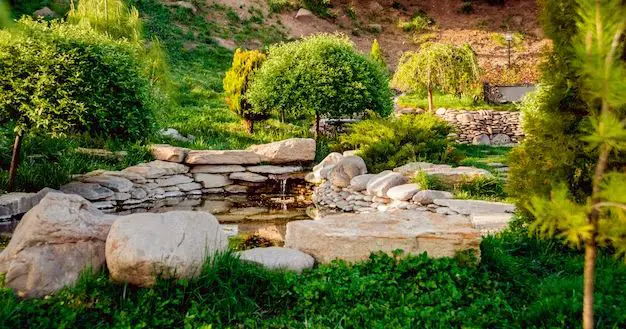
Rock landscaping can transform a bare yard into an attractive, low maintenance outdoor space. However, the key to making rock gardens, rock walls and other rock features look their best is proper planning and execution. Here are some tips on how to design and build rock landscaping that will complement your home and yard beautifully.
Page Contents
Plan and Design Your Rock Landscape
The first step in creating great looking rock landscaping is to come up with a plan. Decide which areas of your yard you want to incorporate rocks into. Think about building rock garden beds, a stone pathway, rock walls and other rock features. Consider the overall style and feel you want for your landscape. A formal symmetrical design calls for neatly arranged rocks while an informal natural style features more randomly placed stones. Also factor in key conditions like sunlight, drainage and foot traffic.
Make a sketch of your yard and where you’d like to place rocks. This will help you determine how much rock you need to purchase. Visit landscaping supply stores to view rock types and sizes in person. Larger stones make more of a statement while smaller pebbles can offer detail. Cool hued rocks like gray and blue help create a relaxing vibe. Warm tones like red and brown stones emit an earthy feel. Neutral beiges and tans blend in easily. Mixing different shapes, colors and textures creates visual interest.
In addition to rocks, incorporate other elements into your design. Planting flowers, grasses and bushes integrates rocks into your overall landscape. Hardscaping features like pathways, patios and decks also complement rock landscaping. Make sure to strategically place rocks so they don’t obstruct or hinder the use of your yard.
Prepare the Installation Site
Proper preparation of the installation site is crucial for ensuring your rocks stay securely in place. Here are some key steps to take before bringing rocks into your yard:
- Remove all grass, plants and debris from installation areas
- Level and grade the soil
- Dig trenches for footings and fill with gravel
- Install edge restraints like metal, plastic or concrete borders
- Add geotextile landscape fabric to block weeds
- Spread 2-4 inches of crushed gravel down as a base
Taking time to prep the site will provide a solid base for your rock landscaping. Making sure the soil is as level as possible will keep rocks stable and prevent shifting. The layers of gravel and landscape fabric also help with drainage and discourage weed growth.
Set and Arrange Your Rocks
Now comes the fun part of bringing in and placing your rocks! Large boulders and wall stones will need to be moved with equipment like dollies and levers. Shovels and rakes work well for scattering smaller gravel and pebbles. Here are some tips for setting rocks:
- Work in sections for easier control over placement
- Create clusters of 3-5 rocks for visual impact
- Alternate sizes within rock groupings
- Overlap rocks for a natural look
- Bury rocks 1/3 to 1/2 their size in soil for stability
- Use larger rocks as focal points
- Leave some space between rock groupings
- Follow your predetermined design
The way you arrange your rocks and stones has a big impact on the overall look. Aim for a pleasing, well-balanced placement. Allow some gaps between rock clusters and avoid overcrowding. Work in sections and step back periodically to evaluate your layout. Make adjustments until you achieve the aesthetic and flow you want.
Finish Setting Rocks with Filler and Accents
Once your main rocks are in place, add smaller filler rocks and accents to complete the look:
- Pack smaller gravel into gaps between larger rocks
- Arrange pebbles and cobblestones around borders
- Add edging rocks along garden beds and walls
- Place capstones on top of stone walls
- Decorate with mosaic stones and garden art
- Incorporate boulders, gravel and mulch to allow drainage
Filler rocks help lock everything together and prevent loose soil from eroding. Decorative pebbles, edging, mosaics and sculptures add those finishing touches. Accent rocks draw the eye to certain spots and enhance the overall design.
Plant Around Your Rock Features
One of the keys to making rock landscaping attractive is integrating it with plants. Foliage, flowers, grasses and bushes soften hard rock edges and accentuate colors and textures. Here are some tips for planting around rock features:
- Select plants suited to your climate and light conditions
- Choose drought tolerant varieties that thrive in rocky soil
- Plant low-growing plants between boulders and walls
- alternate foliage colors and textures for interest
- Allow spillover plants to drape over stone edges
- Set taller plants further back from rocks
- Group plants together for impact
- Leave some rocks unplanted to stand out
When selecting plants, opt for hardy varieties that can handle dry, rocky conditions. Space plants out enough to allow for growth. Use trees, shrubs and tall grasses as backdrops to highlight stonework in front. Low-growing succulents, sedums, thymes and ivies complement large boulders. Place plants before adding filler rocks and mulch so everything blends together.
Add Finishing Mulch, Sand and Gravel
The final step is to spread mulch, sand and gravel to complete your rock landscaping:
- Add mulch around plantings to help retain moisture
- Sweep polymeric sand between patio pavers to prevent weeds
- Fill gaps between stepping stones with gravel or moss
- Spread pea gravel or decomposed granite on pathways
- Top dress rock garden beds with small pebbles or crushed rock
These finishing touches keep everything neat and tidy. Mulch and sand prevent weeds from sprouting. Gravel resists erosion between stones. A top pebble dressing unifies the look and adds subtle color. Be sure not to pile these materials up too high on plants.
Maintaining Your Rock Landscaping
Proper maintenance keeps your rock features looking great. Follow these tips for ongoing upkeep:
- Pull any weeds that grow between rocks
- Clear fallen leaves from rock gardens and walls
- Rake gravel pathways and patios back into place
- Trim back overgrown plants as needed
- Reapply polymeric sand or gravel between stone joints
- Pressure wash dirt and stains from rocks annually
- Seal, repair or replace cracked or shifted rocks
Regular weeding, sweeping and pruning keeps rock landscape elements neat and organized. Pressure washing and reapplying joint materials prevents weed growth. Promptly fixing any damaged or settled rocks maintains the integrity of structures. And replenishing worn mulch preserves moisture for plants.
Conclusion
Creating attractive rock landscaping requires thoughtful planning, careful installation and regular upkeep. Following basic design principles like repeating shapes, alternating sizes and using filler rocks results in an aesthetically pleasing layout. Properly preparing the soil, anchoring stones in place and finishing with plants and gravel provide long-lasting stability and beauty. Maintaining your rock features by promptly removing weeds and debris keeps them looking great for years. With the right approach, you can have stunning, low maintenance rock landscaping that enhances your outdoor space.