Having an organized system for screws, bolts, and nuts can make home improvement projects go much smoother. When you need a certain size or type of hardware, being able to quickly locate it can save significant time and frustration. In this article, we will discuss some tips and methods for keeping your fastener collection tidy and easy to access.
Page Contents
Sort by Type
The first step in organizing your screws, bolts, and nuts is to sort them by type. Some main categories to separate them into include:
- Screws – Phillips head, flat head, wood, sheet metal, self-tapping, etc.
- Bolts – hex head, carriage, lag, eye, U-bolts, etc.
- Nuts – hex, lock, wing, acorn, etc.
- Washers
You can subdivide these categories even further if you have a large collection. For example, separate your wood screws from your self-tapping metal screws. Dividing your fasteners into type makes it easier to locate the specific style you need without sifting through mismatches pieces.
Sort by Size
Within each type category, you’ll want to organize your hardware by size. Some options for sorting by size include:
- Length – Group all 1-inch screws together, 2-inch screws together, etc.
- Diameter – Sort screws and bolts by thickness.
- Head size – Sort nuts and washers by the width across the flats.
If you have many variances, you may need to use multiple sorting criteria. For example, you could group all #6 x 1-inch wood screws together, then have another section for #8 x 1-inch wood screws. The more meticulous you are, the easier it will be to find what you need.
Labeling
Clear labeling is key for a well-organized hardware system. Here are some labeling tips:
- Label each compartment, drawer, or storage bin with the contents using a permanent marker.
- Use photos or diagrams to identify more obscure specialty hardware pieces.
- Label screw and bolt lengths directly on the storage container.
- Use a label maker for neat, typed labels on small containers.
- Color code labels by type – red for nuts, green for screws, etc.
With descriptive labeling, anyone can quickly identify what is in each storage section without needing to rummage and sort through random mixed pieces.
Storage Options
To keep your hardware organized, you need an effective storage system. Some options to consider include:
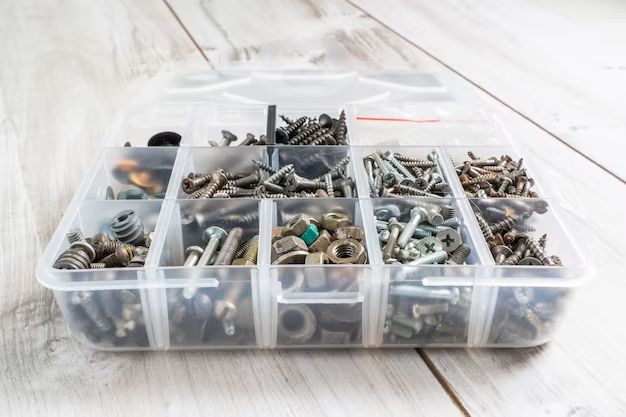
- Small parts organizers – Clear plastic bins with adjustable dividers to separate small items into compartments.
- Drawers – Dedicate a drawer in a toolbox or workbench to hardware storage.
- Wall storage – Mounted panels or strips with hooks to hang containers and tools.
- Cabinets – Use shelves, bins and dividers to organize inside a cabinet.
- Jars/cans – Screws and bolts can be stored in see-through jars or coffee cans.
- Magnetic strips – Adhere metal strips to store nuts, bolts and tools.
Look for storage options that suit your space constraints and allow you to easily see and access the contents. Modular, adjustable organizers provide flexibility as your needs change.
Inventory Management
To prevent constantly running out of certain items, use inventory management as part of your organization system. Some tips include:
- Take stock of your current hardware supplies and quantities.
- Note which sizes and types you use most frequently.
- Identify gaps where you need to restock.
- Purchase bulk quantities of commonly used items.
- Have surplus on hand of specialty hardware that is not easily sourced.
- Take note when you use the last piece of any given item.
By actively managing your inventory, you can minimize frustration and costs from constantly having to run out for a single screw or bolt.
Visual Organization
Humans are visual creatures, so an organizational system we can see makes locating items faster and easier. Some tips for visual organization include:
- Group similar items together.
- Store smaller pieces in the front, larger hardware in the back.
- Angle storage bins for easy viewing into each compartment.
- Use transparent storage containers whenever possible.
- Keep frequently used items most accessible.
- Maintain clutter-free storage to eliminate visual distraction and confusion.
Avoid cramming everything into a single drawer or box. Take the time to thoughtfully organize your hardware so you can actually see everything that is available at a glance.
Portable Storage
For small DIY projects and repairs, you’ll need to transport a selection of hardware with you. Some portable storage ideas include:
- Plastic compartment boxes
- Small fishing tackle or art supply boxes
- Specialty screwdriver kits with built-in storage
- Tool pouches or aprons with pockets
- Small parts on key rings
- Pill organizers or small jars
Choose a portable solution that makes it easy to grab the common items and quantities you need without sorting through your entire inventory. Having a to-go assortment prevents you from realizing mid-project that you forgot an essential piece.
Sort as You Go
Establish the habit of putting hardware away properly after each use. Some tips include:
- Install screwdrivers and wrenches with holes for hanging near your storage.
- Clean dirty hardware to remove drywall, paint or dirt buildup before storing.
- Tighten bulk packages of loose screws, bolts and nuts.
- Return items to their designated storage spot.
- Throw out any damaged or unusable pieces.
Allowing everything to just get tossed in a pile makes it exponentially harder to find what you need later. Developing the discipline to immediately sort each piece into your organized system will save massive headaches down the road.
Considerations by Project
Your hardware needs may vary depending on the type of DIY project or repair. Here are some considerations for common situations:
Woodworking
Wood projects often require:
- Wood screws in a variety of head styles and sizes
- Finish nails
- Bolts, nuts and washers for jigs
- Pocket hole screws
- Brad nails
- Hinges and latches
Organize wood fasteners separately from your metal and construction hardware.
Furniture Assembly
To assemble ready-to-assemble furniture keep on hand:
- Hex bolts and Allen wrenches
- Cam locks and dowels
- Phillips and flat head screws
Store your furniture hardware together in clearly labeled compartments for easy access during assembly.
Drywall Installation and Repair
For drywall projects, be sure to have:
- Drywall screws
- Joint compound
- Joint tape
- Screws for drywall corner bead
Joint compound has a limited shelf life, so only keep small containers on hand that will get used up quickly.
Deck and Fence Construction
Outdoor projects like decks and fences require:
- Exterior wood screws
- Galvanized nails and screws
- Deck screws
- Lag bolts
- Gate hinges and latches
Store outdoor hardware separately from indoor fasteners to prevent rusting.
Auto Repair
For DIY auto repairs, have on hand:
- Metric and standard wrenches
- Metric and standard hex socket sets
- Vise grips
- Hose clamps
- Pliers
Invest in quality tools designed for auto repair. Organize by size and task like wrenches just for spark plugs.
Specialty Hardware
For specialty fasteners only used occasionally, organization helps avoid misplaced pieces. Options include:
- Small tackle box – For small mixed oddities like pin cotter keys and ring clips.
- Zip-closure bags – To prevent jumbling of loose specialty washers, spacers, etc.
- Key rings – Thread infrequently used items like wing nuts onto a key ring.
- Small trays – Use sectioned trays, ice cube trays, or nursery seed trays to hold individual items.
Group specialty items together near your main storage system for those just-in-case moments.
Catalog and Digitize
For ultimate organization, catalog your entire hardware collection into a digital spreadsheet or database. Details to capture include:
- Item name and description
- Part number
- Size
- Quantity on hand
- Storage location
- Project usage notes
Digital documentation makes retrieving usage information quick and easy. You can even attach photos of obscure parts for easy identification.
Conclusion
Organizing your screw, bolt and nut collection may seem tedious, but it pays off significantly in time savings and reduced frustration on DIY projects. Sorting by type and size, using clear labeling, investing in quality storage, and developing ongoing maintenance habits allows you to quickly locate the right hardware item when needed. Organization is truly the key to an efficiently run home workshop or jobsite. Just be diligent about staying organized from the start, and your hardware will always be there when you need it.