Putting a new tube of grease into a grease gun is a straightforward process that can be done in just a few simple steps. Having a properly loaded grease gun is important for lubricating mechanical equipment and automotive parts. Knowing how to load a grease tube allows you to do routine maintenance and make repairs when needed.
In most cases, loading a new grease tube into a grease gun takes just a couple of minutes. With the right technique, you can easily insert a fresh cartridge and prepare your grease gun for use. Having the right supplies on hand, including fresh grease tubes and a functioning grease gun, helps ensure the process goes smoothly.
Taking the time to load grease cartridges properly helps prevent problems like grease leakage and jamming. It also makes sure the grease is evenly and cleanly dispensed when needed. Following a few basic steps in the proper order will have your grease gun up and running again in no time.
Page Contents
Prepare the New Grease Tube
The first step in loading a grease gun is proper preparation of the new grease tube. Make sure you have the right type of tube for your particular grease gun. The tube should be undamaged and unpunctured. Carefully open the end of the tube using the provided cap. You’ll usually need to break a seal on the end. Be careful not to damage the opening or spray grease out.
Once the end cap is removed, you need to open up the crimped portion of the tube so grease can flow out. Take a knife or other sharp tool and cut off the very tip of the crimped metal. You only need to open up the metal enough so grease can slowly be pushed out when you insert the tube. Remove any loose pieces of metal from the cut end.
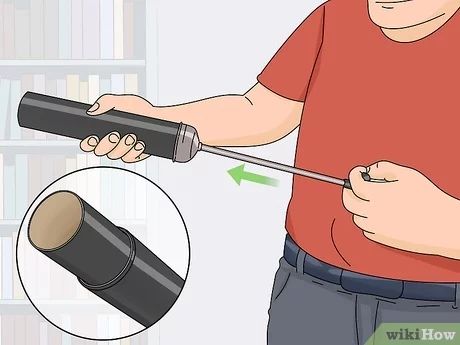
Next, you need to cut the plastic nipple off the dispenser tip if your grease tube has one. Use a knife or scissors to snip it off cleanly. Make sure no plastic fragments fall into the end of the tube. The nipple can sometimes cause clogging issues when you try to load the tube.
At this point your grease tube should be prepped and ready to insert into the grease gun chamber. The metal tip should be slightly opened and any plastic parts removed. Be careful not to bend or damage the end when handling the tube. Proper prep work helps ensure smooth loading.
Clear and Clean the Grease Gun
Before inserting a fresh grease tube, you need to make sure your grease gun is clean and ready. Start by wiping off any dirt, oil or dried grease from the exterior using a rag. Remove the old tube if there is one still loaded. Leftover grease inside the chamber should also be cleaned out.
Use a stiff brush or cleaning tool to loosen and scrape out any old, caked grease inside the tube chamber. A solvent like kerosene can help dissolve and wash out debris as well. Make sure to clean the grease fitting thoroughly since dried grease there can prevent proper priming.
After cleaning, inspect the grease gun piston and internal parts. Make sure the piston is not bent or worn and moves smoothly in the chamber. Worn seals or O-rings should be replaced so the unit can generate adequate pressure. Any damaged parts could cause leaking or jamming issues.
Take the time to do a thorough cleaning each time you load a fresh tube. It helps ensure the grease gun pumps smoothly and dispenses cleanly. Any remaining grease residue or blockages need to be removed prior to inserting a new tube.
Load the New Grease Tube
Once the old grease and debris is cleaned out, you can load the fresh tube. Start by placing the base of the grease gun upright on a stable, level surface. Hold the tube with the cut metal tip facing down. Insert the tip into the chamber opening and press the tube in as far as it will go.
You want the end of the tube to press snugly against the head of the piston in the chamber. Rotate the tube slightly until the metal tip aligns with the slot it feeds through. Press the tube firmly until it slides into place in the chamber and seats securely.
Next, thread the grease gun head back onto the chamber over the tube. Tighten it down completely so that it compresses the tube and holds it in place. The tube tip should still be aligned properly so grease can flow out.
Once fully loaded, you will still need to prime the grease gun. This involves pumping the handle so that grease fills the hose and coupler. Repeat the pumping motion until new, clean grease is expelled. Your grease gun is now loaded and ready for use.
Tips for Proper Loading
– Choose the right tube size – Make sure the tube diameter and length work with your grease gun model.
– Cut the crimped end carefully – Opening up too much can cause leaks and pressure loss.
– Remove plastic nozzles – They can clog up the grease gun head when loading tubes.
– Clean thoroughly between loads – Remove all old grease residue buildup.
– Seat tube tightly – It must press firmly to the piston end and chamber walls.
– Ensure proper alignment – Slot in tip must match feed opening.
– Prime well – Pump handle repeatedly until new grease comes through.
Grease Gun Operation
Once a grease tube is fully loaded, using a grease gun is a straightforward process. Here are some tips for getting the most effective use from your grease gun:
– Wipe and clean grease fitting – Debris on the nipple can block grease flow.
– Firmly press coupler onto fitting – Create a sealed connection for grease flow.
– Pump handle slow and steady – Rapid pumping can lead to pressure bursts and leaks.
– Use full strokes for best flow – Short strokes make it hard to build pressure.
– Add gradual pressure at first – Starting slow prevents seal damage on fitting.
– Be observant while pumping – Watch for leaks or odd noises indicating issues.
– Avoid over-pressurizing – Apply only needed pressure to feed grease in.
– Break seal before removing from fitting – Stop pumping and ease pressure before disconnecting.
Properly using a loaded grease gun takes some practice. Going slow, building consistent pressure, and staying observant will provide the best results. Always take safety precautions when operating a grease gun.
Troubleshooting Common Grease Gun Problems
Jammed Piston
This can be caused by bent parts, grease blockages or tube damage. Disassemble the grease gun and clean parts thoroughly. Examine components and replace any worn or damaged pieces. Only load fresh, clean grease when reassembling.
Grease Leaking from Chamber
Leak points around the piston, worn seals, loose head unit or damaged tubes can lead to leakage. Clean and inspect components to identify wear or crack issues. Replace seals and O-rings as needed to prevent further leaking.
No Grease Flow
Blocked fittings, hard grease or improperly loaded tubes reduce flow. Check for clogs, clean parts thoroughly and make sure the tube is aligned properly in the chamber. Cutting the tube opening a bit larger can also help.
Bent or Damaged Coupler
Excess pressure or side impacts can bend the coupler. Replace significantly bent couplers. Use less force when pressing onto grease fittings. Bent tubes are another cause.
Poor Pressure When Pumping
Worn piston seals reduce pressure. Cleaning old, hardened grease can help. If issue persists, seal replacement will be required. Ensure the pump piston moves freely in the chamber.
Safety Tips
– Wear protective gloves and eyewear when handling grease.
– Ensure your footing is stable when pumping grease.
– Point nozzle away from yourself and others when priming.
– Be cautious when disconnecting from pressurized fittings.
– Avoid excessive pressure that can damage parts or fittings.
– Keep grease off skin and clothing.
– Store grease guns properly when not in use.
With care and proper technique, loading and using a grease gun is a quick and straightforward process. Following safe practices helps avoid malfunctions or damage. Keeping the grease gun in good repair ensures it pumps smoothly when lubrication is required.
Conclusion
Loading a new tube of grease into a grease gun just takes a few simple steps. With the right method, you can quickly insert a fresh grease tube and have your grease gun primed and ready to use again. Be sure to do proper prep work on the new tube. Cleaning out all old grease debris from the grease gun chamber is also key.
Fully seat the tube before tightening down the grease gun head unit. Finish up by pumping the handle repeatedly to prime the tool. Proper loading technique helps prevent issues like clogs, jams or leaks. A few safety precautions, like wearing gloves and eyewear, should be taken as well. Keeping your grease gun well-maintained means it will continue pumping smoothly for all your lubrication needs.