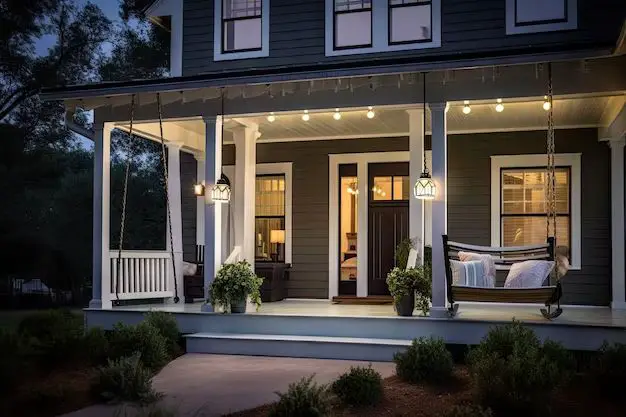
Putting spot lights in front of your house can add security, drama, and aesthetic appeal to the exterior. When done right, landscape lighting can make your home more welcoming and improve curb appeal. There are a few things to consider when deciding on spot lights for the front of your house.
First, determine what areas you want to highlight. Common choices are the front door, walkways, trees/shrubs, or architectural details. Decide if you want soft general illumination or more focused accent lighting. Also think about the look you want to achieve – do you prefer white light, colored, or adjustable lights?
Next, choose fixtures that fit your home’s style. Small bullet lights work for minimalist contemporary homes, while lantern-style lights suit traditional designs. Make sure lights are UL-listed for outdoor use and rated for wet locations.
Position is also important. Up-lighting typically looks best for trees and shrubs, illuminating the canopy from below. Down-lighting and path lighting work well to safely guide visitors to your front door. Avoid glare by positioning lights off to the side of entryways.
Proper installation is key to making your lighting look polished and professional. Lights mounted in ground require digging trenches for wiring. Hiring an electrician is recommended, especially for 120-volt fixtures. Low-voltage systems are simpler for DIYers to install. Use exterior-rated wiring and waterproof connectors.
To create dramatic effects, use a mix of lighting techniques. Combine uplighting, silhouetting, grazing (lighting a vertical surface at a sharp angle) and wall-washing. Use floodlights, spotlight, recessed step lights and path lights. Dimmers and smart technology allow control over brightness and on/off times.
Page Contents
Choosing Fixtures
When selecting fixture styles for spot lighting your home’s exterior, consider the following:
– Bullets/Well Lights: Compact and versatile, these are ideal for highlighting plants and hardscapes. Recessed into the ground, they produce focused, glare-free illumination.
– Path Lights: Low-profile lights that mount along walkways, stairs, and driveways. They add safety while creating dramatic effects.
– Step Lights: Miniature fixtures placed in risers of steps and stairs. They add visibility and a delightful ambiance.
– In-ground Markers: Subtle accent lights that provide soft glows. Perfect for gardens, flower beds, and landscape accents.
– Spotlights: Available as floodlights or narrow spotlights. Great for highlighting architectural features from a distance.
– Lanterns: Freestanding or wall-mounted fixtures that take traditional incandescent or integrated LED bulbs. Feature charming silhouettes.
– In-ground Well Light:
– Path Light:
– Lantern:
Consider the aesthetic you want and how much illumination fixtures provide when selecting lights. Combining several styles creates beautiful effects.
Choosing Bulb Types and Colors
For spot lighting, you’ll need to choose bulb types and color temperatures:
| Bulb Type | Characteristics |
|---|---|
| Incandescent |
|
| LED |
|
| Halogen |
|
| Color Temperature | Light Appearance |
|---|---|
| Soft white (2700K) | Warm, yellowish |
| Bright white (3500-4100K) | Neutral, white |
| Daylight (5000K+) | Cool, blueish |
For most homes, warm 2700K or bright 35000K lights complement traditional architecture the best. Go for daylight or colored lights only for modern styles.
Wiring and Voltage Considerations
Low voltage lighting systems operate on 12V or 24V power. They are simple and safe for DIY installation:
- Transformer converts 120V to low voltage
- Landscape wire runs from transformer to lights
- Easy connections between wire and fixtures
- No need to dig trenches
120V systems require hired electricians for installation:
- Hardwired to your home’s supply
- Components installed per local codes
- Wiring buried underground
- Allows for brighter bulbs
Voltage Drop is loss of power through wires. It causes dimming at fixture. Minimize with:
- Short wire runs from transformer to lights
- Use 12-gauge low voltage cable
- Have 3-5A transformers
Creating Lighting Zones
It helps to divide your home into logical lighting zones when designing a layout. Typical zones include:
- Front walkway
- Front door area
- Driveway & garage
- Patios & decks
- Landscaping
- Security areas
Determine lighting goals for each zone:
- Safety and security
- Task lighting
- Accent aesthetics
- Creating an ambiance
You can control lights in separate zones independently with switches or smart technology. Planning zones results in better effects.
Sample Lighting Zone Plan
| Zone | Goals | Lighting Techniques |
|---|---|---|
| Front Walkway |
|
|
| Porch & Front Door |
|
|
| Landscaping |
|
|
Installing and Positioning Lights
Proper installation and positioning are key to maximizing your landscape lighting effectiveness. Follow these tips:
- If hardwiring, use exterior-rated junction boxes and conduit.
- Seal all connections and ends with waterproof materials.
- Position lights off to the sides of walkways to avoid glare.
- Aim spotlights carefully to highlight architectural details.
- Angle fixtures to provide soft, indirect light vs. harsh light.
- Use upliting judiciously to avoid creating dark shadows.
- Test adjustments at night to fine-tune setup.
Also take into account:
- Plant growth – Avoid blocking by trees/shrubs.
- Drainage – Ensure lights and wiring don’t get submerged.
- Sprinklers – Prevent water from hitting fixtures.
- Future plans – Allow for additions and flexibility.
Taking time to properly place and direct your spot lights makes a big difference. Play with angles and positioning to highlight the best features of your home’s facade.
Lighting Automation Options
Today’s outdoor lighting can be enhanced with automation and remote controls:
- Timers – Turns lighting on/off on set schedules.
- Motion Sensors – Turns on lights when activity is detected. Helpful for security.
- Photocells – Turns lights on at dusk, off at dawn.
- Smart Lighting – Connected bulbs controlled via smartphone/voice.
- Dimmers – Allows adjusting brightness levels.
Smart lighting offers the ultimate automation benefits:
- Control lights remotely
- Set schedules and rules
- Integrate with other smart home devices
- Monitor power consumption
- Dynamic effects like color changing
Today’s WiFi-enabled LED bulbs and controllers make it easy to set up sleek, automated lighting.
Safety Tips
When installing landscape lighting, be sure to prioritize safety:
- Hire a licensed electrician if hardwiring 120V fixtures
- Use only UL-listed, outdoor-rated fixtures
- Install GFCI outlet if using plugin transformer
- Bury low voltage wiring at proper depth
- Isolate lighting from sprinkler systems
- Shut power off at breaker when modifying
- Call 811 before digging for buried utility lines
- Use insulated tools when working
- Keep connections dry and sealed
- Prevent wires from becoming trip hazards
Also take care when positioning lights:
- Avoid directing intense light at neighbor’s homes
- Prevent glare into windows and streets
- Use shielded fixtures and louvers as needed
Following basic safety procedures protects you, your home, and the community. Check local codes for any restrictions too.
Budgeting Considerations
Landscape lighting can range dramatically in cost. To budget effectively:
– Research pricing for components and get quotes from contractors. Expect to pay $25-$150 per fixtures, plus wiring.
– Factor in voltage. Low voltage systems cost less for components, but high voltage allows for brighter lights.
-Consider mixing fixtures. Use high voltage only where needed, low voltage elsewhere.
– Buy quality fixtures that withstand weather and last. Focus budget on permanent elements, not bulbs.
– Prepare for hidden costs like transformer boxes, conduit, trenching and hardscaping repairs.
– Include a controller/timer and any automation features you want. Smart home components can run $100-$300.
– Account for ongoing electricity and maintenance costs. LEDs use minimal power.
– Weigh DIY savings vs. electrician costs. Some homeowners handle low voltage, hire out 120V and digging.
With proper planning, you can create an impressive lighting scheme even on a limited budget. Focus on accenting key architectural and landscape features to maximize impact.
Conclusion
Installing spot lights on the exterior of your home can dramatically improve curb appeal, safety, and enjoyment of your landscape. With strategic placement to highlight architectural details, gardens, walkways, and entries, spot lighting adds style and functionality. By selecting fixture styles and bulbs that complement your home’s look, following sound installation practices, and taking advantage of smart controls, you can design an elegant outdoor lighting plan that makes your home shine.