Removing a broken screw that is stuck in wood can be a frustrating task. The screw often breaks when you apply too much force or if the screw snaps off from age and corrosion. Whatever the reason, getting the remains of the screw out of the wood requires patience and the right tools.
Page Contents
- 1 What You Need to Remove a Broken Screw from Wood
- 2 Step 1: Clamp the Wood Piece in a Vice
- 3 Step 2: Try Removing the Screw with a Screwdriver
- 4 Step 3: Grab the Screw Remnants with Pliers
- 5 Step 4: Use a Screw Extractor
- 6 Step 5: Use a Screw Extractor Tool
- 7 Tips for Removing Stubborn, Stuck Screws
- 8 Final Steps for Removing a Broken Screw
- 9 Preventing Broken Screws in the Future
- 10 Conclusion
What You Need to Remove a Broken Screw from Wood
Before you start, make sure you have the following tools on hand:
- Screwdriver or drill that fits the screw head (if possible)
- Vice grips or pliers
- Screw extractor set
- Hammer
- WD-40 or other lubricant
Step 1: Clamp the Wood Piece in a Vice
Start by securing the wood in a vice or clamp. This will keep the wood steady as you work to remove the broken screw. Tighten the vice enough to hold the wood snugly but not so tight that you risk splitting the wood.
Step 2: Try Removing the Screw with a Screwdriver
If you can still see part of the screw head protruding from the wood, try inserting a screwdriver that matches the screw head into the slot. Apply firm downward pressure on the screwdriver and try turning counterclockwise to back the screw out.
This may work if the head isn’t too damaged or stripped. Applying lubricant around the screw head first can help loosen a stuck screw. But be careful not to strip the head if the screw won’t budge.
Step 3: Grab the Screw Remnants with Pliers
If the screw head is sheared off or too damaged to turn with a screwdriver, lock a pair of vice grips or pliers onto the remaining portion of screw that is visible above the wood’s surface. Apply steady outward pressure as you slowly rotate the pliers counterclockwise to unscrew the remnants.
Step 4: Use a Screw Extractor
If gripping the screw remnant with pliers doesn’t work, you’ll need to use a screw extractor. Start by re-drilling the screw hole using a drill bit that is the same diameter as the shank of the broken screw (not including the threads). Drill down into the screw recess to create a starting point for the extractor.
Next, select an extractor bit that matches the diameter of the screw shank. Tap the extractor bit into the drilled hole with a hammer so the extractor bites into the screw. Attach an extractor tool to the bit and turn counterclockwise to back the screw out.
Types of Screw Extractors
Some common types of screw extractors include:
- Spiral Flute Extractors – Made of carbon steel and tapered, with spiral flutes that bite into the screw.
- Straight Flute Extractors – Cylindrical extractors with straight flutes for gripping the screw.
- Left Hand Drill Bits – Designed to drill in a counterclockwise direction to back screws out.
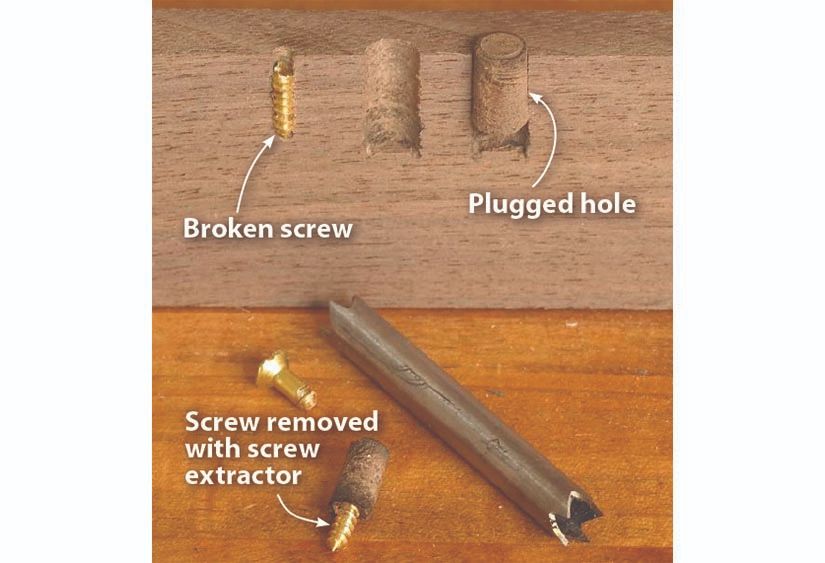
Step 5: Use a Screw Extractor Tool
For screws that break off flush or submerged below the wood’s surface, use an extractor tool instead of traditional extractors. These tools have a center drill bit surrounded by a tapered extractor sleeve.
Drill a pilot hole into the screw recess, then slide the extractor sleeve over the bit. The metal teeth will grip down on the broken screw as you drill and back the screw out. Apply steady, even pressure and drilling motion.
Tips for Removing Stubborn, Stuck Screws
Not all broken screws will come out easily. Here are some troubleshooting tips if you’re having issues removing the screw:
- Soak the area around the screw with penetrating oil or WD-40 to loosen corroded screws.
- For stripped screw heads, file the head to create a new slot for the screwdriver.
- Use a rubber band between the screwdriver and screw head to increase grip.
- Apply heat with a soldering iron or blow dryer to help loosen threadlocker or expand the screw.
Final Steps for Removing a Broken Screw
Once you’ve successfully extracted the broken screw, there are a few final steps:
- Clean excess wood fragments, debris, or sawdust out of the screw hole.
- Consider filling deeper screw holes with wood putty.
- Use a tap and die set to re-thread the hole if necessary before inserting a new screw.
- Lubricate new replacement screws and tighten slowly to avoid snapping their heads.
Preventing Broken Screws in the Future
To avoid dealing with stuck, broken screw situations again:
- Drill pilot holes in hardwoods before driving in screws.
- Push on the screwdriver instead of twisting when first inserting screws.
- Avoid forcing in corroded or rusted screws.
- Replace old brittle screws that are likely to snap.
- Use an impact driver rather than a power drill at higher torque settings.
Conclusion
Removing a broken screw stuck in wood can be tricky but is doable with some persistence and the right tools. Start by clamping the wood and trying a screwdriver first. If that doesn’t work, use pliers or a screw extractor to back the screw out. For flush screws, extractor tools are your best bet. Penetrating oil, heat, and re-threading the hole can also help during stubborn situations.
With patience and care, you should be able to remove the broken screw without enlarging the screw hole or damaging the surrounding wood. Just be sure to take steps to prevent future broken screws by pre-drilling, using impact drivers, and replacing aged screws.