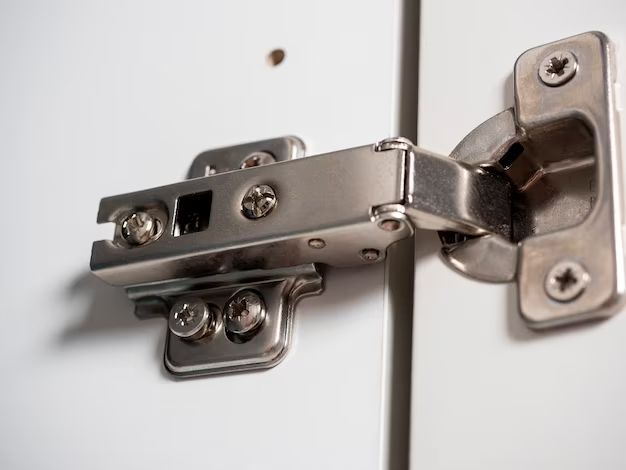
European hinges, also known as Euro hinges, are a popular type of concealed cabinet hinge used on modern kitchen cabinets and other cabinetry. Unlike more traditional hinges that are surface-mounted, Euro hinges are designed to be mortised or recessed into the door and frame. This creates a very sleek, integrated look and allows the door to open fully against the side of the cabinet.
Removing a Euro hinge requires some specific steps, as they cannot simply be unscrewed like a regular hinge. Care needs to be taken to avoid damaging the wooden door or cabinet frame during removal. With the right tools and techniques, you can successfully detach a Euro hinge and reuse or replace it as needed.
Page Contents
Gather the Necessary Tools
Before starting the Euro hinge removal process, make sure you have gathered all the necessary tools:
– Flathead screwdriver – You’ll need a flathead screwdriver that fits the screws on your specific hinges. The two most common sizes used are #0 and #2 Phillips or flathead screws.
– Hammer – A light hammer or mallet will be useful for tapping out the hinge cups.
– Chisel – Use a 1/2″ or 3/4″ chisel to help pry the hinge cups loose if they are stuck.
– Safety glasses – Wear protective eyewear in case any metal pieces fly loose while tapping.
– Rag – Have a rag on hand to stuff into the hinge mortises to prevent scratches to the frame or door.
– Replacement hinges (optional) – If planning to install new hinges, have those ready to go before removing the old ones.
Remove Door from Cabinet Frame
Start by detaching the door from the cabinet frame so you can work on it lying flat. To remove the door:
1. Open the door fully and place a prop stick underneath to hold it open.
2. Locate the screws on the upper and lower hinge plates that attach to the cabinet frame.
3. Using your screwdriver, loosen the screws a few turns but do not fully remove them yet.
4. Have someone support the weight of the door as you fully detach the screws from the frame.
5. Lift the door off the screws and carefully set it aside somewhere flat and stable.
Loosen Hinge Cups from Door and Frame
With the door removed, you can now see both the hinge cups recessed into the door and the frame. To extract the hinge:
1. Partially loosen the screws anchoring the hinge cups into the door and frame using your screwdriver. Do not fully remove them yet.
2. Carefully pry around the edges of each hinge cup with your chisel to break the seal and loosen them up. Tap gently with your hammer if needed.
3. Once loosened, unscrew and fully remove the screws to detach the cups from the frame and door.
4. Pull the hinge arm out from the cups and set the hinge aside.
5. Stuff rags into the empty mortises in the door and frame to prevent damage as you work.
Extract Remaining Hinge Cups
With the hinge arm removed, all that remains are the two empty hinge cups still recessed into the door and frame:
1. Take your chisel and carefully pry around the edges of each cup, working it loose from the surrounding wood.
2. When loosened sufficiently, place the tip of your chisel into the cup cavity and tap firmly with the hammer to pop it free.
3. Remove the freed hinge cups and clean excess wood debris from the empty mortises.
4. Apply wood glue or wood filler into the holes and let dry completely if not installing new hinges right away.
5. Sand and paint the filled holes to match the rest of the cabinet frame or door.
Installing New Euro Hinges
Once the old hinges have been removed, new Euro hinges can be installed if desired:
1. Use the old hinge holes as a template and drill pilot holes for screws on the new hinges.
2. Position the new hinge cups into the mortises and attach with wood screws.
3. Connect the hinge arm pieces between the cups.
4. Test the swing and alignment. Make any necessary adjustments.
5. Attach door to cabinet frame with screws to complete.
When installing new Euro hinges, be sure to carefully follow the manufacturer’s instructions for optimal results. If replacing old hinges, it also helps to choose a similar style and size for the easiest fit.
Tips for Preventing Hinge Damage
Here are some helpful tips to avoid damaging Euro hinges and making future removal easier:
– Tighten screws just until snug – Overtightening can strip the holes or crack the cup.
– Lubricate hinges periodically – This prevents rust and helps maintain smooth motion.
– Use release tabs when adjusting – Release tabs take pressure off so hinges can be repositioned without damage.
– Fill old holes properly – Filling holes completely before installing new hardware provides solid anchoring.
– Use painter’s tape – Apply tape around the cups before painting so paint doesn’t seal them in place.
Following these best practices will extend the life of your Euro hinges and make repairs much simpler when needed.
Conclusion
While removing embedded Euro hinges takes finesse and care, the process can certainly be managed successfully with the proper tools, techniques, and patience. Always work cautiously to avoid splintering the surrounding wood or frame. New hinges can then be installed in the existing mortises for a seamless look. Maintaining your Euro hinges properly will help prevent the need for removal down the road. With this helpful guide, you now have the knowledge to take on Euro hinge removal and replacement jobs with confidence.