We’ve all been there – your kids decide to turn your nice wooden furniture into their own personal coloring book using Sharpies. Or maybe you made the poor decision to label your moving boxes with a permanent marker that bled through onto your dresser. Regardless of how it happened, Sharpie stains on furniture, especially wood furniture, can be extremely difficult to remove.
Sharpies contain a permanent, oil-based ink that is designed to stick to surfaces and resist fading or smudging. This makes Sharpie stains on furniture very stubborn. The ink penetrates into the porous surface of wood, which makes it even harder to get out.
While Sharpie stains can seem impossible to remove, there are several methods you can try to lift or lighten the marks on your furniture. It may take some trial and error with different techniques and cleaning solutions, but you should be able to improve, if not completely erase, Sharpie stains on wood and other furniture materials.
Page Contents
- 1 Can You Really Remove Sharpie from Furniture?
- 2 Supplies Needed for Removing Sharpie
- 3 Pre-Treatment Steps
- 4 Alcohol, Acetone and Other Solvents
- 5 Baking Soda or Toothpaste
- 6 Oils to Smudge and Soften Sharpie
- 7 Magic Eraser
- 8 Sanding or Planing Wood
- 9 Trying Different Techniques in Progression
- 10 Preventing Future Sharpie Stains
- 11 When to Call in a Professional
- 12 In Summary
Can You Really Remove Sharpie from Furniture?
The short answer – yes, you can get Sharpie marks off of furniture. However, there are a few caveats.
First, the longer the Sharpie stain has set on the furniture, the harder it will be to remove. The ink has more time to really penetrate into the fibers of the wood or material. So for the best chance of removal, you’ll want to act as quickly as possible when you discover a Sharpie mark.
Second, while it is possible to remove Sharpie from furniture, you may not be able to erase the stain 100%. You can often lighten the mark significantly or eliminate most of it, but some ghosting or a light stain may still remain on close inspection.
Lastly, certain types of finishes and furniture materials hold up better to Sharpie removal techniques than others. The ink adheres less well to finished, sealed, or non-porous surfaces. Unfinished, unsealed, or highly porous furniture is the most challenging to remove Sharpie from.
So Sharpie can be removed, but there are limitations. With effort and the right cleaning methods, however, you can often eliminate or drastically reduce Sharpie marks on furniture.
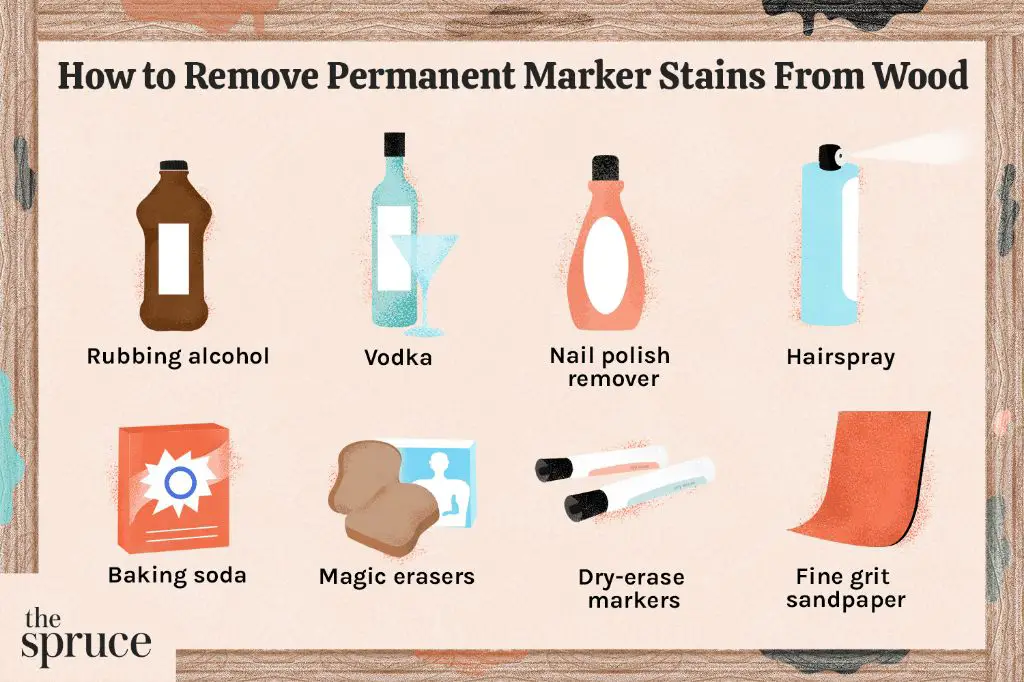
Supplies Needed for Removing Sharpie
Before you start trying to tackle Sharpie stains on furniture, make sure you have the right supplies on hand. Here are some of the key ingredients that can be helpful for Sharpie removal:
– Rubbing alcohol or denatured alcohol – The alcohol helps dissolve the Sharpie ink. Concentrations of 90% work best.
– Acetone nail polish remover – Can also help break down permanent marker stains. Make sure it does not contain additional moisturizers or oils.
– Baking soda – Acts as a gentle abrasive to lift ink stains. Forms a paste when mixed with water.
– White vinegar – Helps dissolve ink marks. Can also counteract any wood discoloration.
– Toothpaste – The baking soda in toothpaste serves as a mild abrasive.
– Olive oil or coconut oil – The oils help smudge and break down Sharpie pigments.
– Magic Eraser – The melamine foam in these erasers lifts stains.
– Soft cloths, cotton pads, paper towels
– Popsicle sticks or toothpicks for scrubbing
– Drop cloth or plastic sheets to protect surrounding surfaces
Having all of these cleaning solutions and tools on hand will allow you to test different techniques and find what works best for your specific Sharpie stain. Gather the supplies before you start attempting any Sharpie removal methods.
Pre-Treatment Steps
Before you break out the big guns like alcohol, acetone, or abrasives, start with some simple pre-treatment steps:
1. Wipe away any wet Sharpie ink immediately with a dry cloth or paper towel. This prevents spreading and removes excess pigment before it sets in.
2. Blot the stain gently with a cloth soaked in warm water. The moisture helps dilute the Sharpie ink and lift it from the surface.
3. Try wiping the stain with a soft cloth soaked in hot soapy water. Dish soap can help break down oils.
4. Use an ink eraser pen designed for permanent marker. The chemicals in the eraser may draw out Sharpie stains.
5. Try gently scraping at the mark using a popsicle stick, the edge of a credit card, or a plastic spoon. This takes advantage of friction to disrupt the ink adhesion.
6. Vacuum up any loose ink particles removed by scraping or blotting. This prevents re-staining the surrounding area.
These pre-treatments are non-abrasive and safe for most furniture finishes. If you are able to fully lift the Sharpie stain using any of these gentler methods, you can skip more aggressive treatments.
Alcohol, Acetone and Other Solvents
One of the most effective ways to tackle stubborn Sharpie marks on furniture is using strong solvents like alcohol and acetone. Here’s how:
– Put on gloves and work in a well-ventilated area. Avoid breathing in fumes.
– Soak a cloth or cotton pad with rubbing alcohol or acetone. Hold it against the Sharpie stain for 1-2 minutes.
– Check if any ink has transferred onto the cloth. Reapply the alcohol and keep blotting until no more ink lifts.
– Once the stain stops transferring, scrub at the mark gently with the alcohol-soaked pad to break up remaining pigment.
– Rinse the area with a cloth dampened with clean water to remove any residue.
– Let the furniture dry fully before attempting any other treatments. The alcohol may temporarily lighten or discolor the wood.
– If any hint of the stain remains, repeat the alcohol application and scrubbing. Multiple applications are often needed.
The straight alcohol or acetone gradually breaks down and dissolves the oils and pigments in the Sharpie ink. With repeated applications and gentle scrubbing, you can often completely eliminate mild Sharpie stains using this solvent technique.
Potential Risks and Precautions
While alcohol and acetone are effective for Sharpie removal, there are some risks and precautions to note:
– Test first on an inconspicuous area to ensure the solvents do not damage or discolor the furniture finish.
– Avoid using on fragile, antique, or highly finished wood. The solvents may strip the finish or cause hazing.
– Wipe up drips immediately to prevent damaging surrounding surfaces. Use drop cloths.
– Alcohol and acetone can dry out your skin. Wear gloves and wash hands after use.
– Never mix alcohol and acetone together. This can create toxic fumes.
– Work in a room with open windows, ventilation, and no open flames. Vapors are flammable.
– Keep solvent containers sealed and safely stored away after using.
With proper care and testing, solvents can be very effective for Sharpie removal without damaging most wood furnishings. But take precautions when using these strong chemicals.
Baking Soda or Toothpaste
For a safer and less harsh option than solvents, try using baking soda or toothpaste to remove Sharpie marks. Here are two methods:
Baking Soda Paste
– Make a paste by stirring 2-3 tablespoons of baking soda with just enough water to form a thick consistency.
– Using a cloth or popsicle stick, gently spread the paste over the Sharpie stain.
– Let the paste sit for 5-10 minutes to absorb the ink.
– Wipe away the baking soda paste.
– Scrub the area in circles with a damp cloth or soft brush. Rinse frequently.
– Dry the area then reapply more paste if needed for stubborn stains.
The baking soda works like a very mild abrasive to lift the Sharpie pigment without damaging the wood finish.
Toothpaste
– Squeeze a small amount of whitening toothpaste directly onto the Sharpie mark.
– Using a damp cloth or cotton swab, gently rub the toothpaste over the stain in circular motions.
– As the stain lifts, wipe away excess toothpaste with a clean damp cloth.
– Repeat if needed until no more ink transfers.
– Rinse with water and pat dry.
The baking soda in toothpaste serves as a gentle polishing agent to help break down ink stains. Just be careful not to scrub too aggressively.
These methods are safe even for antique or delicate wood finishes. Baking soda or toothpaste offer a good starting point before attempting stronger Sharpie removal solutions.
Oils to Smudge and Soften Sharpie
Oils can help treat Sharpie stains in a couple of ways. First, they help “smudge” the stain and disrupt the pigment adhesion. Second, they soften the ink to make it easier to wipe away. Here’s how to use them:
– Pour a small amount of olive oil, coconut oil, or baby oil onto a cloth or cotton ball.
– Gently rub the oil over the Sharpie mark using circular motions.
– Keep rubbing gently to work the oil into the stain and blur or feather the edges.
– Once it is smudged, wipe off excess oil with a clean paper towel or rag.
– If any visible stain remains, apply more oil and repeat the process. The stain should gradually lift and transfer to the cloth.
– Finally, wash the area with warm soapy water and rinse to remove oily residue.
The natural oils will not damage or discolor wood like solvents can. So they are a very safe option to try first. Just be careful, as excess oil may create a dark stain ring around the Sharpie mark. Always wipe off any oil drips immediately during the process.
Heavier Oils and Conditioners
For older, set-in stains on dry, unfinished wood, you can try using heavier oils:
– Rub tung oil, linseed oil, or wood conditioner into the Sharpie stain. Allow it to soak for 10-15 minutes.
– Wipe off any excess oil and then scrub at the stain with fine steel wool.
– Reapply more oil and scrub with steel wool until the mark lightens significantly.
– Finish by wiping the area down with a clean dry cloth.
The thicker oils help deeply penetrate and dissolve the Sharpie pigment so it can be abraded away. But this is only suitable for unfinished, bare wood. Do not use heavy oils on sealed or finished wood.
Magic Eraser
Magic Erasers utilize melamine foam to safely lift stains from a variety of surfaces. To use one for Sharpie marks:
– Slightly dampen the Magic Eraser and wring out any excess water.
– Gently rub the stained area using light, circular scrubbing motions.
– Flip the eraser frequently so you are always using a clean side.
– Rinse the eraser under running water when it becomes dark with ink.
– Scrub until you have removed as much of the Sharpie stain as possible.
– Wipe off any eraser residue and pat the area dry.
Magic Erasers work through friction, not harsh chemicals, to disrupt stain adhesion rather than eroding the finish. Test first, as excessive scrubbing can potentially dull some shiny surfaces over time.
Potential Risks
– Not as effective on old, set-in Sharpie stains. Better for fresh marks.
– Can gradually dull or etch some glossy, delicate finishes if you scrub too hard.
– Won’t work well on extremely porous or absorbent materials where ink has soaked in deeply.
When used gently, Magic Erasers can effectively and safely lift fresh Sharpie marks from many surfaces like laminates, painted wood, and sealed finishes. But test first and be cautious on fragile antiques or polished wood.
Sanding or Planing Wood
For dense, finished wood with deep Sharpie staining, you may need to resort to gentle sanding or planing to remove the top layer of stained wood fibers. This is only suitable for unfinished raw wood:
– Use 300-400 grit sandpaper and a sanding block. Go over the stained area with light, even strokes in the direction of the wood grain.
– Remove only as much material as needed to get below the Sharpie-saturated top layer.
– Wipe away all sanding dust with a dry cloth. Apply mineral spirits to clean wood pores and allow to dry.
– Consider an even lighter touch-up sanding with 600 grit paper to even out the sanded area.
– You can refinish the sanded wood area with tung oil, wax, or varnish to match the surrounding finish.
For even removal, you can use a hand plane adjusted for very thin shavings to gently skim the stained layer off the wood surface. Take extreme care not to dig too deeply into the wood.
Sanding or planing creates lasting damage, so only use it as a last resort on unfinished wood. But it is the most reliable way to remove deep Sharpie stains that other methods cannot lift.
Trying Different Techniques in Progression
Removing Sharpie stains from furniture often takes patience and trying multiple techniques in progression:
1. Start with the gentler options like baking soda or toothpaste paste. No need to start harsh if a mild method might work.
2. If those do not fully eliminate the stain, step it up to solvents like alcohol or acetone as needed.
3. If dealing with old, set-in stains, or unsanded wood, try heavier oils next.
4. Finally, for the most stubborn marks, gentler abrasives like Magic Eraser or sandpaper may be needed.
It also helps to repeat certain steps in between other techniques:
– Rinse and wipe down with water after using solvents or oils before moving on.
– Try a second round of baking soda paste or toothpaste after oils or solvents. The mild abrasion helps lift pigment loosened by the liquids.
With some trials, you will find the right progression of methods that work for each type of Sharpie stain. Just be patient and persistent.
Preventing Future Sharpie Stains
An ounce of prevention is worth a pound of Sharpie stain removal. Here are some tips to prevent marks in the future:
– Always use markers designed for non-porous surfaces like window paint pens rather than standard Sharpies. Or use chalk/wax pencils instead of liquid ink markers.
– Immediately clean up any spills or drips when using permanent markers. Don’t let ink soak in.
– Cover surfaces with butcher paper or plastic when doing arts and crafts with markers.
– Store markers securely away from little hands. Make sure caps are tightly sealed.
– Apply a protective sealant to unfinished, raw wood pieces to create a stain-resistant barrier.
– Attach felt pads to furniture legs and other objects that might bump into and mark the wood grain.
Stopping Sharpie stains before they happen is better than having to remove them from furniture later! With some care and planning, permanent marker mishaps can be avoided.
When to Call in a Professional
While DIY removal methods may successfully lighten or eliminate many Sharpie stains, some situations call for contacting a professional refinishing expert:
– Valuable antique or highly finished wood with deep staining or etching that requires refinishing.
– Ink stains covering a very large area that would need extensive sanding or planing.
– Delicate or fragile museum-quality furnishings that require expert handling.
– Inability to identify the exact finish or wood species in order to select suitable treatments.
– A previously unsuccessful removal attempt that damages the finish or etches the stain deeper.
– Lack of experience working with chemical stripping agents needed for old shellac, lacquer, or varnish finishes.
Don’t risk further damaging an expensive wood antique or heirloom piece. Sharpie stains often require custom solutions based on the exact finish and wood type. When in doubt, contact a professional refinisher.
In Summary
While Sharpie stains can seem impossible to conquer, there are many techniques you can use to significantly improve or remove marks from furniture:
– Act quickly and start with mild options like baking soda paste or toothpaste.
– Use solvents like alcohol or acetone carefully and safely to dissolve ink.
– Try natural oils to smudge and lift staining. Then scrub with mild abrasives.
– Revert to sanding or planing as a last resort only on unfinished wood.
– With patience and persistence, you can erase or greatly reduce Sharpie stains and save your furniture.
Don’t give up at the first sign of trouble removing permanent marker. Work methodically through different options. With some trials, you can often eliminate or drastically lighten even the most stubborn Sharpie stains on wood and restore your furniture’s appearance.