Removing trim from walls without damaging the drywall underneath can be tricky, but is definitely doable with the right techniques and tools. Trim pieces like baseboards, crown molding, door and window casings can get damaged over time and need replacing. While it may be tempting to just rip them off, this can cause unnecessary damage to the drywall behind the trim. Taking some extra care when removing trim can save you a lot of time and hassle with drywall repairs down the road. Here are some tips on how to remove trim properly without damaging drywall.
Page Contents
- 0.1 Use a pry bar
- 0.2 Pull nails as you go
- 0.3 Use scrap wood strips
- 0.4 Loosen one side first
- 0.5 Use shims for extra leverage
- 0.6 Cut trim into sections if needed
- 0.7 Watch for nail heads
- 0.8 Pry against framing if possible
- 0.9 Remove remaining nails
- 1 Preparing the Wall Surface
- 2 Cutting and Fitting the New Trim
- 3 Installing the Trim
- 4 Applying Primer and Paint
- 5 Conclusion
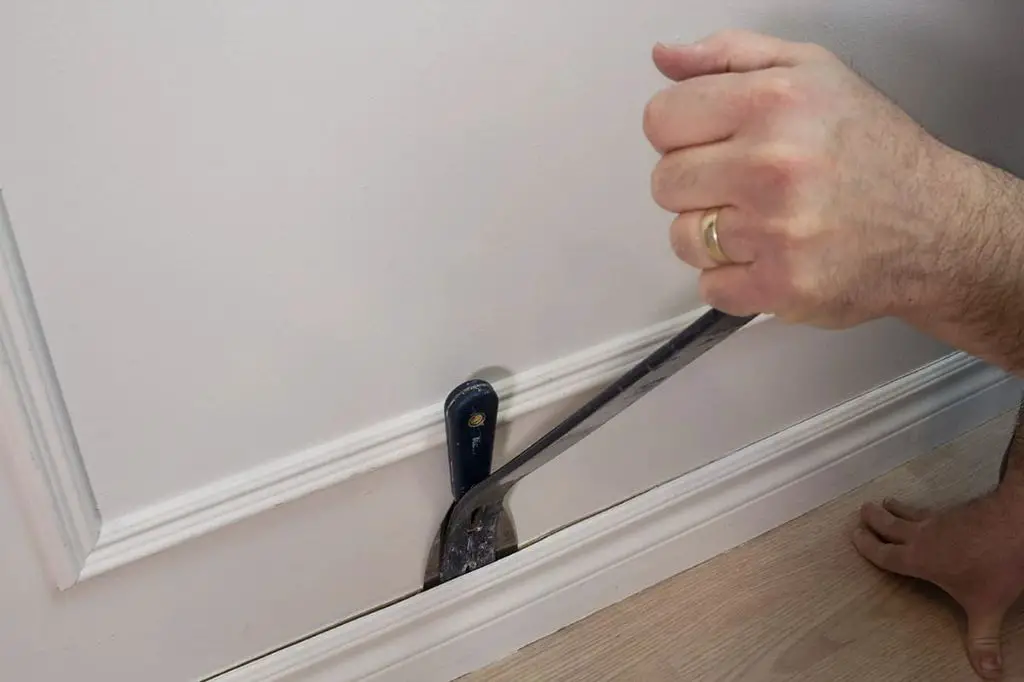
Use a pry bar
One of the most useful tools for trim removal is a pry bar. Look for one with a curved end that allows you to get behind the trim to lift it off gently. Insert the pry bar between the trim and drywall and slowly pry upwards while tapping the trim with a hammer. Apply even pressure as you work your way along the trim to loosen the nails. Be patient and take your time prying to avoid digging into the drywall and causing damage.
Pull nails as you go
As you pry up the trim, use pliers or a nail puller to remove any exposed nails. Pulling nails as you work helps release the trim so you can pry it off more smoothly. This also ensures the nails don’t scrape against the drywall when removing the trim. Removing nails prevents puncturing or tearing the drywall paper as you pull the trim piece away.
Use scrap wood strips
Another tactic is to slide scrap pieces of wood between the pry bar and drywall. This acts as a protective barrier as you pry upwards so the bar doesn’t press directly on the drywall. Simply cut strips from 1×4 inch boards and tap them into the gap behind the trim. Then, position your pry bar on the wood strips as you work your way along the trim. The wood takes the pressure rather than the drywall surface.
Loosen one side first
Rather than trying to pry up the entire length of trim at once, focus on loosening one side first. Get one end pulled away from the wall, removing nails as you go. With one side freed, you can use more leverage to work little by little down the trim piece. Going slowly helps prevent bending or cracking the trim as you pull it off.
Use shims for extra leverage
If you’re having trouble getting behind larger trim pieces, use some shims to create a gap. Tap shims made of wood or plastic between the trim and drywall. Add them in a few spots, then use your pry bar with the added space to work the trim loose. The shims give you just enough room to get started prying upwards.
Cut trim into sections if needed
For long pieces of trim or molding, cut them into manageable sections to remove. Use a miter or jigsaw to cut through the middle of the trim, separating it into smaller pieces. It’s much easier to pry up and control smaller sections versus wrestling with long lengths of trim. Just be sure to support the trim as you cut to avoid damaging the drywall.
Watch for nail heads
Keep an eye out for any nail heads poking through the drywall surface as you remove trim. Stop and pull these nails immediately with pliers so they don’t drag across the paper. Also, use a putty knife to tuck the drywall paper back in place if it starts to tear. Catching these issues early prevents more extensive drywall damage.
Pry against framing if possible
When using a pry bar, try to lever it against a stud or framing behind the trim if possible. This gives you something solid to push against for added force. Positioning a block of scrap wood between the bar and framing can further protect the wall. Just take care not to pry too hard against delicate walls or plaster.
Remove remaining nails
Once the trim piece is off, lay it face down and pull any remaining nails from the back side. Make note of the size and type of nails for reinstalling replacement trim. Discard the old trim and sweep the wall area well to remove any debris. Now you’re ready to install new trim pieces without having to repair drywall damage.
Preparing the Wall Surface
After removing existing trim, there are a few steps to prep the wall for new trim installation. Proper prep prevents future issues like gaps, cracks, and lifting of the new trim.
Fill holes and imperfections
Inspect the drywall or plaster and fill any holes, dents, cracks, or surface damage using drywall joint compound. Allow the compound to dry completely and then sand until smooth. Address any scraped or damaged drywall paper as well. The surface should be as smooth as possible for the new trim.
Scrape off old caulk or adhesive
Use a putty knife to gently scrape away any remaining caulk, construction adhesive, or other residue from the old trim. Getting down to the bare drywall allows for optimal adhesion when caulking and installing the new trim. Avoid gouging into the drywall surface as you scrape.
Clean dust and debris
Thoroughly clean all dust, bits of old caulk, and other debris from the wall area. Use a shop vacuum and soft brush accessory to remove everything from crevices and corners. Wipe down with a damp cloth as well. Start with a clean surface for applying new caulk and trim.
Check for plumb and straight
Use a level and measuring tape to ensure the wall surface is plumb and straight. Install scrap boards and shim any gaps if the wall is crooked. The trim boards should sit completely flush against the surface. Address dips or humps in the drywall as needed so trim mounts evenly.
Prep door and window jambs
For doors and windows, make sure the jambs and frames are properly shimmed, square, and plumb. Check that window frames haven’t settled out of position. Adjust framing as needed to provide a uniform mounting surface for trim.
Cutting and Fitting the New Trim
Carefully measure and cut replacement trim pieces to achieve a precise fit against the prepared wall. Allowing for tight seams avoids gaps that must be filled with caulk later. Follow these tips for cutting and fitting the new trim:
Select appropriate trim
Match the same style and thickness of the old trim when possible for consistency. For example, use 1×4 inch boards to replace old 1×4 baseboard trim. Choose wood materials suitable for trim like poplar, pine, or medium density fiberboard (MDF).
Measure precisely
Use a steel tape measure to carefully measure all dimensions of the wall area receiving new trim. Account for inside and outside corners in your measurements. Write down all measurements to cut trim accurately.
Cut miters for corners
Use a miter saw to cut each end of trim pieces to 45 degrees for clean joints at inside and outside corners. Test fit and adjust miters for tight seams between adjoining boards.
Cut scarf joints if needed
For two trim boards meeting mid-wall, cut opposing 45 degree angles (scarf joint) to join them seamlessly. Apply wood glue in the joint for added strength. Clamp pieces together until glue dries.
Rip trim to proper width
If the old trim is a different width than standard sizes available, rip boards to the needed width on a table saw. Rip thin strips to build up molding to match existing. Make test cuts on scrap wood first.
Use a pneumatic brad nailer
This tool provides a quick means of temporarily tacking trim in place before fastening permanently. Adjust pieces as needed to achieve tight joints. Nails are easily pulled out later.
Allow space between boards
Leave a 1/16” gap between adjoining trim boards to account for wood expansion and contraction. Trim tight against one another can warp and pull away from the wall over time as wood expands and contracts.
Do a dry run before fastening
Test fit all trim without glue or nails first. Ensure proper miter angles for tight seams between boards. Make any adjustments with the miter saw or table saw and Confirm boards sit flush against the wall.
Installing the Trim
Once prepped and test fitted, it’s time to securely install the new trim pieces with adhesive, nails, and caulk for a long-lasting finish. Follow these guidelines when fastening the trim permanently to walls:
Apply adhesive
Run a continuous bead of high-quality trim adhesive along the back side of each piece. This creates a strong bond with the wall surface as the adhesive dries. Use a panel adhesive like Liquid Nails for reliable strength.
Fasten with finish nails
Use an 18-gauge finish nailer and narrow gauge nails (16-18 gauge) to attach trim to the wall. Nail through the trim into the wall studs or framing whenever possible for a sturdy hold. Nail every 10-12 inches along the length of trim.
Set nails and fill holes
Tap all nail heads gently with a hammer until flush with the wood. Fill nail holes with wood filler and allow drying completely. Sand smooth once dry.
Apply caulk
Run a smooth, thin bead of paintable silicone caulk along every seam and joint between trim boards. Also caulk along the top edge and ends of trim where it meets the wall. Let caulk dry fully.
Create watertight seal
For baseboard trim, completely caulk the gap between the bottom edge of trim and the floor. Tool the caulk into a smooth, watertight seal. This prevents moisture penetration behind the baseboard.
Fill gaps if needed
Inspect joints and use caulk to fill any remaining small gaps between trim boards. Carefully tool caulk with a wet finger for a smooth look once dry. Allow caulk to cure fully before painting.
Brad nail for extra strength
Consider using an 18-gauge brad nailer to drive nails at an angle through the bottom edge of baseboard into the wall. This provides extra holding power. Just be careful not to puncture electrical wiring inside walls.
Applying Primer and Paint
A professional-looking finish requires priming and painting the new trim with a color matching your interior. Here are some tips for painting:
Lightly sand trim
Once all caulk and filler are fully dry, lightly sand trim to smooth any roughness. Carefully sand adjacent surfaces like drywall and existing paint as well to feather edges.
Remove sanding dust
Thoroughly wipe and vacuum sanded surfaces to remove all dust particles before priming or painting. Residual dust can impact paint adhesion and create a dusty finish.
Spot prime as needed
For previously finished trim, use primer to spot coat any unpainted surfaces like scrapes or bare wood. This prevents finish variations after painting. Apply primer to all surfaces of new raw wood trim.
Apply primer coat
Use a quality primer designed for wood trim and lightly coat all surfaces of the trim. Allow primer to dry fully before sanding and applying paint. Proper priming ensures paint adheres well.
Caulk between coats
Once primer is dry, inspect joints again and caulk any remaining tiny gaps between trim and wall surfaces. Let caulk fully cure before sanding and final painting.
Apply two paint coats
Use a premium interior trim enamel or acrylic paint in a satin, semi-gloss, or gloss sheen. Lightly sand trim between coats. Allow the first coat to dry fully before applying the finish coat.
Work methodically
Maintain wet edges and systematically paint the same direction to avoid lap marks, brush marks, or variation in sheen. Carefully cut-in edges where trim meets walls before rolling paint.
Conclusion
While it does take some time and care, properly removing existing trim and installing new trim without damaging drywall is certainly achievable. Following the right techniques like using a pry bar, pulling nails as you go, and preparing the wall surface can allow you to remove trim successfully. Taking precise measurements, creating tight miter joints, using adhesives and nails properly, and applying professional-quality primer and paint will then allow the new trim to look flawless. Paying attention to all the little details results in a finished look free of gaps, cracks, and damage. Just be patient and meticulous throughout the process and you can achieve walls and trim that look fresh and new.