Removing wall tiles can be a tricky task, especially if you want to avoid damaging the wall underneath. With the right tools and techniques, it is possible to remove tiles relatively easily and minimize wall damage. Here is a step-by-step guide to removing wall tiles safely.
Page Contents
- 1 Assess the Tile Installation
- 2 Gather the Proper Tools
- 3 Prepare the Workspace
- 4 Score the Grout Lines
- 5 Tap Tiles to Break Adhesive Bond
- 6 Pry Off Tiles
- 7 Remove Mortar and Backerboard
- 8 Scrape Off Adhesive
- 9 Clean the Wall Surface
- 10 Make Any Necessary Repairs
- 11 Prepping for New Tile
- 12 Tips for Safe Tile Removal
- 13 When to Call a Professional
- 14 Conclusion
Assess the Tile Installation
Start by taking a close look at how the tiles were installed. This will give you an idea of how difficult removal will be. Here are some things to check:
- Are the tiles mounted directly on drywall or plaster? Or is there a layer of cement board or backerboard underneath?
- Were the tiles installed with thinset mortar or construction adhesive?
- Do the tiles have a mesh backing or are they mounted directly on the wall surface?
Tiles installed directly on drywall with adhesive will be the easiest to remove. Cement board with mortar will be more difficult. Mesh-backed tiles set in mortar will likely be the most challenging.
Gather the Proper Tools
You’ll need the following tools to safely remove wall tiles:
- Hammer
- Cold chisel
- Putty knife or paint scraper
- Grout saw or oscillating tool
- Eye protection
- Knee pads
- Drop cloth
- Pry bar
- Utility knife
- Rubber mallet
The hammer, chisel, and putty knife will help you chip away tile and adhesive. A grout saw or oscillating tool will let you cut through mortar and mesh backing. Safety gear like eye protection and knee pads is essential. Have a drop cloth ready to contain falling debris and tiles.
Prepare the Workspace
Before starting demo work, you’ll want to prepare the room:
- Clear the area of furniture and belongings.
- Sweep and vacuum the floor.
- Cover vents and doorways with plastic sheeting.
- Lay a drop cloth under the tile work area.
This will help contain dust and debris and make clean-up much easier later on.
Score the Grout Lines
Most wall tiles are held in place by grout between them. Scoring or cutting through this grout will allow you to remove tiles one by one. Use an oscillating tool or grout saw to cut along grout lines surrounding each tile. Hold the saw at a 45-degree angle and run it back and forth to scratch through the grout. Press firmly but don’t try to cut all the way through the backer or adhesive yet.
Tap Tiles to Break Adhesive Bond
With the grout scored, you can start breaking tile free from the wall. Take a hammer and rubber mallet and lightly tap on tiles to loosen them. Work methodically across the installation, tapping each tile until you hear a hollow sound that indicates the adhesive bond is broken. Remove any loose perimeter tiles first using a pry bar inserted into the grout lines. This will give you access to tap interior tiles.
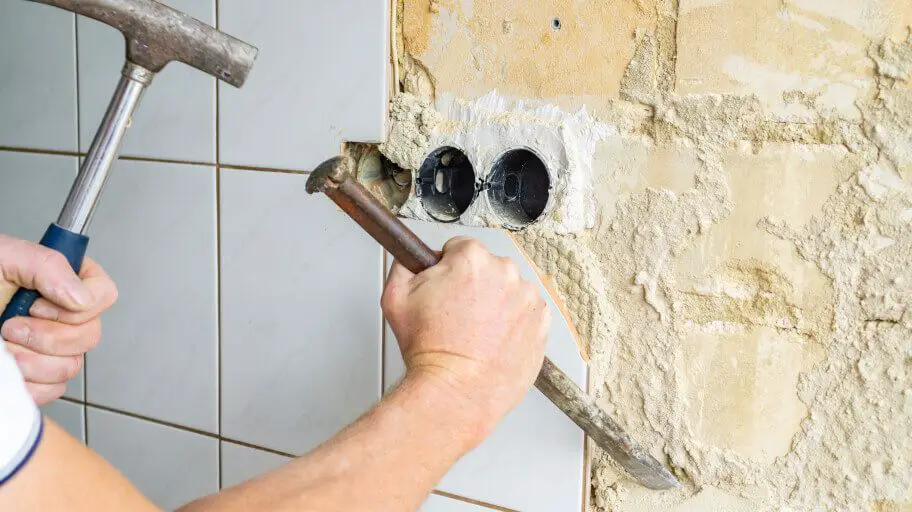
Pry Off Tiles
Once tiles are loose, pry them off the wall using a putty knife or pry bar. Slide the flat tool into the grout lines and twist gently to pop tiles off. Try to remove tiles in whole pieces to minimize debris. Stack removed tiles on your drop cloth. Avoid prying too aggressively or you may damage the wall surface underneath.
Remove Mortar and Backerboard
If you discover mesh-backed tiles or cement board underneath, use a chisel and hammer to chip away remaining thinset mortar. Hold the chisel at a 30-degree angle and tap gently with the hammer to scrape off stubborn spots. Take your time and be careful not to gouge into the wall itself. Use a utility knife to cut away any mesh tile backing or strips of cement board still sticking to the wall.
Scrape Off Adhesive
Many wall tiles are mounted with construction adhesive. Use a putty knife or paint scraper to gently pry and scrape off any residual adhesive left on the wall surface. Try to get off as much as you can to prepare the wall for new tile. Avoid digging into the wall material itself.
Clean the Wall Surface
With all tiles, mortar and adhesive removed, take time to thoroughly clean the exposed wall area. Sweep away dust and debris. Use a wet sponge and clean water to wash away any remaining grout haze and residue. Allow the wall to fully dry before doing any patching or repairs.
Make Any Necessary Repairs
Examine the wall for any damage that may need attention before new tile is installed. Fill small holes or dents with spackle. Use joint compound to patch any large areas. Sand and prime repaired patches before tiling. If the wall surface is uneven or damaged beyond simple repairs, you may need to install new drywall or backerboard before attempting to retile.
Prepping for New Tile
Once the wall surface is cleaned up and repaired, you’re ready to start fresh with new tile. Lightly sand and wipe down the area to prepare it for the new tile adhesive. Make sure to follow all manufacturer’s instructions when applying primer and new tile adhesive. Allow proper drying time before setting tile. Use spacers between new tiles and tool new grout lines carefully for a professional looking finished product.
Tips for Safe Tile Removal
Here are some additional tips to follow for safe and effective tile removal:
- Always wear eye protection when chiseling or scraping tiles.
- Work slowly and carefully to avoid damaging the wall surface.
- Take breaks often when doing demo work to avoid injuries.
- Keep the work area well ventilated when removing adhesives.
- Dispose of removed tiles safely by bagging debris.
- Have a first aid kit nearby in case of minor cuts or abrasions.
- Keep children and pets away from the work area.
When to Call a Professional
Removing wall tile yourself can save money but also takes time and effort. Consider calling in a professional contractor for tile removal in the following situations:
- The tiles contain asbestos.
- There are multiple layers of tile that need removal.
- The tiles are set in a thick mortar bed.
- Wall damage is extensive and requires major repairs.
- You don’t have the right tools for the job.
- The tile removal job is simply larger than you can handle.
Hiring a qualified tile removal contractor will ensure the job gets done quickly, safely and correctly.
Conclusion
Removing wall tiles without damaging drywall or plaster underneath takes patience and the right approach. Always start by carefully scoring grout lines before attempting to pry tiles off. Use hand tools instead of power tools whenever possible to prevent gouging the wall. Work slowly and clean as you go to get a smooth, undamaged wall surface ready for new tile installation. Follow safety precautions and consider hiring a pro for bigger removal jobs or special situations like asbestos tile abatement.