Replacing a 3 way lamp socket can seem daunting to someone who hasn’t done it before, but it’s actually a pretty straightforward process if you follow the right steps. A 3 way lamp has three light bulbs and allows you to control the light output at high, medium, and low settings. This is accomplished through the 3 way socket, which has three contacts that allow electricity to flow to different bulbs depending on the switch setting. Knowing how to properly replace this socket is key to restoring functionality to a 3 way lamp.
In this comprehensive guide, we’ll walk through the entire process step-by-step, from turning off power and disassembling the lamp to wiring the new socket and reassembling the lamp. We’ll also provide tips and warnings along the way to help you avoid common mistakes. With the right materials and safety precautions, you can replace a 3 way socket successfully in less than an hour. Let’s get started!
Page Contents
What You’ll Need
Before you begin, make sure you have the following materials on hand:
- Replacement 3 way socket that matches the wattage of your light bulbs
- Wire strippers
- Needle nose pliers
- Electrical tape
- Small philips screwdriver
- Voltmeter or non-contact voltage tester (optional)
It’s also a good idea to have the following safety gear:
- Work gloves
- Safety goggles
- Step ladder or sturdy chair
If you need to replace any of the wires inside the lamp, have the appropriate size replacement lamp cord ready as well.
Turn Off Power and Remove Light Bulbs
Before doing any work on the lamp, it’s absolutely essential that you turn off power to the fixture at the circuit breaker. Shut off the breaker that controls the lamp’s circuit and flip it to the “off” position. If you’re unsure which breaker is correct, turn off the main breaker to cut power to the entire house while servicing the lamp.
Verify power is off by using a non-contact voltage tester or multimeter. Test outlets, light switches and wires related to the lamp’s circuit before proceeding. There should be no power detected anywhere along the circuit.
With power off, you can now safely remove the light bulbs from the 3 way lamp. Be sure to handle the bulbs gently to avoid breakage. Set them aside in a secure place while you work on the lamp.
Disassemble the Lamp
There are many different styles of table and floor lamps, so disassembly will vary. But in most cases, you’ll need to access and remove the following components:
- Lamp shades or diffusers
- Harp(s), if present
- Socket covers or housing
- Thumb screws, finials or other fasteners
- Wires going to the socket
Keep all hardware together and organized. Take photos along the way if needed to help with reassembly.
Be very gentle when moving any wires, as old cloth-insulated wiring can crack or fray if bent repeatedly. Support wires to avoid undue stress.
With the lamp disassembled, you should have clear access to remove the 3 way socket next.
Remove the Old 3 Way Socket

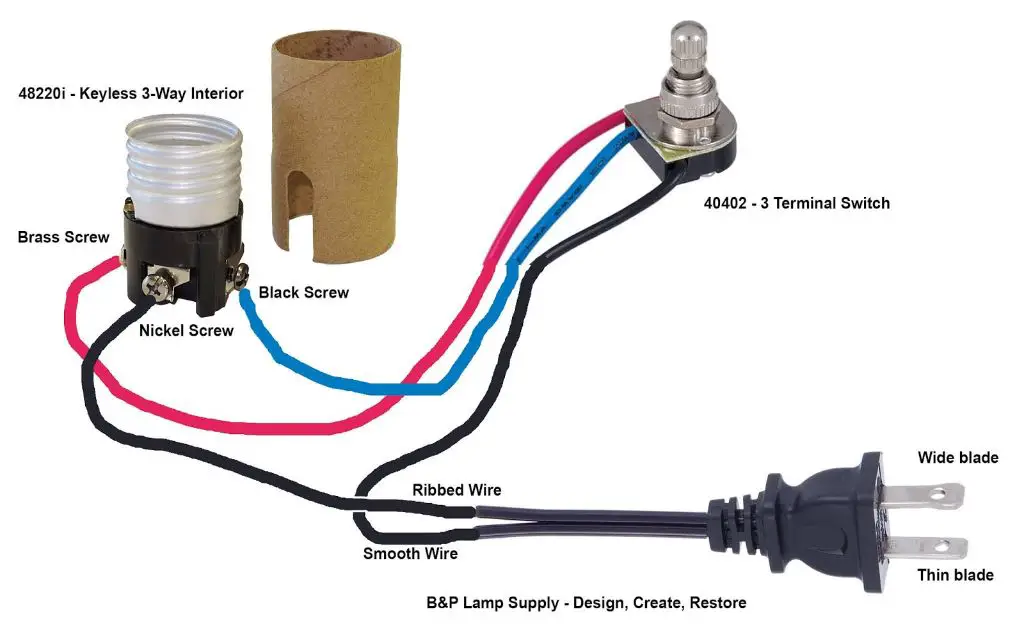
To remove the 3 way socket, you’ll first need to disconnect the wiring. There will likely be 4 or 5 wires connected to the socket:
- Neutral wires – Usually white or ribbed insulation
- Hot wires – Black insulation, connect to the brass screw terminals
- Traveler wires – Red insulation, connect to the chrome or black screw terminals
- Ground wire – Green insulation or bare
Use needle nose pliers to loosen each screw terminal and disconnect the wires one at a time. Keep track of which wire was connected to each terminal! This is critical for proper rewiring later.
Once all wiring is disconnected, unscrew or remove any brackets or fasteners holding the socket in place. The socket should now be free to remove.
Install the New 3 Way Socket

Your new 3 way socket may look slightly different but will operate the same way. Switch the wires over one at a time to the corresponding terminals:
- Neutral wires to silver/white terminals
- Hot wires to brass/black terminals
- Travelers to chrome/dark terminals
- Ground wire to green terminal
Double check that each wire is connected properly before screwing terminals down securely. Give each wire a gentle tug to ensure none are loose.
Use included fasteners or the original hardware to mount the new socket securely in the lamp base or socket housing. The socket should be firmly fixed in place and not able to wiggle or move once installed.
Rewire Lamp as Needed
If any of the original wires are cracked, frayed or damaged, it’s a good idea to replace them with new lamp cord wire at this point. Select replacement wiring that matches the gauge and type of the old wiring. Cut to appropriate lengths and strip about 1/2″ of insulation from the ends of each wire before connecting to the socket and other lamp wiring.
Follow the same wiring configuration as described above, connecting neutral, travelers, hot and ground wires to the correct terminals on the socket. Make sure polarity is maintained throughout the lamp wiring for proper operation and safety.
Reassemble Lamp
With the new 3 way socket installed and wired, it’s time to reassemble the lamp. Refer to your disassembly photos if needed to ensure everything goes back together correctly. A few tips for reassembly:
- Route wires cleanly and allow slack inside wire channels
- Replace any damaged or worn sockets, harps, etc.
- Install light bulbs, shades and diffusers
- Restore lamp power and test function
Take it slow and double check alignments or fit. If something doesn’t line up or fit right, don’t force it – investigate what may be assembled incorrectly. With care, you should be able to reassemble the lamp as it was originally designed.
Restore Power and Test
Once fully reassembled, it’s time to turn power back on at the circuit breaker. Flip the appropriate breakers back to the “on” position to restore electricity to the lamp circuit.
With bulbs installed, use the lamp’s switches to thoroughly test operation on high, medium and low settings. Confirm that each light bulb illuminates properly based on the switch position. The travelers wires allow electricity to flow to different paths depending on the setting.
If the lamp does not function correctly, turn power back off and check all wiring connections. The most common issue is an improperly wired traveler or neutral wire. Verify the travelers are connected to the correct terminals.
Tips and Warnings
Here are a few final tips and warnings to keep in mind when replacing a 3 way socket:
- Shut off power at the breaker before starting any work
- Label wires as you disconnect them to avoid confusion
- Connect wires securely so they don’t loosen over time
- Verify neutral, travelers, hots and ground connect properly
- Don’t force pieces during reassembly if they don’t fit
- Dispose of old sockets properly rather than just tossing in trash
- Call an electrician if you’re ever unsure about safety or wiring
Replacing a 3 way socket requires working with dangerous electricity. Take your time, be extremely careful, and get professional help if needed. With the right precautions, you can upgrade a 3 way lamp with a new socket for improved performance and brighter illumination.
Conclusion
Fixing a 3 way lamp by replacing the socket is a manageable home repair for a DIYer with basic electrical experience. By following safety procedures, using the proper tools, correctly wiring connections, and taking care during reassembly, you can restore a malfunctioning 3 way lamp. Pay close attention to how wires are routed and connected as removing the old socket and wiring in the new one is the hardest part. If you methodically follow the steps and tips in this guide, you can successfully replace a 3 way socket and get your unique lamp glowing again!