Replacing a burnt out light bulb under a kitchen or bathroom cabinet can seem like a daunting task, especially if you’ve never done it before. However, with the right tools and following a few simple steps, it’s actually quite easy! Here is a comprehensive guide on how to replace a light bulb under a cabinet.
Page Contents
What You’ll Need
Before getting started, make sure you have the following tools and materials:
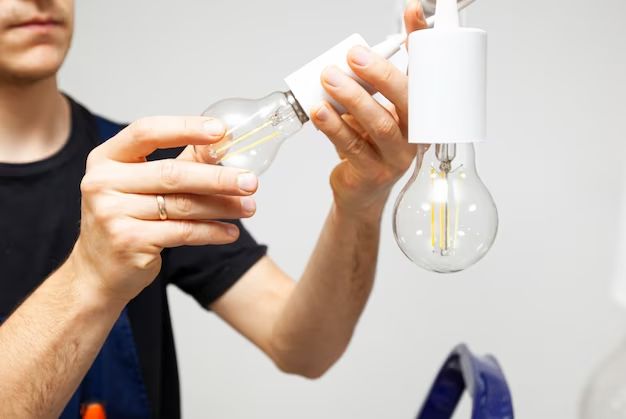
– Replacement light bulb(s) – Check the burnt out bulb to see what type, shape and wattage you need. LED bulbs last longer than incandescent.
– Flashlight or headlamp – This will help you see under the cabinet and locate the light socket.
– Phillips screwdriver – To remove any screws holding the light fixture or cover plate in place.
– Needle nose pliers (optional) – Helpful for removing stuck bulbs.
– Ladder or step stool – To safely reach the cabinet light.
– Replacement fuse or circuit breaker (if needed) – In case the bulb blew due to a short circuit.
Safety Tips
When replacing any electrical component, it’s important to keep safety in mind:
– Turn off the power supply to the cabinet light and any nearby circuits. Unplug appliances if needed.
– Use a nonconductive wooden or fiberglass ladder, not metal.
– Don’t touch the replacement bulb with bare fingers. Oils from skin can cause hot spots and damage the bulb.
– Make sure hands are dry to avoid getting shocked.
– If you don’t feel comfortable doing electrical work, consider hiring an electrician.
Step-by-Step Instructions
Once you have all the necessary materials and have taken safety precautions, follow these steps:
1. Turn off power supply and unplug any nearby appliances. Turn off the light switch that controls the cabinet lighting.
2. Get your ladder or step stool into position. Make sure it is stable and secure before climbing. Position it directly under the cabinet requiring bulb replacement.
3. Using your flashlight or headlamp, locate the bulb underneath the cabinet. You may need to trace the wire back from the light switch to find it. Identify the type and wattage.
4. Look for any glass cover or bracket surrounding the bulb and note how it is attached. You may need to unscrew or loosen retaining screws to access the bulb.
5. Use pliers to gently turn the bulb counterclockwise to unscrew it from the socket if it doesn’t unscrew easily by hand. Pull the bulb straight out to remove it.
6. Inspect the bulb socket for any cracks, loose wires or other damage. Make repairs if needed before inserting new bulb.
7. Check your replacement bulb to ensure it matches the old bulb’s shape, type and wattage. Do not touch the replacement with bare hands.
8. Screw in the new bulb clockwise by hand until it is snug. Don’t over tighten. If it’s loose, it may flicker when turned on.
9. Replace any glass cover or bracket the way you removed it. Insert and tighten any retaining screws.
10. Restore power at the circuit breaker or fuse box. Turn the light switch back on to test the new bulb.
11. If the replacement bulb doesn’t turn on, recheck the power connections and socket. The fuse may need to be replaced if a short is suspected.
Conclusion
With the right preparation and by following these step-by-step instructions, you can easily replace a burnt out or defective light bulb under a kitchen or bathroom cabinet. Paying attention to safety, unplugging nearby appliances, turning off power, and using the correct replacement bulb are key. With a bit of patience, you can avoid hiring an electrician and the satisfaction of doing it yourself!
Properly lighting a kitchen or bathroom makes these important rooms safer and more usable. Don’t live with dark, unusable spaces under cabinets. Pick up replacement bulbs and basic tools at your local hardware store. In about 10-15 minutes, you can have bright, functional lighting shining once again!
Changing light bulbs around the home provides an opportunity to upgrade to more energy efficient LED bulbs that lower electric bills and last years longer than traditional incandescent bulbs. They also produce less heat. So go LED! Just be sure to get the right shape and brightness (measured in lumens, not watts).
With some smart planning and by carefully following safety procedures, most homeowners can tackle basic electrical repairs like changing burnt out light bulbs. But when in doubt, never hesitate to call a licensed electrician. Safety should always be the number one concern when working with electrical systems. Home electrical fire risks and electrocution hazards make DIY electrical work potentially dangerous. Only perform repairs you know you have the skill and experience to complete safely.
FAQs about Replacing Light Bulbs Under Cabinets
How do you know if you need a new light bulb under your cabinet?
If the cabinet light isn’t turning on, first check if the bulb has burnt out by looking for a broken filament inside a glass bulb or no illumination from an LED. Also check fuse and power connections. Flickering lights when turned on can mean a loose bulb, damaged socket or wiring issues.
Where can you buy special appliance light bulbs?
Many hardware stores will carry appliance light bulbs for ovens, refrigerators, range hoods and other appliances where small, odd shaped bulbs are used. These may also be available from home improvement stores or ordered online if locally unavailable.
What causes light bulbs to burn out prematurely?
Frequent on/off cycling causes wear. Environmental factors like moisture, vibration or temperature extremes can shorten bulb life. Over-voltage from a power surge can burn out bulbs. Using wattage higher than recommended will overheat the bulb and filament.
Why do LED lights sometimes flicker?
LED flicker occurs when the driver providing DC current has compatibility issues with the bulb. Low voltage levels, RF interference or damage to LED components can also cause irregular light output. Changing to a LED designed for enclosed fixtures often solves flickering issues.
Can you replace under cabinet lighting with LED?
LED tape lighting and puck lights are ideal for installing under kitchen cabinets. Look for LED options compatible with 12V DC or 120V AC power. LED lasts 25 times longer than halogen or incandescent. Use LED tape for continuous lighting and puck lights to spotlight work areas.
Under Cabinet Lighting Improvement Tips
Upgrading under cabinet lights when replacing bulbs can make your kitchen or bathroom safer and more beautiful. Consider these tips:
– Install LED for cooler operation, lower energy bills and less frequent bulb changes.
– Use task lighting to illuminate key work areas rather than uniform lighting.
– Add lighting over the stove, sink, island and other task locations where needed.
– Use dimmable bulbs with remote controlled or wall-mounted dimmers for greater control over light levels.
– Choose color temperature bulbs to create the desired ambiance – warm white, bright white or daylight.
– Install occupancy sensors or timers to turn lights on/off automatically based on usage.
– Connect cabinet lighting to a smart home system for voice activated or app-based control.
– Group two or more light fixtures on separate switches to provide versatility in which lights turn on.
– Use glass lighting diffusers or covers to create softer, glare-free illumination.
– Consider energy efficient models like CFL or LED when replacing built-in appliance bulbs.
Troubleshooting Dark Cabinets and Under Counter Lights
If your kitchen or bathroom cabinets are dark after replacing a light bulb, there are several issues that could be preventing the lights from turning back on. Try these troubleshooting tips:
– Verify the replacement bulb is the correct type, shape, wattage and voltage. Using an incompatible bulb will prevent proper operation.
– Check that the new bulb is screwed in completely and making proper contact with the socket. Loose bulbs may flicker or turn off intermittently.
– Inspect the bulb socket for damage like bent or spread contacts. Cracked or corroded sockets won’t conduct electricity properly.
– Look for loose, disconnected or burnt wires leading from the socket into the cabinet. Electrical shorts can blow bulbs or cause malfunctions.
– Test the power outlet the lights are wired into using another appliance like a lamp. The outlet may have lost power due to a tripped breaker, defective GFCI outlet or wiring issue.
– Ensure the wall light switch controlling the under cabinet lighting is turned on. If in doubt, flip the switch on and off a few times.
– Replace any blown fuses controlling the light circuit in the main home electrical panel or sub-panel. Fuses burn out over time and need replacement about every 10 years.
Conclusion
Replacing burnt out light bulbs under kitchen or bathroom cabinets is a straightforward task that most homeowners can tackle themselves. Following basic safety procedures and armed with the right replacement bulb, tools, ladder, and handy troubleshooting tips, you can have your under cabinet lighting working again in minutes. Just be careful working around electrical systems and never hesitate to call an electrician if you’re unsure about any needed repairs. With quality LED bulbs installed that will last years with no hassle, you can brighten up those formerly dark cabinets under your counters and enjoy greater visibility when prepping meals and doing tasks in the kitchen or bath.