Replacing a towel rail that is installed on tile can seem daunting, but it’s actually a pretty straightforward process if you follow a few simple steps. In this comprehensive guide, we’ll walk you through everything you need to know to safely and successfully replace your tile-mounted towel rail.
Page Contents
What You’ll Need
Before getting started, make sure you have the following tools and materials on hand:
- New towel rail
- Tape measure
- Pencil
- Electric drill with tile/masonry drill bit
- Hammer
- Flat pry bar
- Phillips head and flathead screwdrivers
- Channellock pliers
- Safety glasses
- Silicone sealant
You’ll also need appropriate wall anchors for the type of tile you have – either plastic anchors for ceramic tile or masonry anchors for porcelain or natural stone.
Preparation
Before starting demo on the old towel rail, turn off the water supply to the rail and disconnect any electrical wiring (for heated models). Protect nearby surfaces from damage and work safely by wearing safety glasses.
Step 1: Remove the Old Towel Rail
Start by removing any attached towels or accessories from the existing rail. Then, using a flat pry bar inserted under the edge of the rail, gently pry it away from the wall. You want to break the seal of the old caulk or adhesive.
For rails mounted with screws or bolts, use a screwdriver or pliers to remove them. For adhesive mounts, keep prying carefully until the rail comes free. Remove any remaining old caulk or adhesive from the wall with a putty knife.
Step 2: Prepare the New Towel Rail
Now is a good time to make any needed adjustments to your new towel rail, like cutting it to fit your space or adding brackets. Hold it in place and make small marks with a pencil where the new mounting holes need to go.
Drill holes in the tile for wall anchors at your marks. Tap anchors gently into the holes with a hammer until they are flush with the tile. Mount any brackets according to the manufacturer instructions.
Step 3: Mount the New Towel Rail
Once prepped, lift the new rail into position and insert the screws into the wall anchors. Tighten them with a screwdriver until snug. Don’t overtighten, as this could crack the tile.
If your rail doesn’t have pre-drilled mounting holes, hold it in the desired position and mark new hole locations before drilling and inserting anchors. Test that the rail is securely mounted and level.
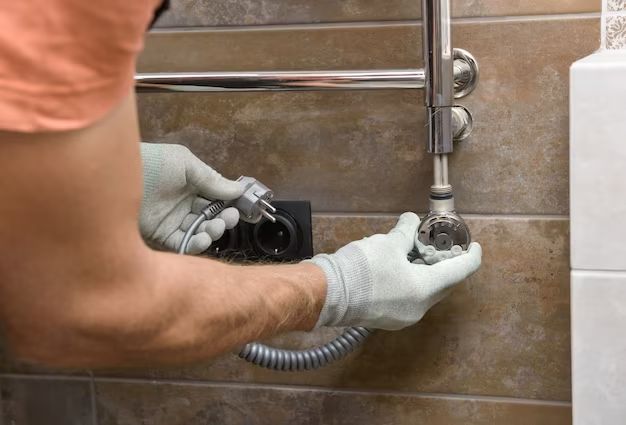
Step 4: Make Plumbing Connections
If you have a heated or plumbed towel rail, it’s time to restore the water supply. Connect the hot and cold supply lines to the appropriate rail valves. Check for leaks and tighten any loose connections with pliers.
Step 5: Make Electrical Connections
For electric towel warmers, plug the rail back into the outlet or hardwire it as before. Make sure any internal wires are securely reconnected. Turn power back on and test that the rail works.
Step 6: Caulk Around Rail
The final step is to seal the edges of the rail with silicone caulk. Run a smooth bead around the top and sides, smoothing with a finger or caulk tool. Allow the caulk to fully cure for at least 24 hours before regular use.
Helpful Tips
Follow these tips for the easiest towel rail replacement:
- Use painter’s tape on wall edges to protect tile and keep lines straight.
- Thoroughly clean the wall area beforehand for best caulk adhesion.
- For screw-mount rails, pre-drill holes in rail to avoid cracking or splitting.
- Follow all manufacturer instructions for electric or plumbing connections.
- Check for level and plumb after mounting but before caulking.
Common Problems and Solutions
While replacing your towel rail, you may encounter a few snags. Here are some common problems and how to get back on track:
| Problem | Solution |
|---|---|
| Existing wall anchors spin in place when trying to remove them. | Use pliers or channellocks to grip anchor edge and unscrew. |
| Towel rail won’t line up with old anchor holes. | Drill new anchor holes to match rail mounting bracket spacing. |
| Caulk bead is uneven or sloppy. | Wet finger and smooth caulk for a clean finish. |
| New rail is loose or pulls away from wall. | Ensure adequate anchors are used for tile type. Tighten screws firmly or re-mount. |
Conclusion
With the right tools and preparation, replacing a tile-mounted towel rail is a relatively simple 1-2 hour project – even for someone with limited DIY experience. The most important steps are removing the old rail safely, drilling properly sized holes for new anchors, and sealing the edges well with caulk. Follow the instructions and tips above to see how easy it can be to upgrade your bath with a brand new towel rail.