Replacing a faulty trip lever on a bathtub drain is a straightforward DIY project that most homeowners can tackle themselves. The trip lever is the mechanism you pull up or push down to open and close the bathtub drain. Over time, the linkage connecting the trip lever to the drain can wear out or get clogged with hair and debris, preventing the drain from fully opening and closing. Replacing the entire trip lever assembly will restore proper functioning to your bathtub drain.
Page Contents
- 1 Things You’ll Need
- 2 Step 1 – Remove the Old Trip Lever
- 3 Step 2 – Detach the Linkage
- 4 Step 3 – Remove the Pivot Rod
- 5 Step 4 – Install the New Pivot Rod
- 6 Step 5 – Attach the Linkage
- 7 Step 6 – Install New Trip Lever
- 8 Step 7 – Seal the Cover Plate
- 9 Conclusion
- 10 Tips for Replacing a Bathtub Drain Trip Lever
- 11 Common Problems When Replacing a Bathtub Drain Trip Lever
- 12 Trip Lever Styles for Different Bathtub Drains
- 13 Helpful Videos for Replacing a Bathtub Drain Trip Lever
- 14 Cost to Professionally Replace a Bathtub Drain Trip Lever
- 15 When to Call a Professional for Your Bathtub Drain
- 16 Safety Tips When Working on Your Bathtub Drain
- 17 Materials and Tools Needed for Replacing a Bathtub Drain Trip Lever
- 18 How to Prevent Future Problems with Your Bathtub Drain
Things You’ll Need
Before starting this project, gather the following materials:
- New trip lever assembly (make sure it’s compatible with your type of bathtub drain/overflow plate)
- Adjustable wrench
- Flat head screwdriver
- Plumber’s putty or silicone caulk
- Rag
It’s also a good idea to turn off the water supply to your bathtub before beginning. Locate the shut-off valves underneath the tub or sink and turn them clockwise to shut off the water.
Step 1 – Remove the Old Trip Lever
Start by using the screwdriver to detach the trip lever cover plate from the overflow plate above the drain. Pry gently around the edges to loosen the caulk or plumber’s putty seal.
Once the cover plate is removed, you’ll have access to the screw holding the trip lever handle onto the overflow plate. Use the adjustable wrench to loosen and remove this screw.
With the screw out, the trip lever handle should easily come off the overflow plate. Set it aside, as you’ll need to transfer some parts over to the new assembly.
Step 2 – Detach the Linkage
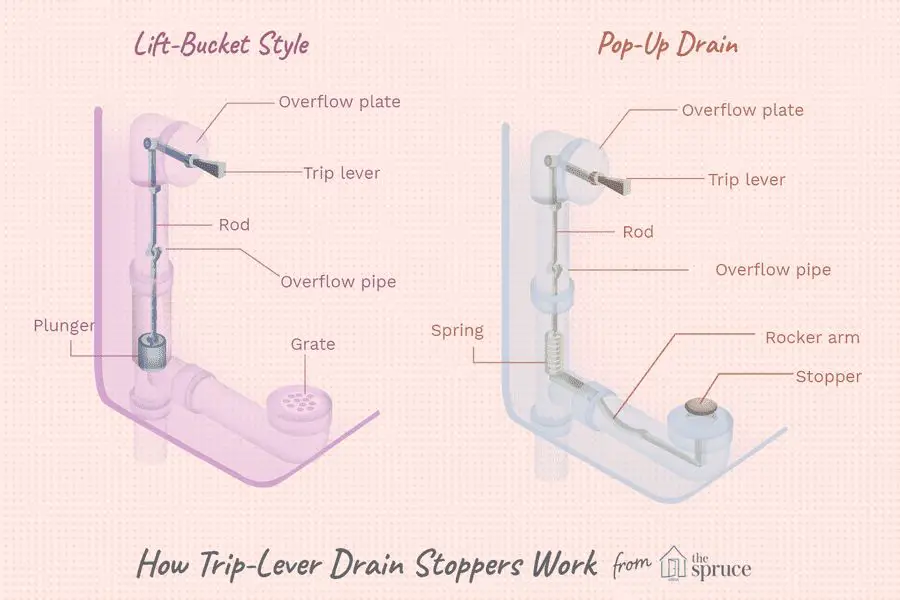
Now look down into the overflow plate. You should see a thin metal rod connecting the horizontal pivot arm to the vertical lift rod that descends down into the bathtub drain. This is the linkage. It is usually held in place with a small setscrew in the pivot arm.
Use a screwdriver to loosen the setscrew and detach the linkage rod from the pivot arm. You can then remove the vertical lift rod from its holder. Set these parts aside.
Step 3 – Remove the Pivot Rod
Next, remove the horizontal pivot rod from the overflow plate. It is threaded at the end where the trip lever handle attaches. Use an adjustable wrench to unscrew the pivot rod counterclockwise. Pull it out of the overflow plate.
You may need to use pliers to get a good grip on the pivot rod. Take care not to damage the threads when removing it.
Step 4 – Install the New Pivot Rod
Your new trip lever kit will come with a new pivot rod. Thread this rod clockwise into the overflow plate until it is tightened securely.
Make sure it is oriented the same way as your old pivot rod so that the trip lever handle can be installed properly.
Step 5 – Attach the Linkage
Now take the thin linkage rod that you removed earlier and insert it into the end of the new pivot rod. Use a screwdriver to tighten the setscrew so that the linkage rod is held firmly in place.
Insert the vertical lift rod back into its holder in the overflow plate. Then attach the upper end of the linkage rod to the lift rod using the setscrew.
Check that the linkage moves smoothly when you pivot the upper horizontal rod. The vertical lift rod should move up and down with it.
Step 6 – Install New Trip Lever
Your new trip lever kit will come with its own handle and screw. Attach the handle to the end of the pivot rod using this new screw. Tighten it down securely with a screwdriver.
You can now test the operation of the new trip lever. Pulling up should fully raise the lift rod and open the tub drain. Pushing down should allow the drain to close.
Step 7 – Seal the Cover Plate
The final step is to seal the cover plate back onto the overflow plate. Apply a fresh ring of plumber’s putty or silicone caulk around the back of the plate.
Then firmly press the plate into position over the screws and trip lever. Tighten the screws to hold it in place.
Wipe away any excess sealant with a rag. Allow the caulk to cure overnight before using your bathtub.
Conclusion
After following these steps, your bathtub drain trip lever should work smoothly to control the opening and closing of the drain. Be sure to turn the water supply back on and test for leaks before using your bathtub again.
Replacing the trip lever is an easy DIY job. Just be sure to get the correct replacement kit for your type of tub drain. With the right materials and tools, you can restore proper functioning to your tub’s drain and overflow system.
Tips for Replacing a Bathtub Drain Trip Lever
Here are some additional tips to keep in mind when replacing a bathtub trip lever:
- Inspect the pivot rod threads for corrosion or damage. Replace if needed.
- Use silicone lubricant on the pivot rod and linkage to prevent sticking.
- Adjust the lift rod height so the drain seals fully when closed.
- Make sure all setscrews are tight to prevent loose connections.
- Attach the trip lever handle loosely before final tightening.
- Test the lever several times before resealing the cover plate.
Following proper steps and techniques will ensure smooth operation and prevent future issues with your new trip lever.
Common Problems When Replacing a Bathtub Drain Trip Lever
While replacing a bathtub trip lever is usually straightforward, some common problems can arise. Being aware of these potential issues can help you identify and address them during your repair:
- Drain not fully closing – The lift rod height may need adjusting so the drain seal engages fully when closed.
- Trip lever loose – The screw securing the trip lever handle may need tightening.
- Leak from cover plate – The plumber’s putty or caulk seal may be incomplete. Reapply sealant.
- Lift rod detached – The setscrew may be loose. Check and tighten all setscrews.
- Trip lever sticks – Lubricate the pivot rod and linkage with silicone.
- Drain stopper stuck – Hair or debris may be trapped. Try removing the stopper to clean.
Being prepared to troubleshoot issues will make your bathtub trip lever replacement go smoothly.
Trip Lever Styles for Different Bathtub Drains
There are a few common styles of trip levers used on different types of bathtub drains:
| Drain Type | Trip Lever Style |
|---|---|
| Lift-and-turn or pop-up stopper | Universal trip lever |
| Toe-touch stopper | Toe-touch tub drain trip lever |
| Flip-it stopper | Flip-it style trip lever |
| Roller ball stopper | Roller ball sink pop-up drain trip lever |
Make sure to match the replacement trip lever design to the type of drain stopper mechanism you have. The universal style works for most standard lift-and-turn and pop-up drains.
Helpful Videos for Replacing a Bathtub Drain Trip Lever
Sometimes it helps to see the trip lever replacement process in action. Here are a few helpful instructional videos:
- Replacing a Bathtub Trip Lever – This video from Home Repair Tutor provides a step-by-step tutorial for replacing a lift-and-turn style trip lever. (3 minutes)
- How to Fix a Sticking Bathtub Drain Trip Lever – This video from The Handyguys shows how to fix a stuck trip lever by cleaning and lubricating the linkage. (3 minutes)
- Adjusting a Pop-up Bathtub Drain Stopper – This video from Bustard & Fowler demonstrates adjusting a trip lever and pop-up drain to get a proper seal. (2 minutes)
Viewing the process and techniques involved can really help boost your knowledge and confidence for this repair project.
Cost to Professionally Replace a Bathtub Drain Trip Lever
While replacing a bathtub drain trip lever yourself can save money, you may opt to have the job done professionally by a plumber. Here are typical costs:
- Trip lever replacement labor: $75 – $150
- Cost of trip lever kit: $10 – $50
- Total cost: $100 – $200
Having an existing leak or significant damage around the tub drain will increase costs. Simple trip lever replacements in easily accessible tubs will be at the lower end of this range.
When to Call a Professional for Your Bathtub Drain
While a trip lever replacement is normally DIY-friendly, some situations call for contacting a professional plumber:
- The drain or overflow pipe is severely corroded.
- The bathtub has a stubborn clog that prevents draining.
- There is a leak between the overflow plate and the tub itself.
- The tub drain is over-tightened and cannot be loosened.
- You are unsure about the cause of the trip lever issues.
A professional plumber has the skills and tools to fully diagnose and repair complex bathtub drain problems beyond just a trip lever replacement.
Safety Tips When Working on Your Bathtub Drain
Use caution when taking on any bathtub repair project:
- Turn off the water supply and drain the tub fully before starting.
- Use eye protection when loosening drain components.
- Be aware that existing drain parts may be corroded or brittle.
- Take care when using caustic chemical drain cleaners.
- Inspect drain components and replace any that are damaged.
- Check for leaks after reassembling the drain trip lever.
Exercising care and working slowly can help prevent tub drain repairs from becoming hazardous.
Materials and Tools Needed for Replacing a Bathtub Drain Trip Lever
Gather the following equipment before tackling a DIY bathtub trip lever replacement project:
- Trip lever kit – Purchase one made for your tub’s drain type
- Adjustable wrench – For loosening drain body and removing pivot rod
- Channellock pliers – Helpful for gripping old pivot rod
- Flathead screwdriver – For prying off cover plate and loosening screws
- Sealant – Plumber’s putty or silicone caulk/adhesive
- Rag – For cleaning up old putty or caulk
- Bucket – For catching water when draining tub
- Safety glasses – For eye protection
Having the right trip lever replacement supplies on hand will make the repair job much smoother.
How to Prevent Future Problems with Your Bathtub Drain
Here are some tips to help keep your bathtub drain and trip lever working properly after replacement:
- Regularly remove hair and debris from the drain basket screen
- Pour boiling water down the drain monthly to melt grease buildup
- Use a bent wire or drain snake to clear out stubborn clogs
- Add baking soda and vinegar monthly to deodorize the drain
- Tighten the trip lever screw if it starts to get loose
- Lubricate the pivot rod and linkage occasionally with silicone
- Adjust the lift rod if the drain stopper doesn’t fully seal
A well-maintained bathtub drain and trip lever can last for many years without needing replacement.