Replacing a valve stem on an outdoor faucet is a fairly straightforward plumbing repair that most homeowners can tackle themselves. The valve stem is the small shaft that the faucet handle attaches to, which allows you to turn the water flow on and off. Over time, these valve stems can wear out or break, resulting in a leaky faucet or making it difficult to control the water flow. Knowing how to replace a bad valve stem can save you the cost of calling in a plumber for a relatively simple fix.
In this 5000 word guide, we will walk through the step-by-step process for replacing an outdoor faucet valve stem. We will cover how to identify when you need a new valve stem, what tools and parts you’ll need, how to remove the old stem, and how to install the new replacement stem. We’ll also provide tips and advice for troubleshooting some common issues that can come up when working on outdoor faucets.
Ready to fix that dripping or broken exterior faucet valve? Let’s get started!
Page Contents
- 1 How to Know When You Need a New Valve Stem
- 2 Tools and Materials Needed
- 3 How to Remove the Old Valve Stem
- 4 How to Install the New Valve Stem
- 5 Tips for Replacing an Outdoor Faucet Valve Stem
- 5.1 Tip 1: Use Teflon Tape
- 5.2 Tip 2: Don’t Over Tighten
- 5.3 Tip 3: Watch Your Hand Positioning
- 5.4 Tip 4: Remove Mineral Build Up First
- 5.5 Tip 5: Replace Washers
- 5.6 Tip 6: Don’t Force the Valve Stem
- 5.7 Tip 7: Check for Cracks
- 5.8 Tip 8: Clean Valve Seats
- 5.9 Tip 9: Confirm Water is Off
- 5.10 Tip 10: Have Patience Removing Old Stem
- 6 Troubleshooting Valve Stem Replacement Problems
- 7 Conclusion
How to Know When You Need a New Valve Stem
The first step is identifying the signs that indicate it’s time to replace your outdoor faucet’s valve stem. Here are some of the most common indicators that your valve stem needs to be replaced:
Constant Leaking or Dripping
If you notice that your outdoor faucet drips constantly, even when the valve is completely closed, this typically means the valve stem needs to be replaced. The constant leaking is usually caused by wear and tear that allows water to leak through the stem when it should be closed up tight. Replacing the valve stem will stop the leak.
Water Won’t Completely Shut Off
Another sign it’s time for a new valve stem is if you can’t completely stop the water flow even when you turn the handle all the way to the closed position. This indicates the valve stem is too worn to fully seat in the closed position. Replacing it will allow you to completely shut off the water again.
Loose or Wobbly Handle
As a valve stem ages, it can become bent or develop lime and mineral build up on it from the water. This can result in the faucet handle feeling loose, wobbly, or not secured. If you can wiggle the handle around when the valve is closed, the stem likely needs to be replaced.
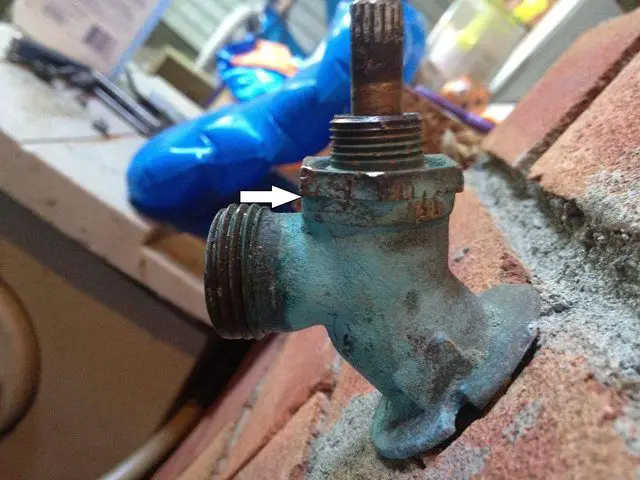
Rusting or Corrosion on the Stem
Since exterior faucets are exposed to the outdoor elements, the valve stems are prone to rusting and corrosion over time. Check the portion of the stem you can see at the back of the faucet when in the closed position. Rust spots or green corrosion indicate a new valve stem is needed.
Difficulty Turning the Handle
You may notice that it becomes increasingly hard to turn the faucet handle over time. This can happen as valve stems wear down or become coated in mineral deposits. If you struggle to turn the handle smoothly through its full range of motion, a replacement valve stem will help restore full functionality.
Water Sputtering or Spraying
As valve stems wear out, you may notice the water flow becomes sporadic or sprays out erratically. Older valve stems can get build up or pits that disrupt the smooth flow of water. Installing a fresh new stem will likely fix sputtering or spraying water issues.
High Water Pressure Problems
Sometimes a faulty valve stem can’t handle normal water pressure properly. You may experience the faucet suddenly shutting off or water ejecting powerfully when the valve is first opened. This indicates it’s time to replace the valve stem.
Identifying the Valve Stem Style
Before replacing your valve stem, take a close look at the current stem to identify what style it is. This will ensure you get an exact replacement. The most common outdoor faucet valve stem styles include:
– Compression: These have threaded ends on the stem that allow for adjusting the swivel compression nut.
– Ball Style: These have a rotating ball mechanism that controls water flow.
– Cartridge Style: These control water flow through an up and down cartridge motion.
– Ceramic Disk: These utilize stacked ceramic disks to control the flow.
– Gate Style: These lift up to create a gate and water flows around the gate.
Once you’ve identified the valve stem style, you can purchase the correct replacement stem.
Tools and Materials Needed
Replacing an outdoor faucet valve stem is a straightforward project you can do yourself. Here are the basic tools and materials you’ll need:
Tools
– Adjustable wrench or pliers to loosen parts
– Channel lock pliers to remove valve stem
– Teflon tape
– Paper towels or rag
– Flashlight
– Replacement valve stem kit
Valve Stem Kit
– Rubber valve stem washer
– Brass replacement stem
– Plastic seat washer
– Retaining nut
– Grease packet
The valve stem kit for your particular faucet can be purchased at any hardware store, home improvement center, or online. Make sure to bring the old valve stem with you to get an exact match.
Other Supplies
– Bucket to catch water
– Vinegar or calcium-lime-rust remover if needed
– Emory cloth or steel wool if needed
Gather all your supplies and tools in one place before starting the repair. Make sure you shut off the main water supply leading to the faucet before beginning. Having the right tools and replacement parts on hand will make the valve stem replacement job much smoother.
How to Remove the Old Valve Stem
Once you’ve gathered the necessary tools and are ready to start replacing the valve stem, follow these steps:
Step 1: Turn Off Water Supply
Locate the shut off valve for the outdoor faucet and turn it clockwise to shut off the water supply. This is usually an interior valve located near the pipe leading outside to the faucet.
Step 2: Open Faucet to Drain
Once the water supply is shut off, turn the faucet handle counter-clockwise to open the valve. This will allow any residual water in the faucet to drain out. Let it drain completely.
Step 3: Disassemble the Handle
Use a wrench or pliers to loosen and remove any nuts, screws or pieces securing the faucet handle. The handle needs to be completely removed to access the valve stem.
Step 4: Remove Bonnet Nut
Use an adjustable wrench or pliers to turn the bonnet nut at the base of the valve stem counter-clockwise. Unscrew it completely to detach it from the faucet body.
Step 5: Remove Valve Stem
With the bonnet nut removed, you can now grip the valve stem with pliers or a wrench and turn it counter-clockwise to unscrew it fully out of the faucet body. Pull the valve stem straight out once detached.
Step 6: Clean Out Faucet Body
Check inside the faucet body for any debris, old washer remnants, or lime and calcium build up. Use a flashlight to inspect closely. Scrub out any gunk with an old toothbrush or pipe brush. Spray with vinegar and let sit if needed to break up mineral deposits. The faucet body must be clean for the new valve stem to seal properly.
Step 7: Lubricate and Grease Replacement Stem
Rub the new replacement valve stem with the provided grease packet. Make sure to fully coat the o-rings on the new stem. The grease will help the stem glide smoothly into place and create a tight seal.
The old valve stem has now been successfully removed. Now you’re ready to install the replacement stem.
How to Install the New Valve Stem
Installing the new valve stem takes place in the reverse order that you removed the old one. Follow these instructions to properly install the replacement:
Step 1: Insert New Stem
Gently insert the greased replacement valve stem straight into the faucet body opening. You want the o-rings on the stem to slide smoothly into place inside the faucet. Seat it completely.
Step 2: Secure Stem Nut
Thread the valve stem retaining nut by hand clockwise onto the stem’s threaded end. Tighten securely with your wrench or pliers.
Step 3: Check Handles
Temporarily place the faucet handle back onto the valve stem to check the alignment. Make sure the handles will open and close the water flow smoothly.
Step 4: Install Washers
Stack any plastic or rubber sealing washers in the correct order as shown in your valve stem kit diagram. Slide them over the valve stem into place. These provide an extra waterproof seal.
Step 5: Thread On Bonnet Nut
Screw the bonnet nut clockwise back into place at the faucet base over the washers. Use your adjustable wrench to tighten it securely.
Step 6: Reattach Handle
If needed, realign the faucet handle to the valve stem so it fits correctly. Reattach the handle and tighten any handle screws or nuts with your wrench.
Step 7: Turn Water Back On
Turn the water supply back on slowly. Check for any leaks at the valve stem. Tighten nuts or washers if needed to stop leaks.
The new valve stem is now installed! Turn on your outdoor faucet to test that water flows smoothly and shuts off completely.
Tips for Replacing an Outdoor Faucet Valve Stem
Follow these additional tips when tackling an outdoor faucet valve stem replacement project:
Tip 1: Use Teflon Tape
Wrap plumber’s Teflon tape clockwise around any threaded connections. This helps create a tight seal.
Tip 2: Don’t Over Tighten
Snug the bonnet nut and connections, but be careful not to over tighten. Overtightening can crack the faucet body.
Tip 3: Watch Your Hand Positioning
Be aware of where you place your hands when using wrenches and pliers. It’s easy to scrape your knuckles on the faucet body.
Tip 4: Remove Mineral Build Up First
If you can’t remove the old stem due to heavy lime and mineral deposits, soak the area in vinegar first to break up the build up before attempting removal.
Tip 5: Replace Washers
Always install new o-ring washers even if the old ones look okay. Old washers may be cracked or warped.
Tip 6: Don’t Force the Valve Stem
Never force the new stem into place. If it hangs up, there is likely debris stuck in the faucet body.
Tip 7: Check for Cracks
Inspect the old valve stem closely for cracks. Cracks indicate the new stem may soon fail as well, requiring faucet replacement.
Tip 8: Clean Valve Seats
Scrub mineral deposits off the valve seat inside the faucet body so the washers can seal properly.
Tip 9: Confirm Water is Off
Double check that the water supply is turned off before starting. Opening up the faucet with the water on leads to a big mess!
Tip 10: Have Patience Removing Old Stem
Take your time removing the old valve stem. Stubborn stems may require resting a penetrant solvent on them for awhile before they will budge.
Following these handy tips will help your valve stem replacement job go quickly and smoothly.
Troubleshooting Valve Stem Replacement Problems
Even if you follow all the steps correctly, there are a few snags that can pop up when replacing an outdoor faucet valve stem. Here are some common troubleshooting tips:
Stem Won’t Budge
– Try using a penetrant solvent like WD-40 and let it soak 15-20 minutes before trying to unscrew the stem again. The lubricant will help break down rust and mineral deposits.
– Firmly grip the stem with vise-grip pliers locked in place to get maximum turning leverage.
– Gently tap around the bonnet nut with a hammer to help jar the stem loose initially.
– Heat expands metal, so try warming the stem area with a hair dryer. The heat will make the stem marginally wider to hopefully break it free.
– If all else fails, the stem may need to be drilled out. This should be a last resort option.
New Stem Won’t Seal
– Make sure you installed new seal washers. Stack washers in the correct order.
– Check for debris or scratches on the faucet seat and stem end. Clean any contaminants.
– The faucet body or new stem might be slightly misaligned. Loosen parts and shift into proper alignment.
– Wrap the stem threads tightly with Teflon tape to improve the seal.
– Make sure you used the included grease packet on the stem o-rings.
Water Leaks After Installation
– Tighten any parts attached to the valve stem, like the retaining nut or bonnet nut. Don’t over tighten.
– Stack the rubber and plastic washers so they are in the correct sequence. Consult your valve stem diagram.
– Lime and mineral deposits on valve seats can cause leaks. Scrub seats smooth with steel wool.
– Replace any washers that are cracked, dried out or flattened. Only use new washers.
– The new stem may not be an exact match for your faucet. Verify you have the proper replacement stem.
Low Water Flow After New Stem Install
– Partially open the faucet handle and check for flow restrictions. Open fully after.
– The water supply valves may still be partially closed. Make sure both interior and exterior valves are fully open.
– Check for kinks in the exterior copper piping that can impede water flow volume.
– Disconnect and clean out the exterior faucet screens or aerators which could be clogged with debris.
Following this troubleshooting guidance will help you resolve any issues that arise after you’ve completed the valve stem installation on your outdoor faucet. Properly replacing the valve stem will restore full water control and stop leaks.
Conclusion
Replacing an aging or damaged valve stem is essential to keep your outdoor spigots and hose faucets functioning properly through changing seasons and fluctuating temperatures. Following the steps outlined here will allow you to remove the old stem and install a new replacement stem to restore your outdoor faucet to good working order.
The ability to easily turn water flow on and off with your exterior water spigots is a necessity for gardening, washing cars, filling pools, attaching hoses, and much more outdoor water needs. Replacing just the valve stem is significantly cheaper than replacing the entire faucet. Doing it yourself also saves the cost of hiring a plumber for a repair that is quite manageable as a DIY project.
With a little time and effort, you can tackle a leaky or damaged valve stem on an outdoor faucet using just a few standard tools. Our step-by-step guide has covered everything you need to know to successfully replace the valve stem. Just take your time, follow all the steps and safety advice, and you’ll have your outdoor faucet working like new again.