Over time, sliding door rollers can wear down and cause the door to not glide smoothly or even come off the track. Replacing old rollers is an easy DIY project that can be done in less than an hour. Here is a step-by-step guide on how to replace sliding door rollers.
Page Contents
- 1 What You’ll Need
- 2 Step 1: Remove the Door from the Track
- 3 Step 2: Remove the Old Rollers
- 4 Step 3: Install the New Rollers
- 5 Step 4: Replace the Door
- 6 Step 5: Test the New Rollers
- 7 Tips for Replacing Sliding Door Rollers
- 8 Signs You Need New Sliding Door Rollers
- 9 Different Types of Sliding Door Rollers
- 10 Sliding Door Roller Materials
- 11 Sliding Door Roller Sizes
- 12 How to Adjust Sliding Door Rollers
- 13 Sliding Door Roller Placement
- 14 Sliding Door Roller Maintenance
- 15 Conclusion
What You’ll Need
- New sliding door rollers
- Screwdriver
- Wrench
- Ladder (if needed)
- Replacement roller brackets (if yours are damaged)
Make sure you purchase the correct replacement rollers for your type of sliding door. The most common types are twin rollers, single rollers, and tandem rollers. You’ll also need the corresponding roller brackets if yours are bent or damaged.
Step 1: Remove the Door from the Track
Start by sliding the door to the fully open position. Using a screwdriver, remove the screws at the top and bottom of the door frame that attach it to the track. Carefully lift the door up and out of the track. You may need a helper or ladder to do this safely.
Step 2: Remove the Old Rollers
With the door removed, lay it on a flat, stable surface. Remove the old roller bracket screws using a screwdriver or wrench. This will release the roller brackets. You can then slide the old rollers out of the brackets.
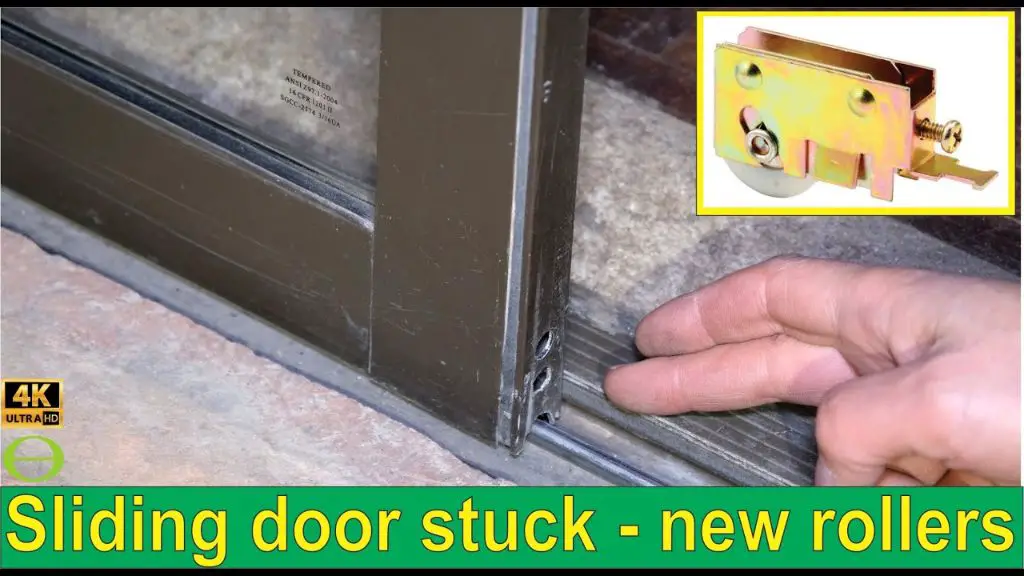
Step 3: Install the New Rollers
Insert the new rollers into the roller brackets. If you have new brackets, secure them into place with the screws. Make sure the locks or tension tabs on the roller brackets are facing the correct direction so they properly secure the rollers.
Step 4: Replace the Door
Carefully lift the door back up into the track opening. Align the slots on the door frame with the track and slide it back into place. Reinstall the screws at the top and bottom to secure the door frame.
Step 5: Test the New Rollers
Slide the door back and forth along the track. The new rollers should glide smoothly and quietly. If the door sticks or doesn’t move easily, you may need to adjust the roller placement or track alignment.
Tips for Replacing Sliding Door Rollers
Follow these tips for a successful roller replacement project:
- Inspect the track for damage or debris before installing new rollers.
- Lubricate old rollers first to see if that improves their performance before replacing them.
- Install any lock tabs in the correct orientation to properly secure the rollers.
- Adjust the track alignment if the door still doesn’t operate smoothly.
- Replace bent or damaged roller brackets to prevent issues.
Signs You Need New Sliding Door Rollers
Here are some signs that indicate it’s time to replace your sliding door rollers:
- The door doesn’t glide smoothly and takes extra force to open.
- The rollers are visibly cracked or worn down.
- You hear squeaking, grinding or rumbling noises when operating the door.
- The door slowly drifts out of alignment over time.
- The door completely derails from the track.
Different Types of Sliding Door Rollers
There are a few common varieties of rollers used on sliding doors:
- Single rollers – Consist of one wheel and bracket. Used on lightweight doors.
- Twin rollers – Two wheels attached to one bracket. Most common type.
- Tandem rollers – Two individual wheel brackets per side. Used on heavy doors.
- Ball bearing rollers – Rollers with ball bearings for ultra smooth motion.
Make sure to get the roller style that matches your existing hardware when buying replacements.
Sliding Door Roller Materials
Rollers can be constructed from different materials, including:
- Plastic – Lightweight but prone to cracking. Good for occasional use doors.
- Nylon – Low cost plastic with good durability.
- Stainless steel – Corrosion resistant and very durable.
- Ball bearing – Stainless steel rollers with internal ball bearings.
Stainless steel rollers are recommended for most sliding door applications. Plastic works well for lightweight doors in low traffic areas.
Sliding Door Roller Sizes
Standard roller sizes include:
- 1/2 inch
- 5/8 inch
- 3/4 inch
- 1 inch
Measure your current rollers to determine the correct replacement size needed. The most common sizes used are 1/2 inch and 5/8 inch.
How to Adjust Sliding Door Rollers
If your sliding door is slightly out of alignment, you may be able to adjust the rollers instead of fully replacing them. Here’s how:
- Loosen the bracket screws.
- Twist the roller bracket to raise or lower that side.
- Slide the roller forward or backward as needed.
- Retighten the bracket screws.
- Test door operation and re-adjust if needed.
Adjust both the top and bottom rollers on each side to realign the door properly in the track.
Sliding Door Roller Placement
Proper roller placement is key for smooth operation. Recommended placement includes:
- Top rollers 2 inches down from door frame top
- Bottom rollers 5 inches up from floor
- Rollers evenly spaced top to bottom
- Door frame centered between both rollers
Equal spacing between the top and bottom rollers prevents sagging and interference issues.
Sliding Door Roller Maintenance
Regular maintenance keeps your rollers working smoothly. Follow these tips:
- Inspect rollers every 6 months for wear.
- Clean track periodically to remove dirt and debris.
- Lubricate rollers with silicone spray lube every 1-2 years.
- Check brackets and hardware for loose screws or damage.
- Replace damaged rollers right away before they fail completely.
Conclusion
Replacing worn out sliding door rollers is an easy DIY project. Follow these steps:
- Remove door from track
- Take out old roller brackets
- Install new rollers and brackets
- Replace door in track
- Test operation
Be sure to get the proper roller type and size for your specific door. Maintain rollers regularly so your door glides smoothly for years to come. Contact a professional if you have any doubts or need help with the repair.