Replacing the bottom seal on an overhead door is an important maintenance task that helps improve energy efficiency, reduce outside noise, and prevent weather damage. While it may seem daunting, it can be done by most homeowners with some simple tools and by following key steps. In this comprehensive guide, we will walk through the entire process of replacing the bottom seal on an overhead door.
Page Contents
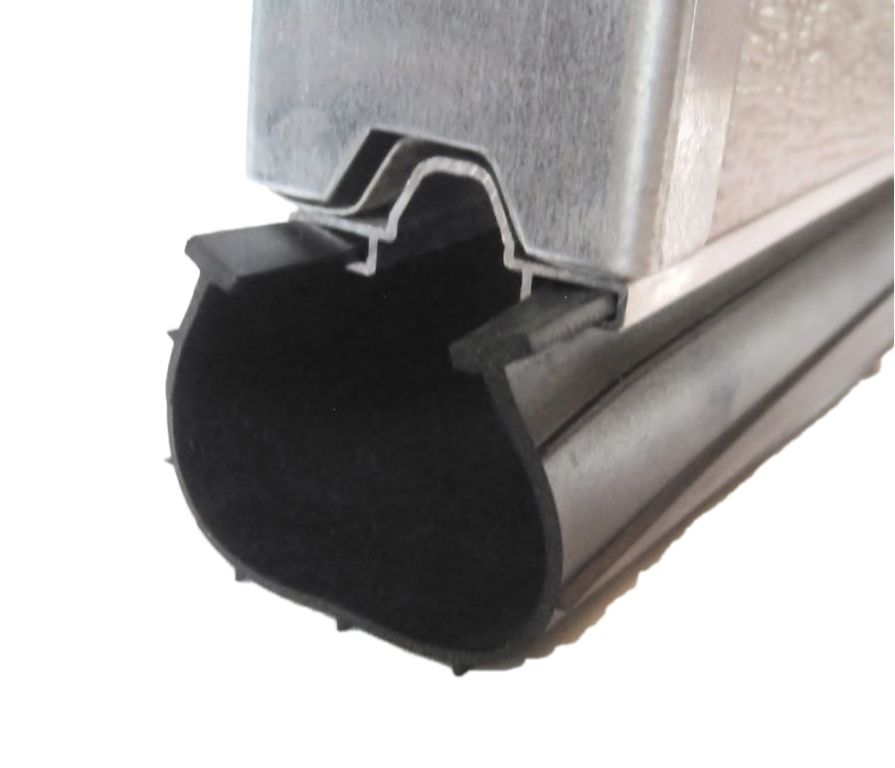
What is the bottom seal on an overhead door?
The bottom seal (also called the bottom weatherstrip) is a long strip made of vinyl, rubber, or brush material that is attached along the bottom edge of the overhead door. It serves several important functions:
- It forms an airtight seal along the bottom when the door is closed to prevent air leaks and energy loss. This helps lower energy bills.
- It blocks dirt, leaves, pests, and moisture from blowing underneath the door into the garage. This protection improves insulation.
- It acts as a noise buffer by damping sounds from the outside when the door is closed. This creates a quieter indoor space.
Over time, the bottom seal wears out from opening and closing the overhead door. Exposure to the elements causes it to dry out and crack. Gaps form along the bottom edge, allowing air, moisture and noise to pass through. Replacing a worn bottom weatherstrip with a new one will restore the door’s protective seal.
When to replace the bottom seal
Here are some signs that indicate the bottom seal on your overhead door needs replacing:
- Visible cracks, tears or gaps in the seal.
- Light visible along the bottom edge when the door is closed.
- Feeling outdoor air blowing in under the door.
- Noticing higher energy bills from heat or cooled air escaping.
- Hearing outside noise coming in under the door.
- Seeing leaves, dirt or water blown in under the door.
As a general rule, the bottom seal should be replaced every 1-2 years for best performance. Check the seal occasionally for wear and damage. It’s a quick and inexpensive fix that’s worth doing regularly.
What you need
Replacing a garage door bottom seal is an easy project. Here are the basic tools and materials you will need:
- Replacement bottom seal. Choose a replacement that is the same length as your current one. The seal should be slightly wider than the door’s bottom edge. Vinyl and rubber seals are common options.
- Hammer
- Needle nose pliers
- Measuring tape
- Scissors or utility knife
- Rags
- Pry bar
Make sure you measure the length of the current seal to buy the right size replacement. Most home improvement stores sell garage door bottom seal kits with all included hardware.
Steps to replace bottom seal
Follow these key steps to successfully replace the bottom seal on an overhead garage door:
-
Lower the door completely. This provides access to work along the full length of the bottom seal area.
-
Pry out the old seal. Slide a pry bar under the seal to pop it out of the retainer on the bottom door edge. Go slowly to avoid damaging the door. Use pliers if needed to remove any remaining staples or nails.
-
Clean the door edge. Use a rag to wipe away any dirt, debris or old caulk along the bottom. Provide a clean surface for the new seal to adhere.
-
Measure and cut the new seal. Lay it in place along the bottom to find the right length. Leave an extra 1-2 inches on each end. Use scissors to cut it to size.
-
Insert the seal into the retainer. Push the new seal fully into the bottom door retainer channel along the entire length. Ensure it sits flush with no gaps.
-
Trim excess length. Leave a 1-2 inch overlap at the ends so they butt together. Trim any extra length with scissors so it sits flush.
-
Secure the ends. Use a hammer to tap nails or screws into the ends to hold them firmly in place.
-
Test for a tight seal. Fully close the door and check for light along the bottom. Relocate any areas where the seal does not sit flush.
Take care when installing the new seal to position it correctly in the retainer channel. Test that it creates an even, consistent seal across the entire bottom edge. This ensures optimal energy efficiency and noise blocking.
Tips for easy bottom seal replacement
Here are some helpful tips to make the job easier and get the best results:
- Do the work when the door is in the down position to access the bottom seal area.
- Make sure the new seal is slightly wider than the door edge to create compression.
- Seal may have notches or holes for fasteners. Align these while inserting into the retainer.
- Ensure the seal is pressed in evenly from one side to the other.
- Join the ends together tightly so they butt up without any gaps.
- Use nails or screws to securely hold the ends in the retainer channel.
- Run a utility knife along the seal after installing to trim any sticking edges.
- Make adjustments if the seal is loose or does not sit flush in some spots.
- Clean out the bottom retainer channel periodically to ensure a good fit.
Taking your time to install the bottom weatherstrip correctly will result in an effective seal that lasts. Test operation of the door to make sure the seal compresses fully when closed.
Troubleshooting issues
In some cases, you may need to troubleshoot issues that appear after replacing the bottom seal. Here are some potential problems and fixes:
| Issue | Cause | Fix |
|---|---|---|
| Light visible under door | Gap in seal or retainer | Adjust seal to close gap |
| Seal not sitting flush | Retainer channel dirty | Clean channel before reinstalling |
| Seal falls out of retainer | Ends not secured properly | Check ends are overlapped and tightly fastened |
| Noisy door operation | Bottom seal needs lubrication | Apply silicone spray to seal |
In most cases, taking the time to adjust the seal, secure the ends properly, and ensure that it sits correctly in a clean retainer channel will resolve any issues that appear after replacement.
Conclusion
Replacing a worn out bottom seal is an inexpensive fix that can make a big difference in the performance of your overhead garage door. With some basic tools and supplies, this is a project any homeowner can tackle in about an hour or less. Just be sure to measure properly, clean the retainer channel, securely fasten the ends, and test for a tight consistent seal across the bottom edge. Taking these steps will improve energy efficiency, noise reduction, and protection from the elements. Keep an eye on the bottom seal as part of regular garage door maintenance, and replace it every year or two to keep your garage fully sealed against the weather and save on heating and cooling costs.