Sealing a barn door on a shed is an important step to help protect the interior from the elements. A properly sealed door will prevent drafts, moisture, pests, and dust from entering the shed. There are several options for sealing a barn door, depending on your specific needs, shed construction, and budget. In this comprehensive guide, we will explore the most common methods for sealing barn doors on sheds to help you choose the right solution.
Page Contents
- 1 Why is it Important to Seal a Barn Door on a Shed?
- 2 What are the Common Materials Used for Sealing Shed Doors?
- 3 How to Measure for Proper Weatherstripping
- 4 How to Install Weatherstripping on a Shed Barn Door
- 5 Tips for Installing Weatherstripping on Irregular Openings
- 6 Common Problem Areas for Weatherstripping on Shed Doors
- 7 How to Make a Basic DIY Draft Blocker for Shed Doors
- 8 Tips for Improving Overall Shed Air Sealing
- 9 Common Questions About Sealing Shed Barn Doors
- 10 Conclusion
Why is it Important to Seal a Barn Door on a Shed?
There are several key reasons you’ll want to take the time to properly seal your shed’s barn door:
- Prevent drafts – Gaps around a poorly sealed door can allow cold air to penetrate the shed in winter and hot air in summer. This makes climate control more difficult and expensive.
- Block moisture – Openings around the door frame provide an entry point for rain, snow, and excess humidity. Moisture damage can lead to rot, mold, and premature deterioration.
- Keep out pests – Rodents, insects, and other pests will take advantage of any gaps in the door framing to get into your shed and cause damage. A tight seal blocks access points.
- Reduce dust and pollen – Wind-driven dust, pollen, and other allergens can blow right through a leaky door seal into your clean shed interior.
Taking the time to seal your barn door thoroughly will pay off through lower maintenance and repair costs, improved energy efficiency, and better protection for your shed’s contents.
What are the Common Materials Used for Sealing Shed Doors?
There are many types of flexible seal materials available that can be applied to barn doors to fill gaps and create an airtight barrier. Common options include:
Weatherstripping
Weatherstripping is a classic sealing solution made of various materials shaped into long strips. It is applied around the door openings to fill gaps. Types include:
- Felt – Inexpensive wool or synthetic fibers compressed into strips.
- Foam – Made from polyurethane, foam options are lightweight and flexible.
- Vinyl – Pliable vinyl strips that resist compression and won’t degrade as quickly.
- Rubber – Strips or blades made from flexible synthetic rubber.
Caulk
Caulk is a pliable putty that comes in tubes or cans. It remains flexible when dry to seal cracks and gaps. Siliconized latex acrylic caulk is a good general-purpose option for outdoor use.
Weather Seal Tape
Special weather sealing tape has an adhesive backing that bonds to surfaces. Foam or vinyl tapes that are compressible can seal irregular gaps.
Door Sweeps
Door sweeps attach to the bottom edge of a door and have a brush or vinyl blade that presses against the threshold to block air and pests.
How to Measure for Proper Weatherstripping
Getting accurate measurements of your door opening is crucial for selecting the right weatherstripping materials and getting a tight seal. Here are some tips:
- Use a steel measuring tape – Cloth tape can stretch over time and give inaccurate readings.
- Measure widths and heights – Note the exact width and height of the door frame opening.
- Check for level and plumb – Use a level tool to identify any areas where the opening is out of square.
- Note gaps – Measure any gaps between the door and frame at corners or along edges.
- Account for closure – Factor in compression when the door is closed to get the right thickness of weatherstripping.
Having these measurements will allow you to order sufficient quantities of materials to seal the entire perimeter of the door. Consult manufacturer guidelines for compression amounts for foam and vinyl products.
How to Install Weatherstripping on a Shed Barn Door
Once you have your supplies and measurements, you’re ready to start installing. Here is a step-by-step guide:
Step 1 – Clean Surfaces
Use a broom and shop vacuum to remove any dirt, sawdust, cobwebs, and debris around the door opening. Wipe with a damp cloth. Ensure surfaces are fully dry before applying seals.
Step 2 – Apply Perimeter Seals
Cut weatherstripping to fit each side of the door frame opening. Remove paper backing and press into place along the outer edges. For compression seals, leave a small gap between ends.
Step 3 – Install Door Sweep
Hold the door sweep against the bottom of the door and mark screw holes. Drill pilot holes then attach sweep with screws. Adjust brush or vinyl blade so it just touches threshold.
Step 4 – Caulk Gaps
Run asteady bead of silicone caulk along any remaining cracked or uneven gaps, smoothing with a finger. Allow to fully cure for 48 hours.
Step 5 – Test and Adjust
Close the door and check for light visible through cracks. Reapply caulk or add additional weatherstripping as needed to address leaks.
Tips for Installing Weatherstripping on Irregular Openings
Many old shed doors have frames that are warped, sagging, or otherwise irregular in shape. This can make getting an airtight seal with conventional weatherstripping challenging. Here are some tips for dealing with irregular door openings:
- Use high density foam seals – Softer, more pliable foam can conform to uneven gaps.
- Apply self-adhesive vinyl strips – Flexible and can stick to uneven surfaces.
- Use thicker door sweeps – Allow the sweep to flatten and bend to match the threshold.
- Add wood shims – Shimming under frame edges can even out crooked areas.
- Caulk generously – Extra caulk can help bridge overly wide gaps.
Don’t force rigid strips into misaligned areas. Take the time to work the materials into the opening to get the best seal.
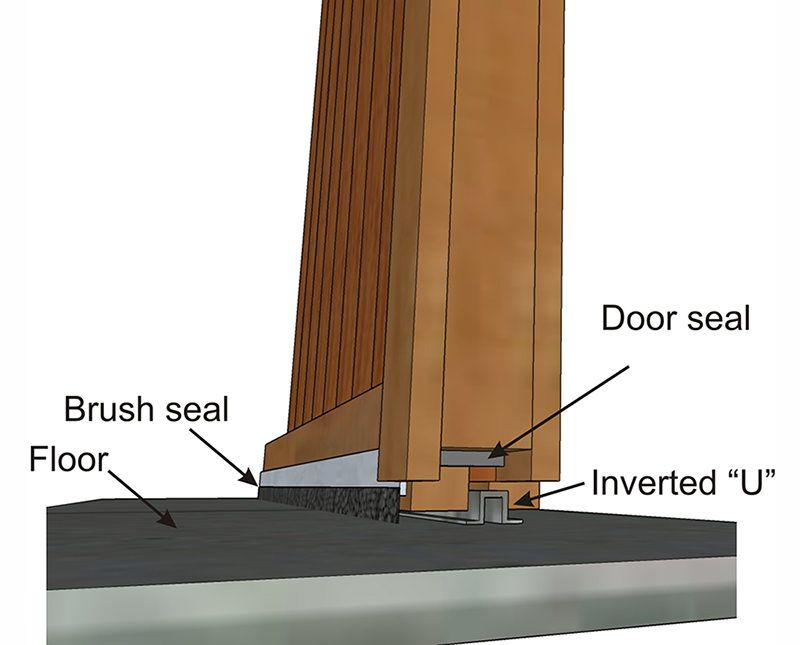
Common Problem Areas for Weatherstripping on Shed Doors
Certain parts of a shed door opening tend to allow more air leaks than others. Focus weatherstripping efforts in these key areas:
Bottom of Door
Gaps between the door bottom and threshold are a major source of drafts. A properly installed door sweep blocks this infiltration route. Make sure the sweep fully contacts the threshold.
Door Corners
The junction point of the door edges and frame is prone to air leaks as the door shifts in place. Dense weatherstripping cushions these joints.
Hinges
Hinge mortises in the door and frame can permit air to pass through into the shed. Foam or rubber hinge gaskets behind each hinge can block this path.
Handle Holes
Any openings for door handles, locks, or pull rings need sealing.Flexible silicone plugs made for this purpose can be inserted into the holes.
How to Make a Basic DIY Draft Blocker for Shed Doors
Draft blockers made of inexpensive materials are easy DIY options for sealing shed doors. Here is how to make one:
Materials Needed
- Scrap piece of 1×4 lumber, cut to width of door opening
- Staple gun with 1/2″ staples
- 3 yards of 14 oz canvas drop cloth material
- Polyester stuffing material, quilt batting scraps, or rags
Instructions
- Cut canvas into two pieces, each 3″ wider than the 1×4 board.
- Lay board at one edge of canvas. Roll canvas over board.
- Staple underside of wrapped board every 2-3 inches.
- Stuff interior tightly with stuffing material.
- Roll unstapled side over stuffing and staple to seal.
- Place draft blocker along door bottom or top edge to seal gaps.
This simple solution can provide an effective air seal for a fraction of the cost of commercial products. Make multiple blockers as needed to fill the door opening.
Tips for Improving Overall Shed Air Sealing
While sealing the door is key, you can further improve the air-tightness of your shed by addressing other common problem areas:
- Add perimeter baseboard trim – Base trim covers gaps where the floor meets walls.
- Caulk windows – Flexible siliconized acrylic caulk works well for sealing windows.
- Insulate outlets/switches – Foam gaskets prevent air from coming through receptacles.
- Seal wall penetrations – Use spray foam for pipes or wires passing through walls.
- Repair siding damage – Fix warped, loose, or missing boards to reduce air infiltration.
Combined with a well-sealed door, sealing these leakage points can dramatically reduce unwanted airflow year-round.
Common Questions About Sealing Shed Barn Doors
Let’s review answers to some frequently asked questions about weatherstripping shed barn doors:
How long does weatherstripping last?
With proper installation, most weatherstripping products will last 2-5 years on a shed door depending on materials and exposure levels. Foam tends to degrade quickest from sunlight while vinyl withstands sun and compression well.
Should I seal all 4 sides of the door?
Sealing all 4 edges of the door frame perimeter plus the door sweep is ideal to get a complete air barrier. Prioritize the bottom threshold seal if options are limited.
Can I use self-adhesive weatherstripping?
Self-stick weatherstripping provides easy installation but may not adhere well long-term, especially in hot or damp environments. Use additional fasteners for critical areas that see frequent use.
What is the best weatherstripping for uneven gaps?
For irregular gaps wider than 1/4″, a medium to high density foam seal is the best bet. It can conform to uneven openings better than rigid products.
Should I paint over weatherstripping?
Painting latex paint over door weatherstripping can reduce its flexibility and adhesion over time. Use unpainted vinyl or rubber products or cover with masking tape before painting.
Conclusion
Installing high quality weatherstripping materials around your shed’s barn door opening is one of the best ways to reduce energy loss and prevent moisture damage. Prioritize sealing the door bottom edge, hinges, and handle holes for optimal air sealing. With the right materials and proper installation, you can stop costly drafts through your shed door for years to come. Let us know if you have any other questions!