Having a finished basement is great – it provides extra living space in your home. However, noise from the main floors of your house can often transfer downstairs and disturb activities like watching TV or sleeping. Soundproofing your basement ceiling is an effective way to block noise and create a quieter basement environment.
There are several methods for soundproofing a basement ceiling to reduce noise transfer. The key steps involve adding mass, using sound-dampening materials, sealing gaps, and isolating noise flanking paths. With the right combination of techniques, you can significantly reduce noise coming through the ceiling from upstairs.
Page Contents
Why Soundproof Your Basement Ceiling?
There are several reasons you may want to soundproof the ceiling between your basement and the main floors of your house:
Block Noise from Upstairs Activities
Daily living noises like footsteps, voices, doors closing, TVs, and kids playing can easily transmit downstairs through the ceiling. Soundproofing blocks this noise transfer so the basement stays quiet.
Reduce Disturbances for Basement Activities
Whether you use your basement for sleeping, watching movies, listening to music, playing games, or entertaining guests, noise coming from upstairs can be disruptive. Soundproofing allows these activities to happen without distraction.
Improve Privacy
Noise moving between floors can affect privacy in your home. Conversations and activities can be easily overheard. Soundproofing the basement ceiling gives more privacy and quiet between floors.
Make Basement Bedrooms More Peaceful
For basement bedrooms, noise infiltration from upstairs is especially problematic when trying to sleep. Soundproofing the ceiling helps create more restful bedrooms.
How to Soundproof a Basement Ceiling
There are several effective techniques for soundproofing between basement and upper floors:
Add Mass with Drywall
Adding mass is one of the most effective ways to block noise transfer. If your basement has exposed joists, install 5/8″ or 1/2″ drywall on the underside to add mass. Use resilient channels between the joists and drywall to prevent vibration transmission. The greater the mass, the more noise will be blocked.
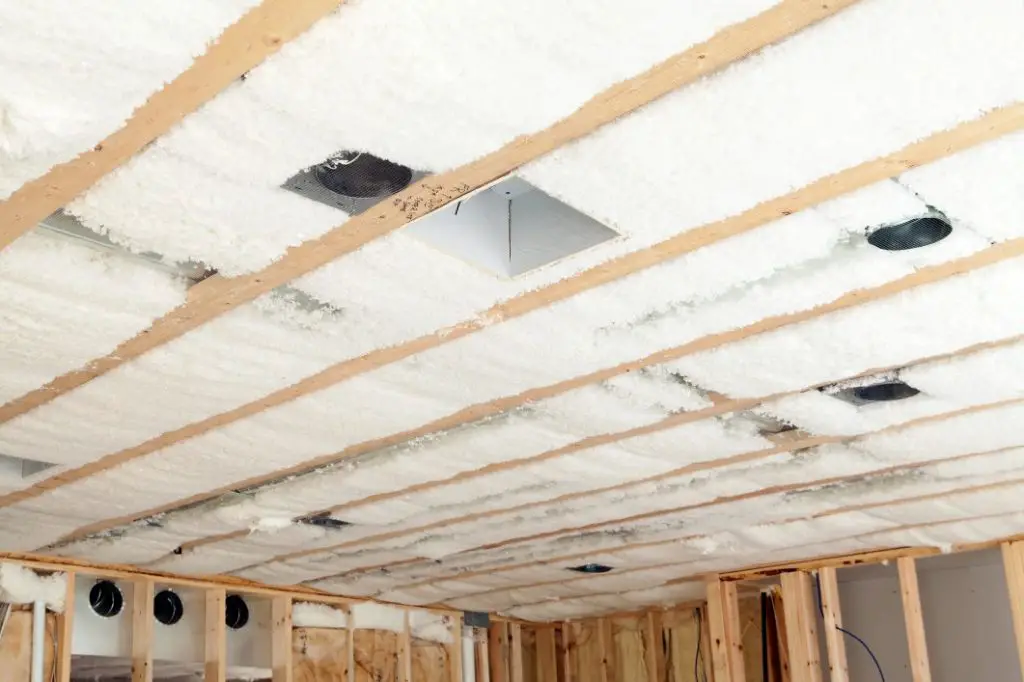
Use Soundproofing Insulation
Special soundproofing insulation like rock wool or fiberglass absorbs noise vibrations rather than transmitting them through the ceiling. Blowing dense cellulose into the joist cavities also helps dampen sound. Combine with drywall for optimal noise blocking.
Seal All Gaps and Cracks
Gaps between ceiling materials allow noise leaks. Seal all spaces with acoustical caulk or Green Glue noiseproofing sealant. Use spray foam for larger gaps before installing drywall. This eliminates potential airborne noise paths.
Isolate Flanking Noise Pathways
Noise can transfer via flanking paths like electrical boxes, ducts, pipes and ceiling light fixtures. Isolate these with soundproofing gaskets, caulk or fire-rated putty to prevent noise leakage.
Add Layers of Soundproofing Materials
Adding multiple layers of sound-absorbing materials will further dampen noise. Try adding mass loaded vinyl, MLV, in addition to drywall and insulation. Green Glue between layers also helps absorb vibration and block sound.
Hang an Acoustical Ceiling
For maximum noise reduction, hang a new acoustical tile dropped ceiling with noise reducing properties below your existing basement ceiling. This adds an extra sound-blocking layer.
Tips for Effective Soundproofing
Follow these tips to ensure your soundproofing efforts are effective:
– Seal all potential air gaps thoroughly – overlooked holes can transmit noise.
– Stagger studs or use double stud walls for greater sound blocking.
– Use quieter ventilation register grilles to reduce noise escaping.
– Add weather stripping around the basement door and coat with Green Glue.
– Float walls over the concrete rather than attaching directly to reduce vibration transmission.
– Combine several methods like drywall, insulation, MLV, and acoustical tiles for best results.
How Much Does it Cost to Soundproof a Basement Ceiling?
The cost to soundproof a basement ceiling depends on the size of your basement, chosen methods and materials, and whether you DIY or hire a contractor. On average, expect to spend $500-$2,000 or more depending on the scope. Things that add cost include drywall installation, removing parts of the existing ceiling, acoustic tiles, and hiring professional labor.
Here is a breakdown of approximate costs for common soundproofing projects:
| Project | Typical Cost |
| Install 1/2″ drywall on basement ceiling | $1.50-$2 per sq.ft (DIY) |
| Blow cellulose insulation into ceiling cavities | $1-$1.50 per sq.ft (DIY) |
| Apply Green Glue noiseproofing compound | $0.50-$1 per sq.ft |
| Install 5/8″ resilient channel | $1.50-$3 per sq.ft |
| Hang acoustic ceiling tiles | $3-$7 per sq.ft installed |
| Hire contractor for installation | $3-$6 per sq.ft |
Is it Worth Soundproofing a Basement Ceiling?
In most cases, soundproofing a basement ceiling is a smart investment. The cost is reasonable for most homeowners, especially if you DIY some of the work. A soundproofed ceiling can make a dramatic difference in reducing noise transfer between floors. This allows your basement to be used without interruption from upstairs sounds.
If you want to add bedrooms, a home theater, or office space to your basement, soundproofing is highly recommended. The small upfront cost will be worthwhile long-term for improving the function and enjoyment of your basement space. Soundproofing also increases your home’s value for resale.
Conclusion
Soundproofing your basement ceiling is one of the most effective ways to reduce noise transfer from upstairs into a finished basement space. By adding mass, sealing leaks, absorbing vibration, and isolating noise flanking paths, you can significantly quiet overhead sounds. Layering several soundproofing techniques works best for blocking everything from voices, to footsteps, to music. With some careful planning and installation, you can transform a noisy basement into a peaceful living space.