Pine is a popular wood used for furniture, flooring, and trim due to its affordability and easy workability. However, untreated pine has a light, yellowish hue that some find unappealing. Staining pine is an easy way to alter its color while still allowing the wood’s natural grain to show through. With the right staining techniques and products, you can give pine a rich, warm, natural-looking color.
Page Contents
Should You Stain Pine?
Staining is an effective method for changing the appearance of pine. Here are some of the benefits of staining pine:
- Enhances the beauty of the wood by highlighting the natural grain patterns
- Allows you to customize the color to your desired shade
- Provides protection from damage caused by sunlight, spills, and everyday wear
- Less costly than replacing with a higher-grade wood
The main downside to staining is that it requires more preparation and labor compared to painting or clear finishes. However, the work is well worth it to have furniture, flooring, or trim with a rich, natural wood appearance.
Choosing a Stain Color for Pine
The key to achieving a natural stained pine look is selecting the right stain color. Here are some color options to consider:
Light brown – A light brown stain adds subtle warmth while allowing the natural pine grain to still be visible. Light brown works well in modern, rustic, or farmhouse styles.
Golden oak – Golden oak stains give pine a rich amber tone. This versatile shade pairs nicely with various design aesthetics.
Dark walnut – For a bold, darker look, a walnut-colored stain looks elegant on pine. Keep in mind the darker the stain, the more the wood grain gets obscured.
Reddish brown – Reddish brown shades add a subtly weathered appearance to pine. This stain color fits nicely with traditional or country decor.
Gray – Gray stained pine has an understated, timeworn look. The gray highlights the wood grain in a unique way.
Choosing a Stain Finish
The finish of the stain also affects the look. Here are some top options:
- Penetrating stains – These soak into the wood and highlight the grain. Use for a natural, non-glossy appearance.
- Gel stains – Gel stains go on thick without dripping. They bring out a bolder wood grain pattern.
- Wiping stains – Wiping stains are applied then wiped to control color intensity. They offer the most color accuracy.
- Semi-transparent – Allows some of the natural wood to show through for a muted effect.
- Opaque – Opaque stains sit on top of the wood rather than absorbing. Good for drastic color changes.
For a natural look on pine, penetrating or gel stains are good options. Wiping stains also allow great control over the end result.
How to Prepare Pine for Staining
Proper prep is crucial for stain to adhere properly and achieve an even color. Follow these steps:
- Sand the wood using 120-150 grit sandpaper. Sanding opens up the wood grain so the stain can penetrate. Be sure to sand in the direction of the wood grain.
- Clean off any debris with a dry cloth followed by a tack cloth. Dust negatively affects stain absorption.
- Apply a wood conditioner following the manufacturer’s directions. Conditioning helps regulate absorption to prevent blotchiness.
- Fill any holes or imperfections with wood filler and let dry completely. Sand again lightly after filling.
- Remove all sanding dust with a vacuum and clean rag. The surface must be pristine for best results.
Proper sanding is the most important step for successful staining. Take your time to thoroughly sand the pine and make sure the surface is ultra clean before applying any stain.
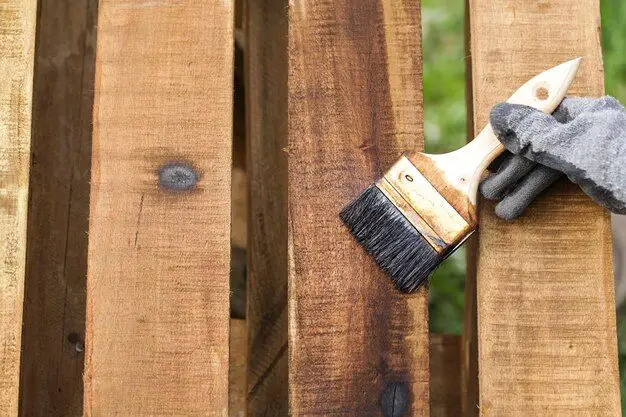
How to Apply Stain
Follow these instructions when applying the stain:
- Test the stain on a scrap piece first to ensure you like the color. Applying multiple coats will darken the color.
- Stir or shake the stain thoroughly before and periodically during application.
- Use a high quality natural bristle brush to apply a uniform coat. Apply stain in the direction of the wood grain.
- Let the stain penetrate for 5-15 minutes then wipe off any excess with a clean cloth.
- Allow the first coat to dry as directed by manufacturer. Darker colors may require overnight drying.
- Apply a second coat if desired to achieve a deeper color. Let fully dry between coats.
- Once fully dry, protect the finish with a sealer like polyurethane. Water-based is good for retaining a non-glossy look.
Applying with a quality brush and wiping off excess stain allows for a controlled, even application. Always read the manufacturer’s instructions since drying time varies by product.
Achieving a Natural Look
Here are some additional tips for making stained pine look as natural as possible:
- Stain all pieces for a project with the same products to ensure consistent coloring throughout.
- Stain both sides of wood pieces to prevent warping and moisture damage.
- Use a pre-stain conditioner to avoid splotchiness and uneven absorption.
- Choose a penetrating or gel stain to highlight the wood grain.
- Opt for a satin, non-glossy finish like a satin polyurethane for protection.
- Apply stain and top coats in the direction of the wood grain.
- Work in an area with good ventilation and adequate lighting to see the true color.
Taking your time to apply the products properly makes a big difference in achieving a smooth, natural-looking wood stain finish.
Best Pine Stain Brands
These top stain brands consistently produce quality products that look great on pine:
| Brand | Known For |
|---|---|
| Minwax | Wide range of oil-based stain colors and finishes |
| Varathane | Water-based and oil-based stains with premium quality |
| General Finishes | Water and oil-based gel stains that highlight wood grain |
| Rust-Oleum | Durable finishes and wiping stain options |
| Cabot | Penetrating oil stains ideal for exterior wood projects |
When in doubt, it’s hard to go wrong with top brands like Minwax, Varathane, and General Finishes for staining pine. Test samples of any stain before committing to a full project.
Protecting and Maintaining Stained Pine
Stain provides some protection for pine wood but an additional topcoat is recommended for the best defense:
- Apply 2-3 coats of polyurethane for interior projects. Water-based polyurethanes allow the wood grain to show through clearly.
- On outdoor projects, use an exterior grade topcoat like spar urethane. Apply up to 4 coats for maximum protection.
- Reapply topcoats every 1-2 years or as needed. Look for signs of wear, dryness, or damage.
- Dust frequently and clean with a wood cleaner to prevent dirt buildup.
- Place carpets, tablecloths, and felt pads under objects to prevent scratches.
- Avoid direct sunlight or heat sources to prevent fading and discoloration over time.
Proper maintenance and reapplication of polyurethane will help stained pine retain its natural, flawless appearance for years to come.
How to Fix Stain Mistakes
Staining can sometimes lead to blotchiness, uneven coloring, drips, or other mishaps. Here are tips for fixing common mistakes:
- Blotchy areas – Sand the blotchy sections and re-apply stain. Use a pre-stain conditioner first next time.
- Too dark – Lightly sand the surface to reduce the color intensity. Use 120-150 grit sandpaper.
- Too light – Apply an additional coat of stain to darken the area overall.
- Drips – Carefully scrape off any drips with a plastic scraper. Sand the area to feather it in, then re-stain.
- Lap marks – During application, always maintain a wet edge to prevent lap marks. Sand out any remaining marks before re-staining.
Catching mistakes early makes them easier to remedy. While frustrating, don’t worry – stain mishaps can be fixed with some careful sanding and re-application.
Conclusion
Staining is an easy way to customize the look of pine wood. With the right preparation, application, and protection, you can achieve a rich, warm, natural-looking stained pine finish. Experiment with different stain colors and techniques on test boards first. Taking your time results in a flawless, professional-looking stained pine surface that highlights the wood’s beauty.