Installing vinyl siding can dramatically transform the look of your home’s exterior. But before you can install the siding panels themselves, you need to put up starter strips along the bottom of the walls. Starter strips serve as a secure base to anchor the first row of siding. While it may seem intimidating, starting a starter strip is a straightforward process when you follow some key steps.
Page Contents
What is a starter strip?
A starter strip is a narrow horizontal strip of vinyl, metal, or plastic that is fastened along the bottom of the wall, just above the foundation. It serves several important purposes:
- Creates a straight, level base line for the siding panels
- Raises the siding slightly off the foundation for proper clearance and drainage
- Covers the unfinished edge of the bottom course of siding
- Secures the first row of siding panels in place
Starter strips typically snap or hook into the bottom “lock” edge of the siding panels. This interlocking connection anchors the panels and prevents them from lifting up. Most vinyl siding manufacturers make matching starter strips that coordinate with their siding styles and colors.
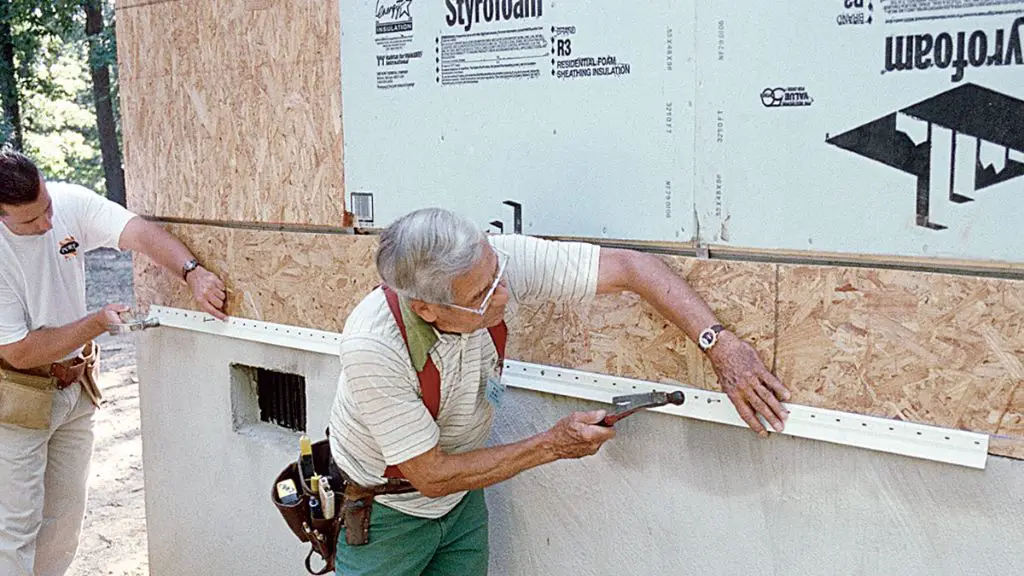
How to Install a Starter Strip
Follow these key steps to properly install a starter strip for vinyl siding:
- Make sure the wall is ready. Before starting any siding work, ensure the wall is smooth, solid, and properly prepared. Remove any old siding if present. Address any moisture issues and make repairs as needed.
- Install corner posts. Put up any outside and inside corner posts first according to manufacturer’s directions. The starter strip will butt up to the corner posts.
- Determine placement. Measure down from the bottom edge of the corner posts to find the correct height for the top of the starter strip. Allow for the panels to hang 1-2 inches below the top of the foundation for proper drainage and ventilation.
- Snap a chalk line. Use a chalk line to snap a perfectly straight, level line where the top of the starter strip will go. This line will guide your installation.
- Cut starter strips. Measure and cut strips to length as needed for each wall section. Include a few inches extra at the ends to wrap around corners.
- Drill guide holes. Drill guide holes every 16-24 inches along the chalk line. The holes should align with the nailing hem on the starter strip.
- Insert nails partially. Partially insert a nail into each guide hole, leaving the head sticking out about 1/4 inch.
- Position strip. Hook the starter strip over the nails so they fit into the nailing hem on the back side.
- Nail in place. Use a hammer to drive the nails flush into the wall, securing the starter strip in position.
- Check for level. Use a level to verify the strip is perfectly straight and level.
- Overlap corners. Where strips meet at corners, cut them so they overlap slightly for a clean look.
- Seal edges. Caulk along the top edge of the starter strip where it meets the wall. This helps seal it against moisture.
- Anchor the ends. Be sure to nail the ends of the starter strips securely to the corner posts.
Once the starter strips are installed properly, you can begin attaching the vinyl siding panels. Always follow the manufacturer’s instructions for the specific siding products you are using.
Tips for Getting It Right
Here are some helpful tips to ensure your starter strips are done correctly:
- Use starter strips made to match your siding for best results.
- Keep the starter strips as straight and level as possible.
- Leave a 1/4 inch gap between strip ends at corners to allow for expansion.
- Overlap joints by at least 1 inch and nail every 8-12 inches.
- Keep the rows flowing in the same direction around the house.
- Caulk along the top edge for maximum weather resistance.
- Double check all measurements to avoid mistakes.
Common Mistakes
Watch out for these common starter strip mistakes:
- Not leaving enough clearance under the siding above the foundation
- Allowing the starter strip to wave up and down instead of being straight
- Putting fasteners in the wrong places
- Not properly wrapping and joining strips at outside corners
- Not sealing the top edge against moisture
- Not anchoring ends of strips securely to corner posts
Taking the time to install the starter strips correctly will ensure your siding job gets off to a great start. Rushing this important first step often leads to problems down the road.
Materials Needed
Gather these supplies before starting your starter strips:
- Starter strips (vinyl, metal, or plastic)
- Matching color caulk
- Utility knife
- Hammer
- Nails
- Chalk line
- Level
- Measuring tape
- Drill with screw tip and drill bits
- Ladder or scaffolding
- Safety glasses and gloves
Always refer to the manufacturer’s installation instructions for the specific type and brand of starter strips and siding you are using.
Costs
On average, starter strips cost $0.50 to $1 per linear foot. Other factors affecting overall costs include:
- Size of the house
- Number of corners and complex angles
- Type of material (vinyl, metal, plastic, etc.)
- Specialty siding options like shakes or scallops
- Whether you do it yourself or hire a professional
Professionally installed starter strips typically range from $2 to $6 per linear foot including labor and materials. The total cost for an average single-story house might be $500 to $1500 or more depending on the variables.
Benefits
Installing starter strips for vinyl siding has many great benefits:
- Straight and level siding: Starter strips provide an even base to keep panels neat and uniform.
- Proper spacing: They establish the correct height above the foundation.
- Better drainage: Angling siding slightly down allows moisture to drain off.
- Anchor for panels: The interlock system secures panels tightly to the wall.
- More finished look: Starter strips give the bottom edge a clean, finished appearance.
- Increased longevity: Correct installation prevents sagging, warping, and water damage.
Taking the time to properly install starter strips results in a more professional, long-lasting siding application.
Conclusion
Starting a starter strip is a crucial first step in any vinyl siding installation. By snapping chalk lines, pre-drilling guide holes, fastening the strips level, and anchoring them securely, you can create an even base for your siding panels. Allowing proper clearance, sealing edges, wrapping corners, and avoiding common mistakes will lead to excellent results. With the right materials and careful attention to detail, you can achieve straight, neat siding that will stand the test of time.