Page Contents
Quick Answers
There are a few common reasons why frost-free spigots can start to leak and some simple steps you can take to stop the leak:
– Worn or damaged washers – The washers inside the spigot handle can wear out over time and need to be replaced. This is often the most common cause of leaks.
– Loose handle – If the handle is loose, it can prevent the spigot from sealing properly when closed. Tightening the handle can often fix minor leaks.
– Damaged vacuum breaker – Frost-free spigots have a vacuum breaker that allows water to drain out to prevent freezing. If this gets clogged or damaged, it can cause leaking.
– Frozen pipe – In very cold weather, if the pipe leading up to the spigot freezes, it can split and start leaking. Thawing the frozen line is needed.
– Corroded/cracked pipe – Over time, the pipe connecting to the spigot can start to corrode and develop cracks or holes that cause leaking. The damaged section of pipe needs replacing.
Steps to Fix a Leaking Frost-free Spigot
If you have a frost-free spigot that is leaking, here are the steps to troubleshoot and fix the issue:
1. Check for worn washers
The first thing to check is the state of the washers inside the spigot handle. Turn off the water supply and disconnect the hose. Then unscrew the handle and examine the washers – there will likely be 2 rubber O-ring type washers. If they are cracked, flattened, or worn, replace them with new washers of the correct size.
2. Tighten the handle
If the handle jiggles or moves when the water is on, this indicates it is loose. Turn off the water and use an adjustable wrench to tighten the handle assembly. Be careful not to overtighten. Turn the water back on and check if the leak stopped.
3. Inspect the vacuum breaker
All frost-free spigots have a vacuum breaker assembly mounted near the top. This allows water to drain out of the line to prevent freezing. Remove the vacuum breaker and inspect it for buildup, corrosion, cracks, or other damage. Clean or replace it if needed.
4. Check for frozen pipes
In cold climates, the pipe leading to the outdoor spigot can freeze in winter. This can cause water pressure to build up and split the pipe, resulting in leaks. Carefully thaw the frozen section of pipe with a hair dryer or heating pad. Then check for cracks and repair as needed.
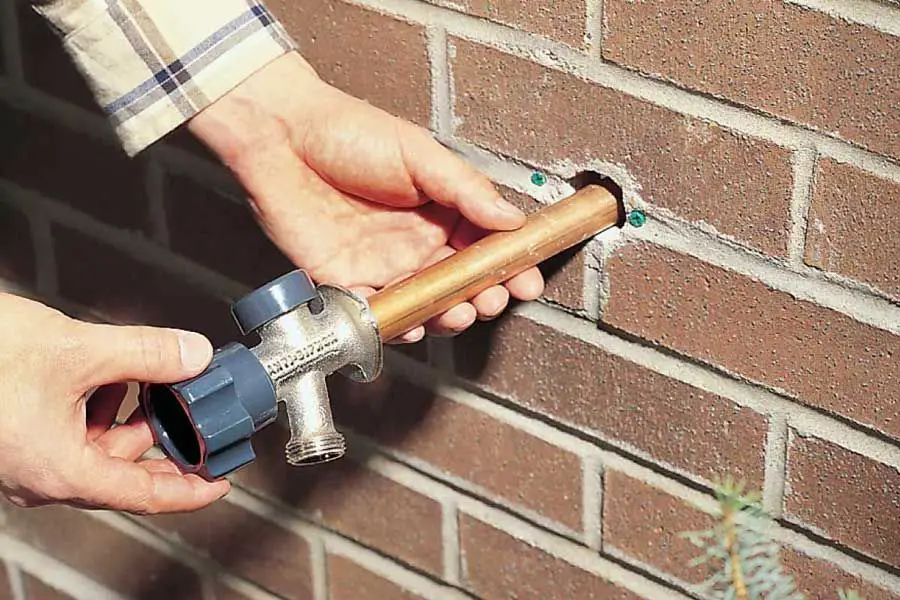
5. Replace damaged pipe section
If there are visible cracks, holes, or extensive corrosion on the pipe, this indicates it needs to be replaced. Turn off the main water supply and drain the line. Cut out the damaged section of pipe and replace with new piping using couplings.
6. Install heat tape
To prevent future freezing issues, consider installing heat tape on the pipes leading to your outdoor spigots. This will continually warm the pipes to prevent freezing and splits in cold weather. Follow manufacturer’s instructions for proper installation.
Conclusion
Persistent leaks coming from your outdoor frost-free spigot can often be repaired with some simple maintenance. In most cases, replacing the valve stem washers, tightening the handle, or replacing damaged parts of the vacuum breaker will solve the problem. For leaks caused by frozen or damaged pipes, repairing or replacing the affected sections is needed. Installing heat tape can also help prevent future freezing issues. If you are unable to determine the cause of the leak or repair it yourself, contact a professional plumber for assistance. Addressing spigot leaks quickly can prevent more extensive water damage down the line.
| Cause of Leak | Solution |
|---|---|
| Worn washers | Replace valve stem washers |
| Loose handle | Tighten handle assembly |
| Damaged vacuum breaker | Clean or replace vacuum breaker |
| Frozen pipe | Thaw pipe and check for cracks |
| Corroded/cracked pipe | Replace damaged section of pipe |
Here is a summary of the common causes of frost-free spigot leaks and the steps to fix them:
Quick Fixes
– Replace worn washers
– Tighten loose spigot handle
– Clean or replace damaged vacuum breaker
Pipe Repairs
– Thaw frozen pipes and check for cracks
– Replace sections of damaged, corroded or cracked pipe
– Install heat tape to prevent future freezing
With some basic maintenance and plumbing repairs, most leaky outdoor spigots can be fixed fairly easily. Pay attention to the leak right away before it leads to bigger problems. If you cannot determine or resolve the cause of the leak yourself, contact a professional plumber for help.