Testing the rear brake light switch is an important maintenance task that helps ensure safe operation of your vehicle’s brake lights. When you press the brake pedal, the switch activates and sends power to turn on the brake lights, alerting other drivers that you are stopping. If the switch is damaged or malfunctioning, the brake lights may not illuminate properly or at all, creating a dangerous situation. Testing the switch takes just a few minutes and requires no special tools. In this article, we will walk through the step-by-step process for testing a rear brake light switch on most vehicles.
Page Contents
What is the purpose of the rear brake light switch?
The rear brake light switch, also known as the stoplight switch, is a simple on/off electric switch that is mounted on or near the brake pedal. It is designed to activate when the brake pedal is pressed and deactivate when the pedal is released. This closes or opens the circuit that provides power to the brake lights.
The main purposes of the rear brake light switch are:
– Illuminate the brake lights when the brakes are applied to indicate to other drivers that the vehicle is stopping. This helps prevent rear-end collisions.
– Deactivate the cruise control system when the brakes are applied. This disengages the cruise control for safety when braking.
– On vehicles with automatic transmissions, the switch signals the transmission to downshift to a lower gear when braking. This provides engine braking assist when slowing down.
– May activate the brake lights for the anti-lock braking system (ABS) to work during hard braking.
So in summary, the brake light switch is a crucial safety component that activates the brake lights during braking and interacts with other vehicle systems. Checking it periodically helps ensure it is working properly.
Symptoms of a faulty brake light switch
A faulty rear brake light switch can cause the following symptoms:
– Brake lights do not illuminate at all when the pedal is pressed.
– Brake lights stay on all the time, even when the pedal is not pressed.
– Brake lights flicker or flash on and off when braking.
– Cruise control does not disengage when braking.
– Transmission may not downshift properly when braking.
– ABS or traction control warning lights come on due to inconsistent brake light circuit signal.
– Pedal feels soft or spongy due to loss of hydraulic pressure (if switch also operates a brake light failure relay).
Any of these symptoms indicate it is time to test and potentially replace the brake light switch. Driving with brake lights that are not functioning properly is unsafe and illegal in most states.
How to test a rear brake light switch
Here is a step-by-step guide on how to test a rear brake light switch:
1. Check for brake light operation
First, visually inspect the brake light operation. Have someone step on the brake pedal while you look at the lights, or place a mirror behind the car to view them. Check that all brake lights come on when the pedal is pressed. Also verify the lights shut off when the pedal is released. If one or more lights fail to operate, focus your testing on that circuit.
2. Turn on headlights
The brake lights use the same bulb filament as the taillights, so the taillights also need to be on to properly test the brake light circuit. Turn on the headlights to illuminate the taillights. Perform all further testing with the headlights on.
3. Locate electrical connector
Find the rear brake light switch connector, usually under the dashboard near the brake pedal arm. It will typically be a two-pin connector with female terminals. Identify the wire colors in the connector if possible.
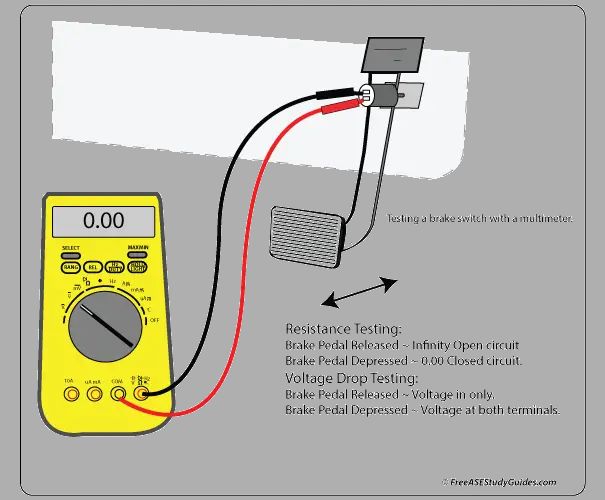
4. Test for continuity
Use a multimeter set to continuity test mode. With the brake pedal fully released, probe the switch connector terminals. There should be no continuity. Press and hold the pedal. Now there should be continuity that triggers the meter. Repeat this pressing and releasing the pedal while watching for the continuity to change.
5. Electrical tests
If the switch passes the continuity test, electrical problems in the wiring or bulbs may be at fault. Use a multimeter to test power and ground at the brake light bulb sockets with the pedal pressed and released. Consult a vehicle wiring diagram to trace circuits as needed.
6. Check brake light switch adjustment
If the switch fails testing, adjust its position on the pedal arm. Loosen the mounting nuts and slide it up or down slightly to change when it activates. Retest until proper switch engagement is achieved.
7. Replace brake light switch
If adjustment does not fix the problem, the switch will need to be replaced. They are inexpensive and widely available parts. Disconnect the connector, remove the mounting nuts, and install the new switch in reverse order. Retest operation before driving.
Conclusion
Testing the rear brake light switch takes just a few easy steps but is critical for road safety. Use the visual, continuity, electrical, adjustment, and replacement tests described to ensure your switch is working properly. Catching and fixing problems with the brake lights could prevent an accident. Be proactive about periodically checking this vital system.
Table summarizing brake light switch testing steps
| Test Step | Procedure |
|---|---|
| 1. Check operation | Press pedal and inspect lights for function |
| 2. Turn on headlights | Illuminate taillights for complete circuit test |
| 3. Locate connector | Find two-terminal switch connector |
| 4. Test continuity | Check continuity circuit opens and closes properly with pedal |
| 5. Electrical tests | Verify power and ground at light bulb sockets |
| 6. Check adjustment | Adjust switch position on pedal arm as needed |
| 7. Replace switch | If faulty, replace brake light switch with new part |
Conclusion
Testing the brake light switch takes just a few simple steps. Visually check light operation, turn on headlights, locate the switch connector, and use a multimeter to test continuity. Also check power and ground at the bulbs, adjust switch position, and replace if needed. Following this process ensures your brake lights are working properly to help avoid collisions. Stay safe on the roads by periodically testing this essential system.