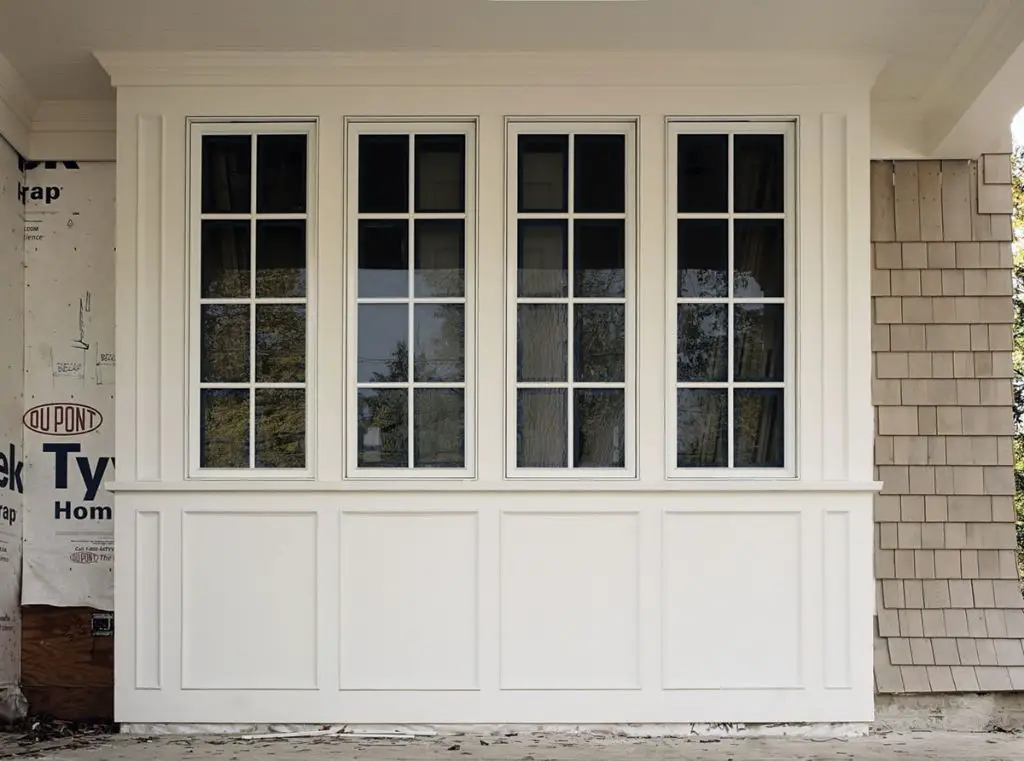
Trimming an exterior bay window refers to adding decorative molding and trim pieces around the edges of a bay window to finish it off and help it blend in with the rest of the home’s exterior. Bay windows are windows that protrude outward from the wall of a home and form a kind of “bay” inside the room. They usually consist of three separate windows joined together to form a larger curved unit.
Bay windows add space, views, and architectural interest to a home, but they also require some extra trimwork to properly finish them. Trimming a bay window includes adding head casing across the top, sill casing along the bottom, and side casings along the sides where the bay meets the wall of the house. Other trim pieces like corner posts or plinth blocks may also be added for decorative effect.
Proper trimming protects the edges of the bay window from water damage, covers any gaps or imperfections, and integrates the bay window with the design of the home. While it can seem complicated, with the right materials and a systematic approach, trimming a bay window is a manageable task for an experienced DIYer.
Page Contents
Materials Needed
Trimming a bay window requires carefully selecting the proper trim pieces and materials. Here’s an overview of what you’ll need:
– Exterior casing boards – These wide, straight boards will be used for the head casing and side casings. They are commonly made of wood, PVC, or composite materials. Cedar and redwood are naturally rot-resistant woods commonly used for exterior trim.
– Exterior sill casing – This is the trim board that will run along the bottom of the bay window. It has a slit in the underside to allow any moisture to run off.
– Corner boards – Vertical boards for the front corners of the bay window unit.
– Sheet stock – plywood or rigid foam insulation to cover the original exterior wall surface inside the bay.
– Sealant – High-quality exterior caulk to seal all trim gaps and joints.
– Galvanized nails and screws
– Wood putty
– Paint or stain to match the home’s exterior
Safety First
When working on an exterior window high off the ground, safety should always be the top concern. Here are some tips for staying safe:
– Use sturdy scaffolding or ladders secured to the house. Never lean ladders against the window itself.
– Have someone assist as a spotter to pass materials and watch your back.
– Wear protective eyewear and gloves when cutting materials.
– Use ropes or ties to secure materials so they don’t drop.
– Follow all manufacturer safety instructions for any power tools.
– Wear a dust mask when cutting wood materials.
– Keep your work area clutter free to prevent slips or falls.
– Work slowly and carefully without taking risky shortcuts.
– Never work on the window in wet, windy, or stormy conditions.
Preparation
Proper planning and preparation are key steps to ensuring the bay window trim project goes smoothly. Here are some tips to get set up beforehand:
– Carefully measure the bay window opening and each individual window to determine the exact material dimensions needed. Factor in the width of the casing boards.
– Purchase all materials along with extra to account for imperfect cuts or mistakes.
– Check for level and plumb along the edges of the bay window, and make any necessary adjustments.
– Remove any existing exterior siding, house wrap, or flashing around the bay window area.
– Fill any gaps or damage to the exterior wall surface around the bay window with appropriate sealants or patching materials. Let them cure completely.
– Make sure the bay window and surrounding wall surface area is clean and dry before beginning work.
Thorough preparation will save time and headaches once the actual trim installation begins.
Installing the Head Casing
The first piece to install is the head casing, the long horizontal board that spans the top of the bay window. Follow these steps:
– Cut the head casing board to the exact width of the bay window plus an extra 1 inch on each side for overhang.
– Apply a bead of galvanized finish nails or exterior screws every 12-16 inches along the back side of the head casing board.
– Lift or raise the casing into place centered above the bay window. Make sure it overhangs the edges equally on both sides.
– Press the casing firmly to the wall and drive in the nails or screws through the board and into the exterior wall surface.
– Caulk along the top edge of the casing board where it meets the wall. Smooth the bead with a wet finger.
– Use wood putty to fill any nail holes and let dry completely.
– Sand any rough edges smooth with 120-150 grit sandpaper.
The head casing provides an attractive finished edge along the top of the bay window.
Installing the Side Casings
The next step is to measure, cut, and install the vertical side casing boards:
– Measure the height from the bottom of the head casing to the bottom of the bay window opening. Cut side casing boards to this exact length.
– Apply galvanized finish nails or exterior screws along the inner rear edge of the boards, spaced 12-16 inches apart.
– Position a side casing along one side, overlapping the head casing by 1/2 inch. Make sure edges are flush and corners meet neatly.
– Nail or screw the board into place through the pre-drilled holes. Refrain from nailing through the head casing.
– Repeat on the opposite side with the other casing board. Miter cut the bottom corners for a neat seam.
– Caulk along the side casing edges and let dry before filling nail holes with wood putty.
The side casings neatly frame the bay window sides and will hide uneven edges of the wall surface.
Installing the Sill Casing
Now for the bottom sill casing, utilizing these steps:
– Measure the width of the bay window at the very bottom and cut the sill casing board to this length.
– Turn the board upside down so the slit opening faces downward. Apply galvanized nails or screws.
– Center and place the sill casing along the bottom of the bay window opening, pressing it into place.
– Drive the nails or screws in through the pre-drilled holes to attach the sill casing.
– Caulk along the top edge and side ends where the sill casing meets the wall.
– Use wood putty as needed to fill any nail holes. Allow to dry fully before sanding smooth.
The sill casing finishes off the bay window trim and allows for proper moisture drainage.
Adding Corner Boards
For a more finished look, you can also add vertical corner boards at the two front corners of the bay window:
– Cut two boards to extend from the bottom sill casing to 8-12 inches above the top of the bay window.
– Apply galvanized nails or screws along the inner edges.
– Position the boards flush to the corners and attach by driving the nails through the pre-drilled holes.
– Caulk along both edges of the corner boards for waterproofing. Let dry.
The corner boards provide a decorative touch and will hide any uneven corners of the bay window for a streamlined look.
Sealing Gaps
Once all trim pieces are installed, it’s important to properly seal any remaining gaps:
– Search for any gaps between boards, miter joints, or along edges where they meet the house.
– Apply exterior caulk in all these areas and smooth into place.
– Pre-fill larger gaps with silicone caulk backer rod before caulking over.
– Take time smoothing the caulk for a clean finish. Wipe away any excess.
– Let the caulk fully cure for at least 24-48 hours before the next steps. Proper sealing prevents moisture damage.
Adding Insulation
It’s wise to add insulation inside the new bay window trim to provide thermal protection:
– Cut pieces of rigid foam insulation to fit neatly inside each trimmed opening.
– Apply several small dabs of construction adhesive and press the insulation boards into place.
– Use spray foam insulation to fill any remaining gaps around the edges.
– Alternatively, stuff fiberglass insulation between the boards.
Proper insulation will prevent condensation issues and help the bay stay comfortable.
Prepping for Paint or Stain
Once constructed and sealed, the bay window trim needs to be prepped before applying protective paint or stain:
– Allow all caulk and wood putty several days to fully cure.
– Sand any rough or uneven areas of the trim boards with 150-220 grit sandpaper until smooth.
– Wipe down the entire bay window trim area with a damp cloth to remove dust and debris.
– Apply wood primer if needed to improve paint adhesion on cedar, redwood, or pine trim boards.
– Allow primer to dry fully before proceeding with paint or stain.
Proper prep prevents peeled or chipped finish coatings down the road.
Painting or Staining
The bay window trim can now be painted or stained to match the house exterior:
– For paint, apply two coats allowing proper dry time between coats. Use high quality exterior latex paint.
– For stain, apply a coat of exterior wood stain in the desired color and wipe away any excess. Add a polyurethane sealer.
– Paint or stain all trim pieces and boards to protect from weathering. Extend 2-3 inches onto the siding.
– Let the paint or stain fully cure 72 hours before exposing to elements.
– Add another coat of paint or polyurethane every 2-3 years for ongoing protection.
Adding Exterior Touches
To complete the exterior bay window trim, here are some finishing touches:
– Reinstall any removed siding or house wrap around the bay.
– Caulk along the intersection of the siding and trim boards.
– Add roofing shingles above the bay to divert water away.
– Install a decorative apex roof peak above the bay window.
– Plant flowers, shrubs or bushes below the bay window.
– Add shutters or decorative window boxes to enhance the bay.
Take time with the final exterior details to create an eye-catching finished look.
Interior Finishing
Don’t forget to complete the look by adding molding and trim inside:
– Frame the inside of the bay window with simple 1×4 or 1×6 pine boards.
– Miter cut the joints and use finish nails to attach the interior trim.
– Install a wood window sill or molding under the bay window on the inside.
– Caulk all interior trim seams for a seamless look.
– Paint or stain the interior trim to match the room.
Finishing off the interior trim gives the bay window a polished built-in look.
Conclusion
Trimming a bay window involves careful planning, safety measures, installing casing boards, sealing, insulation, priming, and painting. While it is a challenging process, the end results are well worth it, adding style, charm, and architecture to any home. With the right materials and systematic steps, you can successfully trim a bay window to match your home. Just take things slowly to ensure it’s done right. Soon you’ll be enjoying the views and sunlight from your finished bay window.