Removing a tire valve can be necessary for various reasons, such as replacing a faulty valve or changing a tire. While it may seem daunting, unscrewing a tire valve is usually a quick and straightforward process when you know the proper steps. In this article, we’ll walk through the complete process of safely unscrewing a tire valve so you can get the job done efficiently.
Page Contents
- 1 What You’ll Need
- 2 Step 1: Position the Vehicle
- 3 Step 2: Deflate the Tire
- 4 Step 3: Loosen the Valve
- 5 Step 4: Clean the Valve Seat
- 6 Step 5: Install New Tire Valve or Reattach Existing
- 7 Step 6: Reinflate the Tire
- 8 Step 7: Reinstall Tire on Vehicle
- 9 Helpful Tips for Unscrewing a Tire Valve
- 10 Signs You Need a New Tire Valve
- 11 Types of Tire Valves
- 12 Safety Tips for Working on Tire Valves
- 13 Conclusion
- 14 Frequently Asked Questions
What You’ll Need
Unscrewing a tire valve doesn’t require any fancy tools—just a few basic items:
- Tire valve tool or small adjustable wrench
- Replacement tire valve (if applicable)
- Tire sealant (if reinstalling the valve)
- Rubber gloves
- Safety glasses
A tire valve tool is specifically designed to grip and turn tire valves and can be purchased inexpensively at any auto parts store. Alternatively, a small adjustable wrench will also work. You’ll also want new rubber gloves and safety glasses to protect your hands and eyes while working.
If you’re removing the valve to replace it, make sure you have the new tire valve ready to install. And if you plan on reinstalling the existing valve, have some tire sealant on hand to ensure a proper seal when screwed back on.
Step 1: Position the Vehicle
Start by parking your vehicle on a flat, level surface and engaging the parking brake. This will make it easier to access the valve stem at the base of the tire.
Block the tire opposite the one you’re working on to prevent the vehicle from rolling. For extra protection, you can also place wheel chocks on the front and back of the opposite tire.
Step 2: Deflate the Tire
Use a tire pressure gauge to check the air pressure in the tire with the valve you’ll be removing. Note the PSI so you can refill it to the proper pressure later.
Then, use the pointy end of the valve tool (or a nail) to depress the valve stem pin at the center of the valve. This will release air from the tire.
Keep depressing the pin until the majority of air is let out and the tire is significantly deflated. But don’t completely flatten it—leave around 5 PSI so the tire maintains its shape.
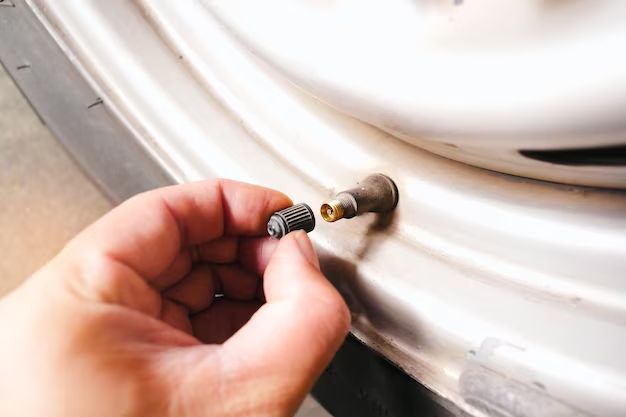
Step 3: Loosen the Valve
Put on your rubber gloves and safety glasses for protection.
Position the open end of the valve tool or wrench over the valve stem. Turn it counterclockwise to loosen the valve.
You may need to press down firmly or gently rock the tool side-to-side to break the initial seal. Take care not to strip the valve by using excessive force.
Continue turning counterclockwise until the valve is completely detached from the wheel.
Step 4: Clean the Valve Seat
With the valve removed, inspect the rubber grommet (valve seat) inside the valve hole on the wheel. Use a tire brush or towel to wipe away any dirt, sealant residue, or debris.
You want a clean surface for the new or reinstalled valve to seal against. So make sure to remove any contaminants before continuing.
Step 5: Install New Tire Valve or Reattach Existing
If you’re replacing the valve with a new one, simply screw it into the valve hole clockwise until tight. Make sure the rubber grommet is evenly aligned before tightening.
Or to reinstall the original valve, apply a fresh coat of tire sealant around the valve hole and base of the valve. This will help create an airtight seal.
Then, screw the valve back into the valve stem hole clockwise. Tighten firmly by hand or with the valve tool.
Step 6: Reinflate the Tire
With the new or reinstalled valve in place, it’s time to reinflate the tire. Use an air compressor or portable pump to fill the tire back up to the proper PSI noted earlier.
As you add air, periodically check the valve area for leaks. If you see any bubbles, stop and tighten the valve further before continuing to inflate.
Step 7: Reinstall Tire on Vehicle
Once inflated, remove the wheel chocks and carefully lower the vehicle off the jack following the manufacturer’s instructions.
Tighten the lug nuts in a star pattern with a lug wrench. Then give each lug nut a final tightening pass once the tire is resting on the ground.
Helpful Tips for Unscrewing a Tire Valve
Follow these tips for a smooth tire valve removal and installation process:
- Inspect the valve before unscrewing. Look for damage like cracks that indicate it needs replacement.
- Use penetrating oil if the valve is stuck and won’t initially loosen.
- Avoid using pliers that can strip the valve head.
- Make sure rubber grommet is aligned when reinstalling valve to prevent air leaks.
- Add soapy water after inflating to check for small leaks if needed.
- Torque lug nuts to manufacturer’s specs once tire is reinstalled.
Signs You Need a New Tire Valve
While you can often reuse an existing tire valve, there are some signs it needs to be replaced:
- Visible cracks or damage in the rubber
- Corrosion on the valve stem
- Leaking air even when fully tightened
- Valve not closing properly when tire inflates
- Tire constantly losing air and requiring refilling
Replacing a worn or faulty tire valve is quick, easy, and inexpensive. It can prevent more extensive repairs caused by tires losing air over time.
Types of Tire Valves
There are two main types of tire valves you’ll encounter:
Schrader Valves
- Also called American valves
- Most common type of valve on passenger vehicles
- Short, thick valve stems
- Pin in the center releases air when depressed
- Can be inflated using standard air nozzles found at gas stations
Presta Valves
- Primarily used on high-performance bikes and sports equipment
- Long, thin threaded valve stems
- Need adapter to inflate at gas station air pumps
- Valve core must be loosened before air can escape when depressing pin
Knowing the valve type is helpful when purchasing a replacement or using an air compressor. Schrader valves found on cars and trucks are the most common.
Safety Tips for Working on Tire Valves
Use caution when removing and installing tire valves:
- Wear OSHA-approved eye protection and gloves.
- Make sure vehicle is parked on a flat, stable surface.
- Loosen lug nuts before lifting vehicle with a jack.
- Block opposite tire to prevent rolling.
- Ensure jack is positioned on a solid frame point.
- Completely deflate tire before removing valve.
- Check for air leaks when reinflating.
- Torque lug nuts to spec when finished.
- Dispose of old valves properly to avoid environmental hazards.
Working on tires involves pressing hazards. But taking proper safety precautions will help prevent injuries or accidents.
Conclusion
While removing a tire valve may seem intimidating, it can be done quickly and safely with the right tools and technique. The basic process involves deflating the tire, unscrewing the valve, cleaning the valve seat, reinstalling a new or existing valve, reinflating the tire to proper PSI, and reattaching it to the vehicle.
Following the step-by-step instructions outlined in this article will allow you to efficiently unscrew a tire valve on your own. Just be sure to use proper safety precautions like eye protection, gloves, wheel chocks, and a jack stand. And take care when reinflating to check for leaks and torque the lug nuts to spec.
Frequently Asked Questions
What size wrench do I need to unscrew a tire valve?
You’ll typically need a small adjustable wrench or tire valve tool with an opening of around 5/8 inches to grip and turn most tire valve stems. Make sure not to use pliers that can strip the valve.
How do I keep the tire valve from leaking when reinstalling?
Apply fresh tire sealant around the valve hole and stem before screwing it back in. Tighten firmly by hand or with a valve tool and check for leaks by filling the tire with air. Tightening further or reapplying sealant can help stop small leaks.
Should I replace a rusty tire valve?
Yes, it’s recommended to replace a tire valve if significant rust and corrosion is present. Rust and debris buildup can prevent the valve from sealing properly when air is added. Replacing it removes the risk of air leaks.
What PSI should I inflate the tire to after adding a new valve?
Fill the tire back up to the manufacturer’s recommended inflation PSI listed on the tire sidewall or owner’s manual. Use a high quality, calibrated tire pressure gauge to achieve the proper pressure.
How do I know if my tire valve needs to be replaced?
Look for visible cracking or damage in the rubber, leaking air when inflated, corroded stem, inability to hold air, and the tire constantly needing refilled. Any of these signs indicate it’s time to replace the worn or faulty valve.