The zircon center finder hd900 is a helpful tool for finding studs and joists behind drywall or other surfaces. It can locate the edges and center of wood and metal studs up to 3/4″ deep. Using the zircon center finder properly allows you to hang heavy objects securely on walls and ceilings. Here’s a quick overview of how to use the zircon center finder hd900:
- Turn on the device by sliding the power switch.
- Hold it vertically against the wall and move it slowly across the surface.
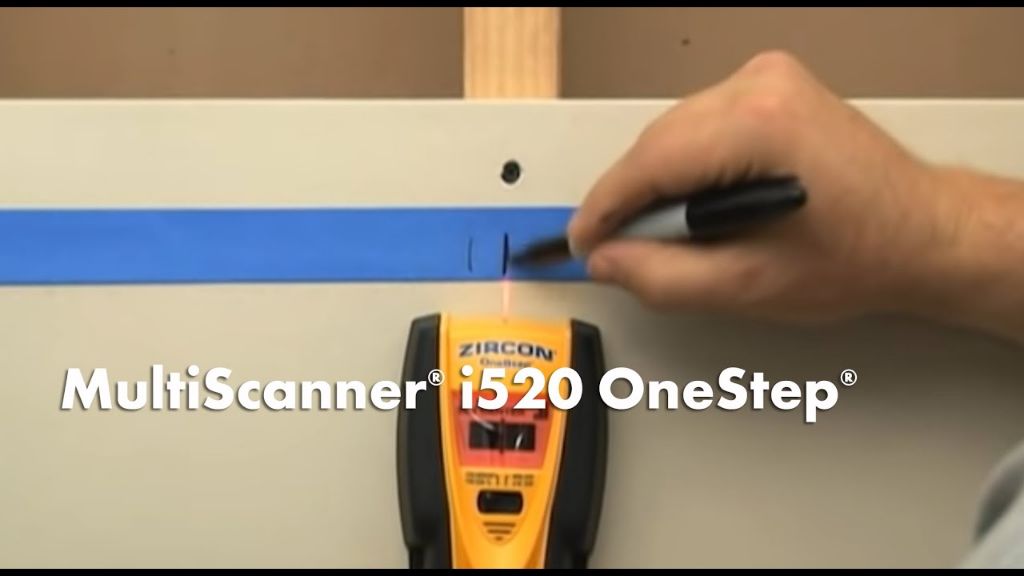
- When it detects a stud, the detection indicator lights up and it beeps. Mark this location.
- Continue sliding across the wall to find the other edge of the stud. Mark this location.
- Measure and mark the middle between the edges to find the stud center.
Now let’s go into more detail on using the various modes and features of the zircon stud finder for the most accurate results.
Page Contents
Preparing the Wall Surface
For best results, prepare the scanning surface before using the zircon stud finder. Here are some tips:
- Clear the area of any items hanging on the wall like pictures or mirrors.
- Clean the wall surface with a dry cloth to remove dirt and oils.
- Brush aside any cobwebs or dust.
Preparing the surface clears away anything that could interfere with the sensor and allows you to trace stud locations more cleanly.
Selecting the Scanning Mode
The zircon center finder has two scanning modes for different situations:
- StudScan Mode – For locating wood or metal wall studs up to 3/4″ deep. This is the standard stud finding mode.
- DeepScan® Mode – For finding the edges of wood or metal studs up to 1-1/2″ deep behind the surface. Useful for thicker surfaces.
Slide the mode switch to select either StudScan or DeepScan depending on the depth you need to scan. StudScan is suitable for most standard drywall surfaces.
Calibrating the Stud Finder
Calibrating the stud finder lets it get adjusted to the wall surface you’re scanning. It provides more reliable results tailored to that specific surface. Follow these steps to calibrate:
- Hold the unit flat against the wall in the StudScan mode with the calibration strip aligned vertically.
- Press and hold the Calibrate button until the screen indicates calibration is complete.
- Repeat this process each time you move to a new scanning surface.
Calibrating ensures optimal performance and accuracy for each unique wall surface. The finder remembers the calibration settings until you change them again.
Locating Stud Edges and Center
Now you’re ready to start locating studs behind the wall. Here is the scanning process:
- Hold the zircon stud finder flat against the wall and slide it slowly across the surface.
- When it detects a stud edge, it beeps and lights up the “StudEdge” indicator. Mark this location.
- Keep sliding across the wall until it beeps and lights up “StudEdge” again for the other edge. Mark this spot.
- Measure halfway between your two marked edges and mark the stud center.
- The stud center marks indicate where you can safely drill or install mounting hardware.
As you scan, keep the finder flat and slide it steadily in one direction. Don’t move too quickly or you may miss the stud edges.
The display shows arrows pointing in the direction of the nearest stud edges as you scan. You can use these like a compass until the finder locks on to the edge and beeps.
Using the Zircon’s Features
The zircon center finder hd900 has a few helpful features and settings to optimize scanning:
- SpotLite® Pointer – This acts like a flashlight shining right where you’re scanning to clearly mark stud locations.
- ACTTM (Auto Correcting Technology) – ACT automatically adjusts the sensor scanning depth if needed when transitioning between different surfaces.
- WireWarning® Detection – Alerts you if electrical wires are behind the scanning area which could be hazardous to drill into.
- Battery Saving Mode – After 5 minutes of inactivity, it powers down to conserve batteries.
Use these features to enhance your scanning and safely locate studs. The SpotLite Pointer and WireWarning can help avoid potential hazards.
Tips for Accurate Scanning
Follow these tips when using the zircon stud finder for the most reliable results:
- Calibrate on each new surface before scanning.
- Move steadily across the wall at a moderate pace.
- Keep the unit flat against the wall as you slide.
- Rescan areas if the results seem inconsistent.
- Confirm stud locations by testing several points along the edges.
Proper scanning technique helps avoid errors and ensures you find the actual stud locations. Take your time tracing studs for best accuracy.
Interpreting the Results
Learn how to interpret the stud finder’s indicators and alerts:
- The StudEdge lights signal stud edges.
- Arrows point towards the nearest stud edge.
- Multiple beeps indicate the wire warning alarm.
- No beeps and no lit arrows mean no studs detected.
Use the display indicators combined with your marked edges to map the stud layout. Get to know these signal meanings to improve your scanning.
Locating Joists in Ceilings and Floors
While designed for walls, you can also use the zircon stud finder to locate joists in ceilings and floors:
- Switch to DeepScan mode to scan deeper through ceilings.
- Scan ceilings in both directions to cross-check results.
- For floors, scan in several spots and triangulate the joist layout.
- Mark joist edges and center just like when finding wall studs.
Adapt the same stud scanning technique to trace ceiling and floor joists. The deeper penetration of DeepScan mode helps find joists through thicker surfaces.
Conclusion
The zircon center finder hd900 makes locating hidden studs and joists easy. Follow the scanning process to mark edges and center points. Use the features and modes to optimize results. With practice, you can become skilled at tracing stud layouts behind walls and ceilings quickly. Understanding the indicator lights helps you interpret results accurately. Consistent scanning technique and properly calibrating will give you reliable, hassle-free results.