Venting a range hood through the ceiling is a common way to remove smoke, grease, odors, and moisture from above your stove. Proper ventilation is important for kitchen air quality and prevents grease buildup. While ceiling venting requires some planning and work, it can be a DIY project if you have basic construction skills.
Page Contents
Can You Vent a Range Hood Through the Ceiling?
Yes, you can vent a range hood through the ceiling. This is a common venting method used in many kitchens. Some benefits of venting up include:
- Gets smoke, grease and odors farther away from your cooking space
- Creates a shorter, more direct venting path in many home layouts
- Is less visible than exterior wall venting
- May be the only venting option based on your home’s construction
Venting through the roof requires ductwork running vertically to the ceiling and roof. This should be as straight and short as possible. The duct needs an exit point through the roof, requiring proper flashing and sealing.
How to Vent a Range Hood Through the Ceiling
Here are the basic steps involved in ceiling venting a range hood:
- Choose the location – Pick a stove location with a clear path vertically through ceiling and roof above.
- Install ceiling and roof penetrations – Cut openings for the ductwork and seal properly.
- Run ductwork – Run metal ductwork from the range hood location vertically up through ceiling and roof.
- Install the hood – Mount and install your range hood and connect to ductwork.
- Seal and test – Seal all connections and test airflow.
Proper planning is crucial before cutting any ceiling or roof openings. Measuring duct length and choosing the right CFM blower motor are also key. Let’s look at each step in more detail:
1. Choose the Range Hood Location
The ideal location for venting through the ceiling has:
- A clear, straight vertical path up through ceiling and roof
- Minimal duct length and elbows
- Accessible attic space above to install ductwork
- Proximity to existing electrical and venting
Try to choose a location with less than a 15-20 foot vertical duct run. Measure the distance from stove top to ceiling, ceiling to attic, and attic to roof. Minimize any horizontal duct sections.
2. Install Ceiling and Roof Penetrations
Once you’ve chosen the best location, create openings in the following areas:
- Ceiling – Cut a hole in the ceiling at least 8 inches larger all around than your duct size.
- Attic – Create an opening in the attic flooring/ceiling below the roof vent location.
- Roof – Cut and frame a hole in the roof for the ductwork to exit. Size depends on your ducting.
The duct will need firestop spacers and attic insulation around it. Seal openings with roof flashing, roof sealant and attic insulation to prevent air leaks.
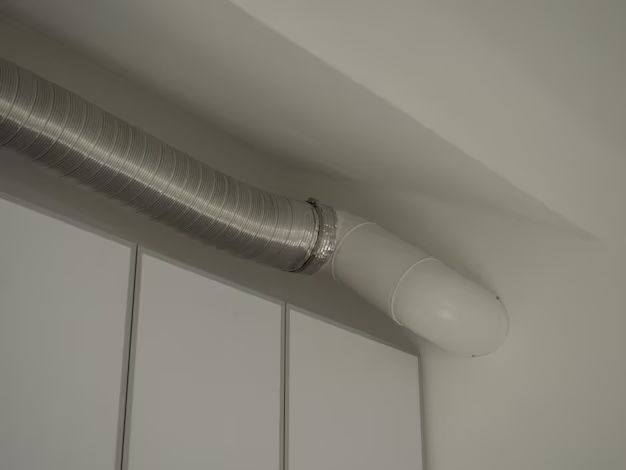
3. Run Ductwork Vertically
With access holes cut, it’s time to install the metal ducting from range hood to roof cap. Galvanized sheet metal is commonly used.
- Run ducting from hood location to ceiling hole using elbows as needed. Use 45 degree elbows if possible.
- Use firestop spacers to seal space between living space and attic.
- Run duct through attic to roof opening. Slope it slightly upward.
- Attach duct to round or rectangular roof cap.
- Use duct tape or screw collars to seal all duct connections.
Maintain at least 2 inches clearance from combustible materials. Support ducting above ceiling and in attic to prevent sagging.
4. Install the Range Hood
With ducting in place, you can install your range hood:
- Mount hood chassis using provided fasteners and instructions.
- Attach ducting to hood outlet using duct tape or clamp.
- Optional – Install hood insert or decorative hood cover.
- Connect wiring according to manufacturer instructions.
Carefully align range hood to ceiling duct opening during mounting. Follow all instructions from the manufacturer.
5. Seal, Insulate and Test Airflow
The final steps involve sealing, insulating and testing:
- Seal all duct connections and openings with duct tape and/or clamps.
- Wrap ductwork in attic with insulation to prevent condensation.
- Power on the range hood and test blower and lights.
- Verify adequate airflow by holding a tissue or paper below hood intake.
- Seal any remaining leaks found during testing.
Your range hood venting is now complete! Proper airflow is key to venting performance. Consult duct sizing guides to match your CFM needs.
Duct Sizing Guidelines
Choosing the right duct size prevents airflow problems. Follow these general duct sizing guidelines:
- Use 6″ round ducts for range hoods up to 400 CFM airflow.
- Use 7-8″ ducts for high-powered 600-1200 CFM range hoods.
- Use rectangular ducts equivalent to round size – 6″ round equals 5″ x 10″ rectangular.
Factors like duct type, length, and elbows can require adjusting duct size. Smooth metal ducts are most efficient. Get the duct size right to maximize airflow.
Through the Roof Venting Tips
Follow these tips for optimal through the roof venting:
- Minimize duct length and elbows.
- Slope ducts upward 1/4 inch per foot.
- Support ductwork 16 inches horizontally or 4 feet vertically.
- Use approved firestop spacers when passing through floors and ceilings.
- Wrap ductwork in unconditioned attic spaces with insulation.
- Seal all openings and duct joints thoroughly.
- Choose rooftop vent caps that prevent backdrafts.
Proper routing, sealing, and insulation ensures your ducting performs efficiently. Preventing leaks and cold air condensation are important.
Calculating Vent Length
To calculate total vent length:
- Measure vertical length from range hood to ceiling.
- Add vertical length from ceiling to roof exit point.
- Include any horizontal lengths required.
- Add equivalent elbow lengths of 5-10 feet per elbow.
Compare total calculated length vs. manufacturer’s recommended maximum vent length. Try to keep total length under 25 feet with minimal elbows.
For example, if duct length is:
- Range hood to ceiling: 6 feet
- Vertical in ceiling: 1 foot
- Attic vertical to roof: 4 feet
- 2 x 90 degree elbows
The total vent length is:
- Vertical lengths: 6 ft + 1 ft + 4 ft = 11 feet
- Elbow equivalents: 2 x 5 ft = 10 feet
- Total vent length = 11 ft + 10 ft = 21 feet
Try to keep total length under 25 feet if possible.
CFM Requirements
Choose a range hood blower motor with adequate CFM airflow for your kitchen size:
| Kitchen Size | Recommended CFM |
|---|---|
| 100 sq.ft. or less | 250-350 CFM |
| 101-150 sq.ft. | 350-450 CFM |
| 151-250 sq.ft. | 450-550 CFM |
| 251-350 sq.ft. | 550-650 CFM |
| 350+ sq.ft. | 650+ CFM |
Higher airflow is needed for larger kitchens. Duct size, length and hood blower speed affect airflow. Getting the right CFM rating is critical.
CEF vs. CFM for Range Hoods
CEF (capture efficiency) and CFM (cubic feet per minute) are important range hood specifications:
- CFM – Measurement of airflow velocity pushed by the fan motor.
- CEF – Measures how effectively the hood captures and contains cooking fumes.
High CFM doesn’t always mean a hood will perform well. CEF factors like hood size, shape, and proximity to the cooktop also impact grease and smoke capture.
Look for a range hood with both high CFM for air movement and a CEF of at least 75% for containing cooking contaminants.
Conclusion
Venting a range hood through the roof is a great option for many homes. While it requires planning and installation work, the benefits of improved ventilation are worth it.
Follow proper duct sizing, seal all connections, and maximize the short and straight duct run for best performance. Insulate ductwork to prevent condensation. Testing for adequate airflow is also critical.
With some carpentry skills and attention to detail, venting a range hood through the ceiling and roof can be a very DIY-friendly project resulting in a cleaner, fresher kitchen.