Wiring a 3-way switch with a dimmer allows you to control the brightness of lights from multiple locations in a room. While it may seem complicated, it’s actually quite straightforward once you understand the basic wiring setup. In this guide, we’ll walk through the entire process step-by-step.
Page Contents
What is a 3-Way Switch?
A 3-way switch has three terminal screws – the common (common), the traveler (traveller), and the ground (earth). The common terminal is connected to the hot wire coming from the circuit breaker or fuse box. The traveler terminals connect to the traveler wires that run between the switches.
3-way switches allow you to control a light fixture from two separate locations, like at the top and bottom of a staircase or at either end of a hallway. The traveler wires ferry the electricity between the two switches.
What is a Dimmer Switch?
A dimmer switch allows you to vary the brightness of a light fixture by reducing the electrical voltage. Most dimmers use a rotary knob or sliding control to adjust the light level. There are many types of dimmers suitable for different bulbs like incandescents, LEDs, and fluorescents.
By combining a dimmer with a 3-way switch setup, you can easily control lighting from multiple locations – turning it on/off from one end and adjusting brightness from the other.
How to Wire a 3-Way Switch with a Dimmer
Wiring a 3-way dimmer involves installing one standard 3-way switch and one 3-way dimmer. The dimmer can go on either end – it doesn’t matter which switch you designate as the primary. Here are the steps:
- Turn off power at the circuit breaker/fuse box.
- Remove the existing switches and disconnect all wires. Carefully label each wire as you remove it.
- Identify the common wire attached to one switch (usually black). Connect it to the common terminal on the dimmer using a wire nut.
- Connect the other two traveler wires to the traveler terminals on the dimmer and the standard switch.
- Connect the ground wires to the ground screw or wire on both switches.
- Mount the dimmer and standard switch in their boxes. Ensure wires are tucked neatly into each box.
- Turn the power back on at the circuit breaker/fuse box. Check that both switches work correctly to control the lights.
Follow basic electrical safety precautions whenever working with home wiring. Use caution and turn off the power to avoid getting shocked.
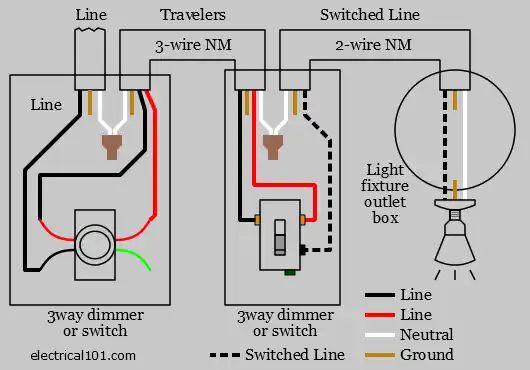
3-Way Switch Dimmer Wiring Diagram
Here is a wiring diagram showing the connections for a 3-way switch with a dimmer:
| Location | Component | Connections |
|---|---|---|
| Switch Box 1 | 3-way dimmer | Common terminal: Hot wire (black) |
| First traveler terminal: Traveler wire 1 (red) | ||
| Second traveler terminal: Traveler wire 2 (white) | ||
| Ground terminal: Ground wire (green) | ||
| Switch Box 2 | Standard 3-way switch | Common terminal: Light fixture hot wire (black) |
| First traveler terminal: Traveler wire 1 (red) | ||
| Second traveler terminal: Traveler wire 2 (white) | ||
| Ground terminal: Ground wire (green) |
The hot source wire (black) connects to the common on the dimmer. The two traveler wires (red and white) connect to the travelers on both switches. The ground wire (green) connects to both switch ground terminals. The light fixture hot (black) connects to the common on the standard 3-way switch.
Troubleshooting 3-Way Switch Wiring Problems
If you have wired a 3-way dimmer and are having issues, here are some common problems and solutions:
Light Not Turning On
- Check circuit breaker or fuse – reset if tripped.
- Ensure power wire is connected to dimmer common terminal.
- Verify traveler wires are connected securely to both switches.
- Confirm light hot wire is connected properly at second switch.
Light Flickers
- Check wire connections – redo any loose wires.
- Check if bulbs are compatible with dimmer switch.
- Dimmer may be faulty – replace dimmer if issue persists.
Light Only Works From One Location
- Traveler wires may be crossed – reverse wires if necessary.
- Traveler wire came loose – reconnect wire to switch terminal.
- Defective switch – test switches and replace faulty one.
Brightness Adjustment Not Working
- Verify dimmer switch is installed, not a regular 3-way.
- Check if bulbs are dimmable – replace with compatible bulbs.
- Test dimmer function with a compatible bulb.
- Faulty dimmer – replace defective dimmer switch.
3-Way Dimmer Switch Options
There are several good dimmer switches to choose from for 3-way wiring. Here are some top options:
Lutron Maestro
- Wide dimming range – dims as low as 5% brightness.
- Slide up/down or tap on/off controls.
- Works with LEDs, incandescents, halogens.
- Available in 8 colors – glossy and matte finishes.
- 10-year warranty.
Leviton Decora
- Lets you preset lighting levels.
- LED locator light for visibility in the dark.
- Rocker switch on/off and dimming controls.
- Dims most bulb types including fluorescent.
- Matches Decora-style wall plates.
GE UltraPro
- Three-way slide dimmer controls.
- Dims halogen, incandescent, LED, and CFL.
- Push pad on/off switch.
- Built-in air gap switch disconnect.
- 5-year limited warranty.
3-Way Dimmer Installation Costs
Installing a 3-way dimmer switch will typically cost $150 to $300. The labor costs are the biggest expense, not the parts themselves. Getting an electrician to wire the dimmer can take 1-3 hours at $50-$100 per hour. The dimmer and standard 3-way switch cost $10-$30 in total.
DIY vs Electrician Costs
If you’re comfortable working with house wiring, you can install a 3-way dimmer yourself and save on labor costs. However, if you have any hesitation about your electrical skills, it’s safer to hire a pro electrician to handle it. They can ensure it’s wired properly and avoid any safety risks.
On average, electrician installation costs will be $150-$200 for a straightforward 3-way lighting circuit. DIY installation just involves the cost of the parts themselves, typically under $50 total.
Factors Affecting Installation Cost
Several factors can increase the cost of installing a 3-way dimmer switch:
- Whole home rewiring: If all of the wiring needs to be replaced, costs can jump into the thousands.
- New switch boxes: Adding new boxes and conduits for wiring will add labor time.
- Difficult access: Switch boxes in cramped spots or far from power source can complicate wiring.
- Outdated electrical panel: Upgrading the main service panel to add a new circuit costs $1,000-$2,000.
- Extra switches: Adding dimmers to more than 2 switches increases materials and wiring time.
Simple, straightforward 3-way switch installations or replacements will be on the lower end of the typical price range. Complex projects or large scale rewiring jobs will cost substantially more depending on the details.
DIY 3-Way Dimmer Switch Installation
With some basic tools and safety precautions, a DIYer can handle installing a 3-way dimmer switch. Follow these steps:
Tools Needed
- Voltage tester – to confirm wires are dead before handling
- Screwdrivers – flathead and Phillips head
- Wire strippers
- Wire cutters
- Wiring staples or cable clamps
- Electrical tape
Safety Tips
- Turn OFF power at the circuit breaker before starting.
- Verify wires are de-energized with a voltage tester.
- Work carefully and methodically – don’t rush.
- Double-check all connections before restoring power.
- Only work on small wiring projects if you feel capable.
- Call an electrician if you have any concerns about wiring safely.
Installation Steps
- Turn off circuit breaker supplying power to the switches.
- Open the switch boxes and disconnect all wires.
- Confirm power is off with voltage tester.
- Connect wires to new dimmer and switch as shown in diagram.
- Mount the dimmer and switch into the boxes.
- Organize wires neatly with staples/clamps.
- Install switch faceplates and mounting screws.
- Turn circuit breaker back on to restore power.
- Test switches to confirm dimmer is working properly.
Take care working inside switch boxes – the metal edges can be sharp. Keep wires organized as it makes troubleshooting much easier if needed.
Conclusion
Installing a 3-way dimmer switch is a relatively straightforward DIY electrical project. Following basic safety procedures and the wiring diagram will allow you to setup 3-way dimmer control over lighting in your home. Pay close attention to connecting the travelers and common wires to the proper switch terminals. With some handy skills, you can avoid the electrician labor charges and gain customized control over your lighting.