Replacing wood siding on a house can be a big project that requires careful planning and preparation. While it may seem daunting, it is very doable for an experienced DIYer. Here is an overview of what’s involved so you know what you’re getting into before taking on a wood siding replacement project.
Page Contents
Evaluate the Existing Siding
The first step is to thoroughly examine the existing wood siding to determine if replacement is necessary or if repairs may suffice. Look for rotting, cracking, warping, and other signs of deterioration. Probe the wood with a screwdriver to check for soft spots. Inspect around windows, doors, joints, and bottom edges where water damage is most likely. Use a moisture meter to detect areas of excess moisture.
If the siding is generally in good shape, you may be able to get by with patching or spot replacement of damaged boards. This is a much simpler and less costly option compared to a full siding replacement. But if more than 20-30% of the siding needs repair, it’s usually better to go ahead and replace all of it for a consistent look.
Choose New Siding Material
Once you decide to fully replace the siding, your next step is to select a material. Here are some of the most common options for wood siding:
- Cedar – Provides a beautiful, natural look. Offers good insulation. More expensive than other woods.
- Redwood – Also attractive and insulating. Comparable cost to cedar.
- Pine – Affordable option. Requires regular staining/painting.
- Engineered wood – Made from wood particles/fibers. Low maintenance. Mimics look of real wood.
Consider factors like your budget, how much maintenance you’re willing to do, and what look you want when choosing new boards. Talk to siding specialists to weigh the pros and cons of each material for your particular home.
Obtain Accurate Measurements
You’ll need to precisely measure all surfaces being covered to determine how much new siding to purchase. Measure the height and width of each wall section. Account for features like windows, doors, and trim that won’t be covered by siding. Add up the totals for the square footage of each wall section. Purchase boards in lengths that will efficiently cover the wall heights with minimal seams and cuts. Having accurate measurements ensures you don’t buy too much or too little siding.
Prepare the Walls
Proper prep work is crucial for successful siding installation. Start by completely removing the existing boards along with any trim, fixtures, or old flashing. Inspect the uncovered wall for any needed repairs. Seal gaps, replace rotted areas, and ensure the walls are smooth and even. Brush on a coat of exterior primer to create a fresh surface for the new siding to adhere to.
Next, install house wrap across the entire surface to protect against moisture intrusion. Carefully tape and seal seams and edges. Then attach furring strips horizontally across the walls to create a nailing base. Make sure strips are spaced according to the manufacturer’s specifications for your siding. The wall is now ready for the new boards.
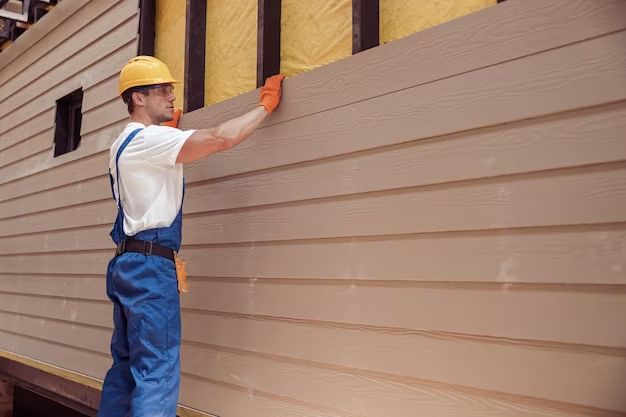
Install the New Siding
Finally, it’s time for the big task – putting up the new siding. Cedar and redwood boards usually start at the bottom edge. Leave a gap at the bottom for ventilation, and work upward in tight overlapping rows. Stagger seams between rows. Pre-drill holes and nail into the furring strips. Work slowly and methodically for the best looking results.
Other types of wood siding use interlocking panels or shingles installed from top to bottom. Follow specific manufacturer instructions for proper installation. Make clean trim cuts around windows, doors, and roof lines. Install siding carefully under eaves to provide sufficient overhang.
Take your time, and don’t force boards that don’twant to fit. Cut precisely for a tight construction. Follow good safety practiceswhen using power tools, ladders, and working at heights.
Finish With Trim and Caulking
The finishing touches complete the siding job. Reinstall corner boards, fascia, and other trim pieces using finish nails. Caulk around windows, doors, joints, and seams with a high-quality exterior caulk. Paint or stain the new siding if desired. Properly maintaining the finish will help your fresh siding last.
Cost to Replace Wood Siding
Replacing wood siding is a big investment for any homeowner. Here are some general cost estimates:*
| Siding Material | Cost per Sq.Ft. |
| Pine siding | $3-7 |
| Cedar siding | $7-13 |
| Redwood siding | $9-15 |
| Engineered wood siding | $5-11 |
*Costs do not include prep work, disposal, labor if hiring out, and other costs beyond the siding itself.
DIY or Professional Replacement?
Tackling a siding replacement yourself can save thousands of dollars in labor costs. But this is an extensive, demanding project best suited for skilled DIYers who are comfortable working at heights.
Hiring a professional siding company ensures the job gets done properly with less risk of mistakes. The work crew will have the right tools and experience with tricky parts like working around windows and doors. Just be prepared for a hefty price tag.
Benefits of DIY Replacement
- Significantly lower cost
- Satisfaction of completing major home project yourself
- Customize to your preferences
- Learn useful home improvement skills
Benefits of Hiring a Professional
- Experienced crews do work quickly and correctly
- No need to rent tools or set up equipment
- Professionally finished look
- Warranties on workmanship
- No risk of injury from working at heights
Conclusion
Replacing wood siding is a major undertaking but certainly doable for an ambitious DIYer. The key steps include assessing the existing siding, choosing a material, prepping the walls, installing new boards carefully, and adding trim details. With proper planning, patience, and safety precautions, you can successfully transform the exterior of your home. Hiring a professional crew is another option but will add significantly to the cost. Determine whether you have the skills, time, and budget for a DIY siding replacement project.