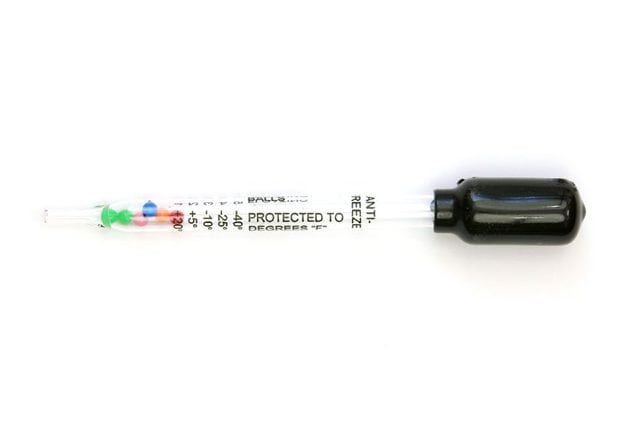
An antifreeze tester is a tool used to test the freezing point and effectiveness of antifreeze or coolant used in internal combustion engines. It typically consists of a clear tube with a cap on top and a number of plastic balls of varying densities floating inside the tube. The way it works is that when a sample of antifreeze is poured into the tube, the balls will sink until they reach the point where the density of the antifreeze solution matches their own density. This allows the freezing point of the antifreeze to be determined based on which balls sink and which float. The more balls that sink, the lower the freezing point.
Page Contents
- 1 Purpose of an Antifreeze Tester
- 2 How an Antifreeze Tester Works
- 3 Recommended Number of Balls
- 4 Impact of Too Few Balls
- 5 Benefits of More Balls
- 6 Maximum Practical Number of Balls
- 7 Recommended Ball Sizing and Spacing
- 8 Material Choices for Balls
- 9 Quality Control During Manufacturing
- 10 Reading and Interpreting Results
- 11 Troubleshooting Inaccurate Readings
- 12 Conclusion
Purpose of an Antifreeze Tester
The main purpose of an antifreeze tester is to allow quick and easy testing of antifreeze to ensure it provides adequate freeze protection. By determining the freezing point, you can confirm that the antifreeze concentration is sufficient for the climate the vehicle operates in. Some key reasons to use an antifreeze tester include:
– Ensure antifreeze meets manufacturer specifications – Most vehicles require a 50/50 mix of antifreeze and water, which should freeze around -34°F. The tester verifies you have the proper concentration.
– Avoid frozen coolant damage – Driving with weak or old antifreeze can lead to cracked radiators, damaged engine blocks, and failed water pumps from ice expansion. Testing prevents these expensive repairs.
– Identify improper mixing – Accidentally diluting the antifreeze with too much water reduces freeze protection. The tester makes improper mixes obvious.
– Diagnose coolant system leaks – Losing antifreeze through leaks results in a weaker solution over time. Regular testing finds these dilution issues early.
– Prevent wintertime breakdowns – Testing the antifreeze before winter arrives can reveal if you have adequate protection for cold temperatures and avoid being stranded.
So in summary, the antifreeze tester is a simple, inexpensive tool that allows regular testing to catch cooling system issues early and avoid the serious damage frozen coolant can cause. It provides peace of mind that your antifreeze is working as it should.
How an Antifreeze Tester Works
Antifreeze testers utilize the different densities between pure antifreeze, pure water, and antifreeze/water mixes to determine the freeze point. Here is an overview of how they work:
– The balls are calibrated to float at specific antifreeze concentrations and freezing points. The lowest density balls will float even in pure water, while the highest density balls require nearly pure antifreeze to float.
– When a sample is added to the tester, the balls will sink until they reach neutral buoyancy at the density equal to the antifreeze mix. The balls that float up indicate the solution density and freezing point.
– More balls sinking equals higher density and lower freezing point due to higher antifreeze concentration. With pure water, only the one or two lowest density balls will float.
– The base of the tube is marked with the freezing point each ball corresponds to. Matching the floating balls shows your solution concentration and freeze protection level.
– Better testers have more balls calibrated closely across the typical range of 30°F to -50°F. This allows more precise readings.
– Light ballasts may be used to help the balls align properly to their calibrated densities as they float. This improves accuracy.
So in summary, the increasing density of the balls allows them to float at specific gravity levels matching the antifreeze solution concentrations needed to reach certain freeze points. It is a simple but effective analog indicator.
Recommended Number of Balls
When looking at different antifreeze testers, you will notice some have as few as 5 balls while higher quality models can have 10 or more balls. But how many balls are actually required to provide reasonably accurate results?
Here are some guidelines for the ideal number of balls:
– At minimum, there should be one ball that floats even in pure water to indicate freezing point above 32°F.
– There should be a ball calibrated to float at the specified antifreeze protection level. For a typical 50/50 mix this would be a ball that floats around -34°F.
– At least 3-4 balls should cover the range of 40°F down through the specified protection level. This allows you to monitor if the solution is becoming diluted over time.
– Another 3-4 balls floating below the specified protection level will indicate if you have added too much antifreeze and exceeded the required concentration.
– For precise readings, having balls calibrated for every 2-3 degree increment through the full range is best. This requires 9-12 balls in total.
– Too many balls crowded together reduces clear readability. Avoid testers with much more than 12 balls unless they cover an expanded range.
So for most purposes, an antifreeze tester with 9-12 properly calibrated balls is recommended. This balances precision across the typical range with ease of reading. The best testers have 1-2 balls across the range of common freeze points.
Impact of Too Few Balls
Antifreeze testers with only 5-7 balls can still provide general guidance on freeze protection level, but there are some downsides to having too few balls:
– Readings may only show major changes rather than gradual dilution over time. Small concentration changes will not be apparent.
– The freezing point readings can only be approximate between the limited calibration points. Exact concentrations are difficult to determine.
– With few points across the range, differentiating close readings becomes less certain and accurate.
– There may not be adequate coverage at the critically important specified protection range to warn if you are near minimum levels.
– Consistency between readings can suffer with fewer calibrated reference points to align to.
– Diagnosing improper mixing is harder without balls spaced closely across the range to pinpoint concentrations.
While antifreeze testers with only a few balls can still provide general guidance, it is better to choose a model with at least 9-10 balls for consistent and reasonably precise testing. The extra gradations help improve monitoring of changes over time.
Benefits of More Balls
Increasing the number of balls in an antifreeze tester to 10-12 or more can provide these benefits:
– Much greater reading precision with balls calibrated in tighter 2-3 degree increments. Gives clear indication of any concentration changes.
– At least 3 balls floating across the critical specified protection range improves accuracy. Catching dilution is easier.
– Full coverage from 0°F down through typical -50°F range leaves no gaps. Problems at any point are immediately obvious.
– Easier to diagnose improper mixing and topping off with denser coverage across the range. No misses between sparse balls.
– More reference points makes reading consistency better between tests. Minimizes variance in readings.
– Enables monitoring coolant condition even with expanded protection additives. Will indicate with lower freezing points.
– Provides greater resolution for diagnosing problems. Can pinpoint small losses of antifreeze over time.
– Works better across wide temperature swings. More balls maintain better spacing as liquid expands and contracts.
While costlier, antifreeze testers with larger numbers of balls deliver significantly better precision and utility for critical cooling system maintenance. The broader calibration ranges and denser ball spacing are worth the extra investment.
Maximum Practical Number of Balls
While more balls improve performance, there is a point where too many balls packed together creates problems:
– Range coverage becomes excessive. For standard antifreeze, testers rarely need to measure below -50°F freezing points.
– Balls calibrated in 1 degree increments start becoming difficult to visually differentiate and lose meaning.
– Packing in too many balls reduces the float height differences between them. Harder to read which are up vs. down.
– Makes it hard to align the balls at consistent spacing. Ballast weights may be needed.
– With balls crowded together, accuracy is harder to validate and calibrate during manufacturing.
– Excess balls increase cost and complexity without significant benefit.
Considering these factors, the maximum practical number of balls for standard antifreeze testers is around 15-18 balls covering a range of 0°F down to around -50°F. This balances optimized small gradations and float height with reading clarity.
Further balls only become useful in extended range testers measuring down well below -50°F for special very low temperature coolant mixes. But for conventional antifreeze, 15-18 balls represent the useful maximum.
Recommended Ball Sizing and Spacing
In addition to the number of balls, proper sizing and spacing is important for readable accuracy:
– Balls should be as large as possible while fitting space constraints. Larger balls are easier to visually differentiate. Optimal size is typically 3/4″ to 1″ diameter.
– Some size variance between lowest and highest density balls allows easier reading. But generally avoid more than 1/4″ difference.
– Ballast weights may be needed to keep spacing consistent and prevent bunching as density changes.
– Ideal vertical spacing is at least 1 ball diameter. This allows each one to float independently.
– Horizontal spacing should allow balls to align in a straight vertical row for easiest reading.
– For wide tubes, balls may need confinement rings to keep proper horizontal alignment and spacing.
– Tube internal width should only exceed ball diameter by 1/8″ to 1/4″ maximum. Minimizes side movement.
Properly sized and spaced balls are crucial for smooth operation and easy visibility as they float at different levels. Following these best practices improves the functionality and user experience of reading an antifreeze tester.
Material Choices for Balls
Antifreeze tester balls must float at precise densities to indicate freezing points accurately. The material used to make the balls is crucial for proper calibration and performance. Here are the key material options:
– Plastic polymers – Lowest cost but limited density range. Can absorb water over time and change calibration. Not ideal for precision.
– Glass – Very consistent density and impervious to liquids. However, more fragile and expensive to manufacture precisely.
– Stainless steel – Allows very precise density control. Non-reactive and durable. One of the best options but carries higher cost.
– Coated base metals – Using affordable base metals like iron or copper coated in enamel paint or epoxy resin prevents corrosion and allows controlled densities.
– Ceramics – Dense ceramic material resists water absorption and allows excellent calibration control. Very rugged as well. Costs more than plastics but less than steel balls.
– Tungsten alloys – Highest density balls for low temperature calibration must use expensive tungsten material. Required for extreme range testers.
For most standard-range antifreeze testers, coated base metal or ceramic balls offer the best performance for the money. They balance affordable manufacture with precision density calibration and durability. This gives the most reliable and consistent freeze point readings over time.
Quality Control During Manufacturing
To produce accurate and reliable antifreeze testers, stringent quality control during manufacturing is essential:
– Ball density measurement – Must gravimetrically verify precise densities match specifications needed for freeze point indications.
– Ball diameter consistency – Diameter must be uniform to enable smooth orientation and spacing in tube. Variations affect readings.
– Coating integrity – Any coatings on base metal balls must be checked for proper coverage with no gaps exposing the core material.
– Freeze point validation – Use reference antifreeze solutions to confirm readings match calibrated densities through full range.
– Assembly – Visual standards should confirm balls align properly in the tube with smooth freedom of movement.
– Leak testing – Completed testers must be leak tested to avoid concentration changes during use.
– Packaging – Secure packaging maintains calibration by preventing density changes during shipping.
Following detailed protocols for density verification, leak testing, freeze point validation, and more ensures each antifreeze tester provides accurate readings that technicians can trust. Rigorous quality control results in a reliable tool.
Reading and Interpreting Results
Using an antifreeze tester properly is important for accurate results. Here are some best practices:
– Fill the tube from the bottom up, allowing air to escape out the top. Eliminates bubbles affecting readings.
– Bleed off any excess sample above the top ball. Excess liquid can cause it to float incorrectly.
– Allow all balls to stabilize for 1-2 minutes after filling. Let them orient to their calibrated buoyancy levels.
– Hold the tube vertically and avoid tilting or agitating after filling. Keep balls stable.
– Read ball levels horizontally. Identify the lowest floating ball to determine freeze point level.
– Double check if the lowest ball seems to bob unevenly. May indicate calibration issue.
– Disregard any balls sticking above their normal position. Look for consistent ball levels.
– Drain and thoroughly rinse tester after each use to maintain calibration. Leftover liquids can contaminate.
Taking the time to properly fill, read, and clean the tester ensures you get accurate results you can trust to make maintenance decisions. Consistent testing technique improves reliability.
Troubleshooting Inaccurate Readings
While antifreeze testers are generally reliable when properly maintained, inaccurate or erratic readings can occasionally occur due to:
– Contaminated sample – Dirt, oil, or other contaminants can change fluid density and cause incorrect readings.
– Worn or damaged balls – Can change calibrated densities. Inspect for chips, cracks, scrapes, or deformation issues.
– Corroded balls – Plain steel balls can corrode over time. Use coated or stainless steel balls.
– Absorption of water – Plastic balls absorb moisture and change density. Metal or ceramic balls are better.
– Leaks – Small leaks in the tube seal can dilute the sample and alter results. Ensure cap seals tightly.
– Blocked vent holes – Trapped air due to clogged vent holes may allow balls to float too high.
– Misaligned balls – If confined too tightly, balls may not space properly and read wrong densities.
– Sediment buildup – Can prevent balls from floating freely. Clean tester thoroughly between tests.
– Improper filling/reading – Wrong technique skews results. Follow proper steps.
– Out of calibration – Ball densities can shift over time. May require recalibration by manufacturer.
By checking these potential issues and using the tester properly, you can minimize incorrect readings and consistently get reliable data on antifreeze condition.
Conclusion
An antifreeze tester is an essential tool for monitoring the freeze protection of engine coolant over time. The ideal tester should contain at least 9-12 plastic, ceramic, or coated metal balls calibrated in approximately 2-3 degree increments across the full range of typical antifreeze densities. This allows precise readings to detect any dilution issues. Balls should be sized for visibility and spaced properly with alignment aids to enable accurate visual reading of the freeze point based on the lowest floating ball. Rigorous manufacturing quality control and consistent user technique following proper filling and reading steps will result in reliable operation. With the right antifreeze tester and proper usage, fleet maintenance personnel can easily ensure cooling systems are protected against freeze damage during cold weather.