Properly installing the plumbing for a double sink drain requires careful planning and execution. Doing it right the first time will prevent leaks, clogs, and other problems down the road. Here is a step-by-step guide on how a double sink drain should be plumbed.
Page Contents
Assessing the Sink and Drain Locations
The first step is to assess the location of the two sinks and plan where the drains will go. Consider the following:
- Measure the distance between the two sink drain holes underneath the sink. They should be 16-18 inches apart to allow room for the drain assembly.
- Determine if the drain holes are centered or offset. Offset drain holes will require an offset drain kit.
- Decide if the drains will route downward through the floor or tie into an existing waste line under the sink.
- Make sure there is enough room under the sink for the drain connections and P-trap assemblies.
Proper planning of the drain positions will make installing them much easier.
Drain Kit Options
There are two main types of drain kits used for double sink drains:
- Standard double sink drain kit – This kit is used when the sink drain holes are centered 16-18 inches apart. It includes a double sink drain body, tailpieces, P-traps, and pipe fittings.
- Offset double sink drain kit – For sink drains that are offset side-by-side, an offset kit allows the drains to tie together off-center under the sink. It includes an offset drain body and other fittings.
The appropriate drain kit for the sink configuration must be purchased before starting the installation.
Installing the Drain Body
Once you have the drain kit, the first step is installing the drain body:
- Apply plumber’s putty around the drain body flange to seal it to the sink.
- Insert the drain body into the sink drain holes from above and tighten the mounting nut below to secure it.
- Wipe away any excess putty squeezed out around the flange.
This seals the drain body to the sink. Make sure it is centered correctly before tightening completely.
Connecting the Tailpieces
With the drain body in place, you can now attach the tailpieces:
- Slide a rubber gasket over the end of each tailpiece and insert them into the drain body outlets.
- Slide a metal washer over each gasket and hand tighten the coupling nuts to secure the tailpieces.
- Make sure at least 1/2″ of tailpiece extends below the drain body.
The tailpieces carry wastewater from the sinks into the main drain piping. Getting them properly aligned is crucial.
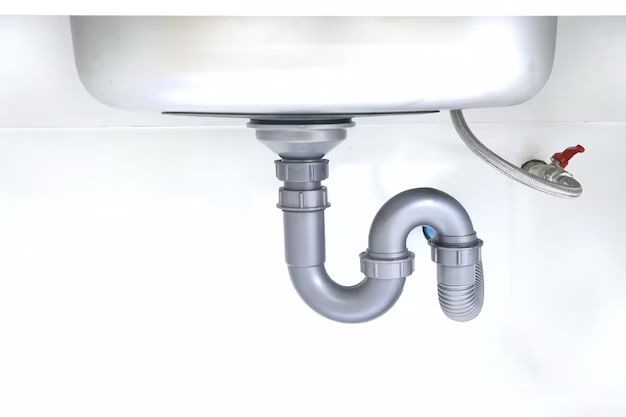
Installing the P-Traps
Now you can install the P-traps:
- Slide a slip nut over the lower end of each tailpiece, followed by a friction ring.
- Apply thread sealant to the trap adapter and thread it into the trap arm.
- Slide the end of the tailpiece into the trap adapter and tighten the slip nut.
- Use elbows and pipe to connect the trap arms to the main drain lines.
The P-traps prevent sewer gases from entering while allowing waste to pass through. Be sure the trap arms are angled correctly.
Connecting the Drains
To join the two sink drains together:
- Use a T-fitting to connect the tailpiece outlets under the drain body.
- Or use a continuous waste kit to join the P-traps under the sink.
The drains are now integrated before tying into the main waste line.
Tying Into the Main Drain
Finally, connect the drain assembly to the main waste line:
- Use straight pipes, elbows, and fittings to route the drain piping to the existing sink drain or waste line.
- The ideal slope is 1/4 inch per foot.
- A vent may be added to the drain line to prevent gurgling.
With everything tightened and leak-tested, the double sink drain is complete!
Tips for Installation
Here are some helpful tips to get a proper installation:
- Read the manufacturer’s instructions for assembly and measure once, cut twice.
- Support pipes with hangers to avoid sagging.
- Use pipe dope or Teflon tape to seal threaded joints.
- Test for leaks before finishing the under-sink plumbing.
- Insulate drain pipes to prevent condensation.
Taking it slow and double checking your work is key for installing a double sink drain.
Drain Options Comparison Table
| Drain Option | Pros | Cons |
|---|---|---|
| Standard Drain Kit |
|
|
| Offset Drain Kit |
|
|
| Continuous Waste |
|
|
Conclusion
Installing the plumbing for a double sink drain requires using the right components and careful assembly. With proper planning and allowing enough room under the sink, the job can be completed by a knowledgeable DIYer in most cases. Following the manufacturer’s instructions for the drain kit is highly recommended. If tackling this project for the first time, hiring a professional plumber may be worth the cost to ensure it is done correctly. With quality materials and workmanship, a double sink drain setup should provide many years of trouble-free service.