Step flashing is an important component in protecting vulnerable areas of a roof from moisture damage. Proper installation of step flashing is crucial to create a weather-tight barrier along transitions and roof penetrations. In this article, we will walk through the key considerations, tools, and step-by-step process for installing step flashing correctly.
Page Contents
What is Step Flashing?
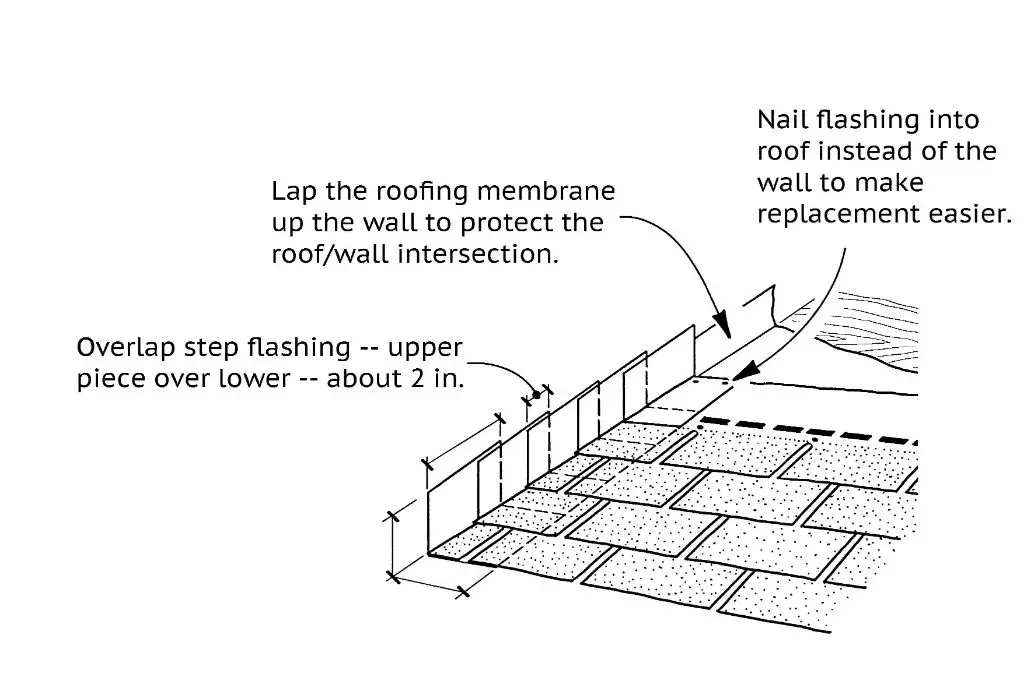
Step flashing refers to small pieces of metal flashing installed along a roof line or around penetrations like chimneys in a stepped pattern. Each piece overlaps the piece below it to allow water to flow down the roof while preventing it from getting underneath the roofing material.
Step flashing provides protection along transitional planes on a roof, including:
- Where a vertical wall meets a sloping roof plane, such as at a chimney or skylight
- At roof-to-wall intersections along gabled ends
- Along the sides of dormers where they meet the roof
The stepped design allows each piece to overlap the one below it in shingle-like fashion so that water is shed down and over the steps. The end result is a staggered, watertight barrier that prevents moisture infiltration while still allowing the roof to expand and contract.
Benefits of Step Flashing
There are several important benefits that step flashing provides:
- Prevents leaks: The overlapping stepped design blocks water from being driven under the roof covering during rain and snowmelt.
- Accommodates movement: The segmented pieces can shift slightly to accommodate expansion and contraction of the roof covering.
- Aesthetically pleasing: Step flashing provides a finished look along transitions and penetrations.
- Versatile: Step flashing can be used in many areas, including along walls, dormers, chimneys, skylights, and more.
- Durable: Quality metal step flashing is corrosion and rust resistant, providing long-lasting protection.
For these reasons, building codes require the use of flashing in vulnerable areas. Step flashing provides an efficient, versatile solution.
What Type of Metal Works Best?
Step flashing is commonly made from galvanized steel, copper, or aluminum:
- Galvanized steel: Galvanized steel is steel coated with zinc to prevent rusting. It provides an affordable, durable option for step flashing.
- Copper: Copper offers excellent corrosion resistance and a long lifespan. It has a distinctive copper or green patina finish.
- Aluminum: Aluminum is lightweight, rust-proof, and withstands weather extremes. It is more expensive but lasts longer than galvanized steel.
The type of metal used depends on factors like budget, life expectancy, and aesthetics. Galvanized steel offers the most economical choice for most homes. Copper and aluminum provide longer-lasting protection. Consult local building codes for any restrictions on flashing material.
Step Flashing Design
Proper step flashing design is important to direct water down and over the steps without gaps. Here are key design guidelines:
- Flashing width: Each piece should be 4-8 inches wide to provide adequate overlap.
- Height: The vertical height of each flashing piece should be at least 4 inches.
- Overlap: Each piece should overlap the one below by 2-4 inches.
- Angle: The ideal angle is 45 degrees off the horizontal to facilitate water runoff.
- Placement: Step flashing should be installed at all roof transitions and protrusions as required by code.
- Material thickness: 26 gauge metal or thicker provides optimal durability and weather-resistance.
- Sealant: Non-corrosive sealant should be used between pieces to create a water-tight barrier.
Following proper design guidelines ensures that the step flashing will effectively protect the roof from moisture damage.
Prep Work
Proper prep work must be completed before installing step flashing:
- Inspect the roof line that will receive the flashing. Look for any damaged or warped areas that need to be corrected.
- Make sure the roof and transition area are clear of old caulk or sealant remnants so that the new flashing will adhere properly.
- Remove any existing shingles or roof materials as needed to expose at least 4 inches of vertical roof deck where the flashing will be installed.
- If possible, install step flashing before laying roof shingles to allow proper layering.
- Measure and cut step flashing pieces to the appropriate lengths before carrying them onto the roof.
Taking time to properly prep helps ensure that step flashing is installed successfully.
Tools and Materials Needed
Having the right tools and materials on hand will make the flashing installation process easier and safer:
- Metal step flashing pieces
- Galvanized roofing nails
- Non-corrosive sealant (silicone or polyurethane caulk)
- Utility knife
- Tin snips
- Hammer
- Tape measure
- Carpenter’s square
- Chalk line
- Safety equipment (harness, ropes, boots, etc.)
You’ll also need any equipment needed to access the roof safely, such as a ladder or scaffolding. Ensure that all tools are secured so they don’t slide off the roof while working.
Installation Steps
Installing step flashing properly involves careful attention to detail. Follow these key steps:
- Mark layout lines: Snap horizontal and vertical chalk lines where flashing will be installed to guide placement.
- Cut the first piece: Cut the first piece of step flashing to overlap roof line by at least 4 inches vertically and horizontally.
- Set first piece in place: Slide the first piece up under the upper shingles so at least 4 inches is underneath. Make sure the bottom edge aligns with chalk line.
- Fasten in place: Secure the top corner and bottom edge with roofing nails into the roof deck. Do not overdrive the fasteners.
- Apply sealant: Apply non-corrosive sealant along the top edge that will be overlapped.
- Install overlapping piece: Slide the next piece up under the upper shingles so it overlaps the piece below by 2-4 inches. Fasten in place through both pieces.
- Repeat stepping: Continue cutting and installing pieces in stepped pattern until transition is flashed.
- Seal edges: Apply sealant along both side edges where flashing meets roof and sidewall.
Watch a video tutorial for a great visual guide to the proper step flashing installation sequence and techniques.
Common Mistakes to Avoid
Avoid these common missteps when installing step flashing:
- Not overlappping pieces enough – At least 2-4 inches overlap is needed between each piece to provide a watertight barrier.
- Leaving gaps between flashing and roof – The flashing should press tightly against shingles with no gaps.
- Forgetting sealant – Sealant is essential to prevent moisture entry along flashing edges.
- Incorrect fastener placement – Fasteners should anchor both pieces without excess play in the metal.
- Overdriving fasteners – This can distort the flashing and cause leaks.
- Incorrect metal thickness – Flashing that is too thin can bend and warp over time.
Taking care to install step flashing correctly will protect against these mistakes.
Tips for Success
Here are some tips to help ensure step flashing is installed successfully:
- Work slowly and methodically for best results.
- Use chalk lines and measure carefully for straight, even steps.
- Always keep safety top of mind when working on a roof.
- Wear gloves when handling metal to avoid cuts from sharp edges.
- Seal any unused spike or anchor holes to prevent potential leaks.
- Consider soldering flashing joints for optimal water-tightness (requires skill).
- Inspect work from the ground and inside attic when done to check for gaps.
- Get certified if doing roof work professionally since proper flashing is code required.
Conclusion
Installing step flashing correctly is an important process that protects vulnerable areas on a roof from moisture damage. Following the proper design guidelines, using quality materials, taking careful prep steps, and installing the flashing meticulously ensures the roof will shed water properly. Taking the time to install step flashing well is a smart investment that safeguards roof integrity for the long run.