Building an enclosure for your trash cans serves several purposes. First, it keeps your garbage out of sight and contained in one area, improving the aesthetics of your home. Trash enclosures also help deter animals from getting into your garbage. In addition, a proper enclosure will help reduce odors and keep your cans upright and in place.
Constructing a simple enclosure for your trash and recycling bins is a relatively easy weekend DIY project. The main considerations when building a trash enclosure are size, materials, and placement. This article will provide step-by-step instructions on how to build a basic wooden enclosure for standard residential trash and recycling bins.
Page Contents
Planning Your Enclosure
Before starting your project, take some time to plan out your enclosure. Here are some key factors to consider:
Size
Measure the height, depth, and width of your trash and recycling bins to determine the interior dimensions needed for your enclosure. Be sure to account for any handles or other protruding parts on the bins. Also allow sufficient clearance above the bins – at least 6 inches – so the lids can open fully.
For the exterior size, allow at least 1 foot of clearance around the bins on all sides. This provides sufficient room to maneuver the bins in and out. A good standard exterior size for a single bin is 4 feet wide by 3 feet deep by 4 feet tall. Adjust accordingly if building an enclosure for multiple bins.
Materials
Wood is an ideal material for building a trash enclosure. Pressure-treated lumber is durable and weather-resistant. Some possible wood options include:
– 2x4s or 2x6s for the frame
– 5/8-inch or 3/4-inch plywood for the walls
– Cedar or redwood boards for slats or shingles
Other potential materials are vinyl or composite fencing, bricks, concrete blocks, or metal panels.
Placement
Determine the best location to place the enclosure. Some guidelines:
– Near your home for convenient access
– Away from doors, windows, patios, or walkways
– Not too far from the curb or alley for waste collection
– Level ground if possible
Check with your city about any regulations for trash enclosures. Some homeowners’ associations may also have restrictions.
Design and Aesthetics
Consider the overall look and style. Some options:
– Simple square or rectangle shape
– Shed-style roof
– Trellis panels for an open airy feel
– Lattice wrapping for greenery to grow on
– Coordinate color with home exterior
Gather Supplies
Once you determine the size and design of your enclosure, make a list of the required building supplies and materials. Here is an overview of the basic components:
Lumber
– Posts: 4×4 inch for corners, 2×4 inch for walls
– Headers & sills: 2×4 or 2×6 inch
– Wall framing: 2×4 inch studs
– Plywood or boards for walls
– Shingles, slats, lattice (optional)
Hardware & Fasteners
– Galvanized nails or exterior wood screws
– Hinges and latch for gate
– Corner brackets for frame
Concrete & Gravel (optional)
– Fast-setting concrete mix
– Gravel or crushed rock
Paint & Stain (optional)
– Exterior primer & paint or wood stain
– Paintbrush & roller
Tools Needed
– Circular or miter saw
– Power drill and drill bits
– Level
– Tape measure
– Shovel
– Safety equipment (gloves, eye protection, etc.)
Purchase all materials and supplies before starting your project. Consult the steps below to determine lumber dimensions and quantity needed.
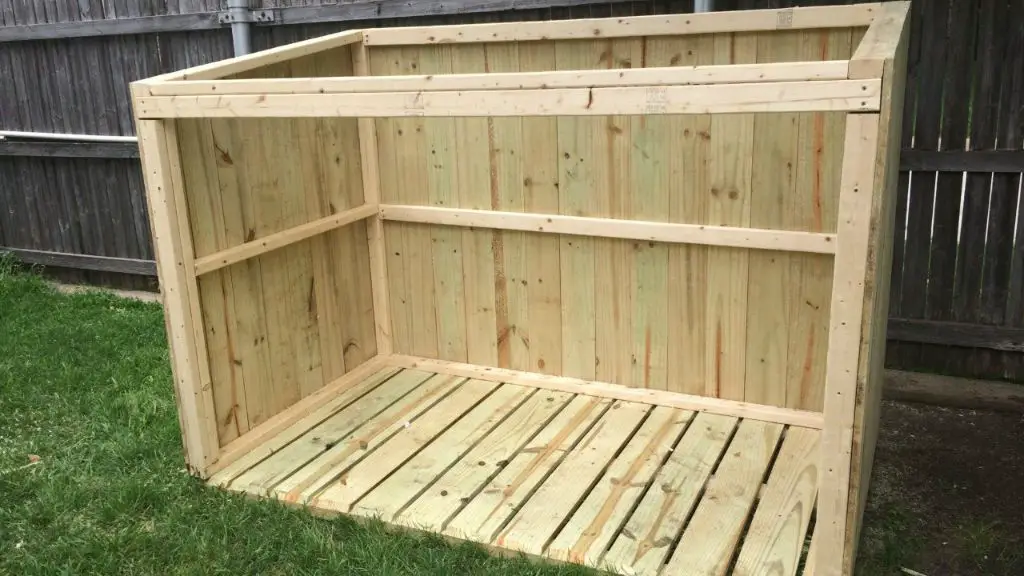
Step 1: Build the Frame
The first step is to construct a sturdy frame for your enclosure using posts and headers.
1. Cut four corner posts (4×4 inch lumber) to the height of your enclosure.
2. Cut two headers and sills (2×4 or 2×6) to span the width of the structure.
3. Set the posts in the ground approximately 2 feet deep. Make sure the posts are level and positioned at the correct dimensions for your enclosure’s footprint.
4. Attach the headers to connect the tops of the posts using galvanized screws or nails.
5. Attach the sills to connect the bottoms of the posts.
6. Measure diagonally from corner to corner to double check the frame is square.
7. Use corner brackets or screws to reinforce the post connections.
8. Backfill the holes with concrete around the corner posts for strength.
Your timber frame will provide the supporting structure to attach walls and a roof.
Step 2: Build the Walls
Next, add walls to enclose the frame using plywood, boards, or other materials.
1. Determine desired height, subtracting the thickness of the top framing and sills. Cut 2×4 studs to this length.
2. Space and attach studs between the posts using nails or screws. Studs typically space 16 inches on center.
3. Cut wall sheathing (plywood or boards) to size. Wall panels should fit snugly between the corner posts and top & bottom framing.
4. Attach plywood or boards to the studs, keeping the bottom flush with the sills. Use galvanized nails to attach.
5. For a gate, cut wall panels to size but do not attach one section. This will be attached later with hinges.
6. To improve aesthetics, add trim boards around the wall panels.
Your enclosure now has a floor, roof, and walls. Next you will add a front gate and any decorative elements.
Step 3: Add a Gate
The gate allows convenient access to your trash cans. Follow these instructions to attach a sturdy hinged gate:
1. Cut two gate posts from 4×4 lumber. Dig holes and cement these on either side of the wall opening.
2. Cut a gate frame slightly smaller than the opening from 2×4 lumber. Assemble into a rectangle using screws.
3. Cover the gate frame with plywood. Attach hinges to one side using galvanized hardware.
4. Install a sturdy latch on the opposite side to keep the gate closed. Test opening and closing.
5. Hang the gate between the posts with a 2 inch gap along the bottom for clearance. Attach with screws into the gate posts.
6. Paint or stain the gate to match the rest of the enclosure.
The gate should now allow easy access to place trash in the bins.
Step 4: Add Roof (Optional)
Adding a roof will help protect the enclosure from rain and snow. Here are some simple roof options:
For a shed style roof:
1. Cut two rafters from 2×4 lumber and attach to the side corner posts using metal brackets.
2. Install horizontal purlins between the rafters, spacing every 2 feet.
3. Attach plywood roof sheathing, overhanging 6 inches on each side.
4. Cover with asphalt shingles for a durable waterproof roof.
For a flat roof:
1. Use posts and headers to frame a roof section the dimensions of the top of the enclosure.
2. Cover with 1/2-inch plywood. Attach using screws.
3. Install roll roofing material or roofing felt paper atop the plywood.
4. Finish edges with roof flashing trim for a neat appearance.
Step 5: Add Finishing Touches
Finally, finish off your enclosure with these aesthetic touches:
– Paint or stain walls and trim to match home
– Add lattice along walls for vines to grow on
– Install corner boards for a polished look
– Consider gravel or pavers below enclosure
– Affix house numbers or signage to personalize
Once constructed, place trash and recycling bins within the enclosure. Position near the gate opening for convenience.
Your new trash enclosure will neatly contain garbage bins and improve the appearance of your home’s exterior. Empty bins regularly and follow any regulations for curbside waste collection in your neighborhood. Enjoy this useful addition that protects your cans and keeps alleys, gardens, and patios clear of messy trash.
Tips for Keeping Trash Enclosures Clean
Here are some additional tips for maintaining a clean, odor-free trash enclosure:
– Sweep out debris and dirt regularly
– Scrub stains on floor or walls with detergent
– Use bleach-based cleaner to disinfect surfaces
– Sprinkle baking soda to absorb odors
– Keep drain holes clear to prevent standing water
– Empty bins frequently to limit food waste smells
– Keep bins closed securely with tight fitting lids
– Line bins with plastic bags to reduce stains
– Do not overload bins to prevent trash overflowing
– Use odor eliminating products in bottom of cans
With regular cleaning and maintenance, your trash enclosure can stay neat and sanitary for many years. Keeping garbage area clean will make taking out trash much more pleasant.
Conclusion
Building your own trash enclosure is a straightforward DIY project that can be completed in a weekend with basic carpentry skills. Following the steps above will allow you to construct a sturdy wood enclosure adapted to fit your needs. Customize with a roof, gate, and decorative elements for optimal function and aesthetics. Place the finished enclosure in a convenient spot near your home to corral unruly garbage bins. Maintain the enclosure regularly by cleaning floors, walls, and bins to control odors. A trash enclosure is useful addition that will give your home’s exterior a more refined, organized appearance.