Page Contents
- 1 Why do you need a storm shelter?
- 2 What should you look for in a storm shelter?
- 3 What are the best materials for an inexpensive DIY storm shelter?
- 4 What size storm shelter do you need?
- 5 Where should the storm shelter be located?
- 6 How much does a storm shelter cost?
- 7 How deep should you bury an underground storm shelter?
- 8 How to build a DIY concrete block storm shelter?
- 9 What should you keep in your storm shelter?
- 10 Conclusion
Why do you need a storm shelter?
Having a storm shelter can literally be the difference between life and death in the event of a tornado or other extreme weather event. Tornadoes can generate winds of over 200 mph, easily destroying buildings and causing devastating injuries and loss of life. A proper storm shelter provides protection from these dangerous winds and flying debris. Without one, you are taking a huge risk by staying in your house or seeking shelter in an interior room or basement. Storm shelters give you the best chance of surviving a direct hit from a tornado. They are worth the investment for the peace of mind knowing that you have a safe place to go when seconds count. Don’t wait until it’s too late – build an inexpensive storm shelter now to protect your family.
What should you look for in a storm shelter?
When installing a storm shelter, there are a few key features you’ll want to keep in mind:
Wind Resistance
Look for a shelter rated to withstand winds of 250 mph or more – this ensures it can withstand even the most intense tornadoes. The shelter structure should be made of steel or concrete reinforced with rebar. Avoid wood or brick shelters that can more easily fail in high winds.
Anchoring
The shelter must be firmly anchored to the ground to prevent it from being lifted up or pushed by extreme winds. Anchor bolts should be secured deep into the ground or connected to an existing concrete foundation.
Size
Choose a shelter large enough to accommodate all family members as well as some emergency supplies. Minimum floor space should be about 7 square feet per person. The shelter should also have enough headroom when seated on the floor or bench.
Access
Look for shelters with wide doors and steps for easy access. The door should seal tightly when closed and have locks to prevent it blowing open. Be sure the door opens outwards so debris does not trap you inside.
Ventilation
Proper ventilation brings in fresh air while preventing debris ingress. Look for pass-through vents or ventilation pipes that run from interior to exterior. Shelters should have at least 2 ventilation openings.
Safety Features
Choose a shelter with emergency lighting, ventilation fans, communication antennas and other features to maximize occupant safety. Benches and emergency supplies are also useful add-ons.
What are the best materials for an inexpensive DIY storm shelter?
Here are some of the best options for building an affordable DIY storm shelter:
Concrete
Poured concrete reinforced with rebar is one of the strongest and most affordable materials for DIY storm shelters. Building forms are needed for the pouring and curing process. The minimum thickness should be 8 inches.
CMU Block
Concrete masonry units (CMU) are an inexpensive choice. These hollow concrete blocks can be reinforced with mortar and rebar and installed by most DIYers. Use 8x8x16 inch blocks for the walls.
Steel Culvert Pipes
Large, steel drainage pipes from a home improvement store can be installed below ground as an instant shelter. Choose a diameter of 4 feet or more and be sure to anchor and seal the ends properly.
Shipping Containers
Used steel shipping containers are repurposed into underground shelters. Be sure to reinforce the walls and openings to meet wind resistance standards.
Fiberglass
Fiberglass storm shelters provide good protection at lower cost but require professional installation. These lightweight units can be anchored above or below ground.
Wood/Plywood
For very temporary use, an emergency wood shelter can be built from framing timber and plywood. Use at least 3/4 inch plywood and do not rely on this type of minimal shelter for permanent protection.
What size storm shelter do you need?
The size of storm shelter you need depends on:
Number of Occupants
Allow for at least 7 square feet of floor space per person inside the shelter. For a family of 4, start with a minimum of 28 square feet.
Supplies
Add space for water, food, medical kits and other emergency supplies. Plan for at least 10 cubic feet of storage.
Comfort
More room allows occupants to sit more comfortably while waiting out the storm. An extra 10-20 square feet makes a big difference.
Some typical storm shelter dimensions based on occupancy:
| Number of People | Minimum Size |
| 1-3 | 4ft x 6ft |
| 4-6 | 6ft x 8ft |
| 7-10 | 8ft x 10ft |
As a general rule of thumb, start with 7 square feet per person then add extra space as needed. Most standard manufactured shelters range from 4ft x 6ft up to 8ft x 10ft.
Where should the storm shelter be located?
Key factors to consider for storm shelter placement:
Accessibility
The shelter needs to be easy to access from the house, ideally without having to go outside. Indoor basement shelters are very convenient.
Soil Conditions
Good drainage and stable soil make underground installation easier. Avoid low lying areas or slopes that could flood.
Utilities
If possible, locate near existing plumbing or electrical lines to more easily add features like sump pumps or emergency power.
Wind Direction
Position upwind (usually west or north facing) from the most likely tornado approach direction for your area if possible.
Above Ground Hazards
Avoid areas with heavy trees, power lines or unstable structures that could damage the shelter in high winds.
Ideally choose a centralized, interior room like a basement or garage on the ground floor. Underground shelters can be installed in the yard. Make sure all occupants can access the shelter in under 2 minutes.
How much does a storm shelter cost?
Storm shelter costs vary considerably based on the size and type:
Precast Concrete – $2,500 to $7,000 installed
These factory built shelters are installed below ground. More expensive, but very fast and easy.
Poured Concrete – $1,500 to $3,000
For DIY builders, poured concrete is affordable but requires lots of labor.
CMU/Block – $1,000 to $4,000
Concrete masonry units create an inexpensive DIY shelter option. Easier for beginners than poured concrete.
Steel/Fiberglass – $2,000 to $5,000
Prefabricated fiberglass or steel shelters offer quick protection. Professional installation is recommended.
Culvert Pipe – Less than $1,000
Large steel drainage pipes can be installed as budget DIY shelters. Be sure to reinforce the ends.
Shipping Container – $1,000 to $3,000
Used shipping containers need significant reinforcement but provide lots of interior space.
In summary, premade precast concrete shelters are the quickest and easiest option starting around $3,000. For DIY builds, CMU block or concrete shelters can be built for $2,000 or less with proper planning and preparation.
How deep should you bury an underground storm shelter?
For proper protection, underground storm shelters should be buried at the following minimum depths:
Frost Line Depth
In colder climates, the shelter must be located below the frost line depth to prevent being pushed upwards by ground freeze-thaw cycles. The frost line depth can vary from 1-4 feet depending on your location.
8 Inches Above Water Table
Avoid digging within 8 inches of the ground water table level to prevent flooding the shelter. Contact local utilities to determine typical water table depth in your area.
4-6 Feet Recommended
For most regions, the practical recommended depth is 4 to 6 feet to clear both frost line and water table constraints. Going deeper provides additional protection.
Some additional burying tips:
– Add a sump pump if burying below the water table is unavoidable
– Slope the soil upwards around the shelter to improve drainage
– For in-ground shelters, build an access stairwell down to the door
– Backfill with pea gravel for better drainage around the shelter
– Place a vapor barrier under the floor to protect against moisture
Following these guidelines will provide good stability and keep your underground shelter dry when you need it most.
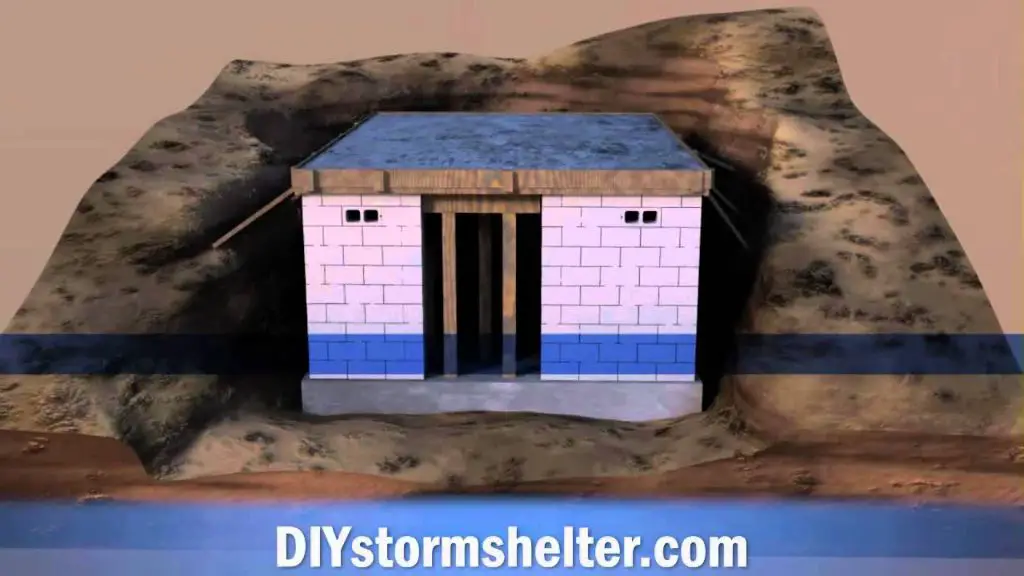
How to build a DIY concrete block storm shelter?
Follow these steps to build your own concrete block storm shelter:
1. Choose Location
Select an accessible spot with good drainage and stable soil. Allow 2 ft clearance around the perimeter.
2. Excavate Pit
Excavate a pit at least 4-6 ft deep with sloped walls. Add gravel and vapor barrier in bottom.
Dig 16-24 in for footer and fill with concrete reinforced with rebar. This anchors the walls.
4. Build Concrete Block Walls
Stack 8x8x16 concrete blocks using mortar to form the 4 walls. Fully mortar all joints.
5. Add Ceiling Supports
Bolt 4×6 timber supports overhead to support roof. Leave access hole for entry.
6. Install Roof
Create roof from 3/4 in plywood layered with waterproof membrane. Add entry hatch.
7. Backfill Around Shelter
Backfill pit with soil and gravel. Mound remaining soil over shelter.
8. Install Ventilation
Add ventilation pipes from the shelter interior up to the surface. Camouflage openings.
9. Equip Interior
Add benches, emergency supplies, lighting and other items to complete your shelter.
Be sure to check local building codes for any requirements and restrictions in your area. Allow several weeks for proper concrete curing before use.
What should you keep in your storm shelter?
Here are some essential items to store in your storm shelter:
Emergency Supplies
Bottled water, non-perishable food, first aid kit, sanitation supplies, rain gear, flashlight, radio, batteries
Tools
Multi-tool, gloves, duct tape, plastic sheeting, permanent marker
Comfort Items
Clothing, blankets, sleeping bags, games, books, toys for kids
Safety Items
Whistle, dust masks, emergency oxygen kit if needed
Communication Devices
Cell phone, walkie-talkies, NOAA weather radio
Important Documents
Copies of ID, insurance policies, medical records, other critical paperwork
Entertainment
Card games, board games, playing cards, sudoku books
Having supplies like food, water and first aid materials can allow you to shelter safely for hours or days if needed. Comfort items help ease stress and anxiety. Communication devices and tools for repairing damage are also essentials.
Conclusion
Installing an underground storm shelter or reinforced “safe room” is one of the best ways to protect yourself and your family from violent storms. While professional installations provide the highest quality, DIY concrete or CMU block shelters can be built much more affordably. Careful planning for size, location and depth is necessary to gain proper protection from high winds and debris. Be sure to equip your shelter with emergency supplies, tools and other essentials. With the right preparation, an inexpensive yet effective storm shelter can be a lifesaving investment.