Page Contents
- 1 What are the Benefits of Enclosing a Porch?
- 2 What Type of Enclosure is Right for Your Porch?
- 3 How to Frame the Enclosure
- 4 Choosing Enclosure Wall Materials
- 5 Choosing Enclosure Windows and Doors
- 6 Insulating the Enclosure
- 7 Heating and Cooling the Enclosed Porch
- 8 Adding Plumbing to the Enclosure
- 9 Adding Electricity to the Enclosed Porch
- 10 Finishing Touches for an Enclosed Porch
- 11 Conclusion
What are the Benefits of Enclosing a Porch?
Enclosing a porch can provide numerous benefits at a relatively low cost. Here are some of the main reasons you may want to enclose your porch:
- Adds usable living space – An enclosed porch effectively increases the square footage of your home, providing additional space for living, dining, office, playroom, etc.
- Protection from weather – Keeping out rain, wind, insects, etc. allows you to comfortably use the porch year-round.
- Temperature control – Screened enclosures allow fresh air in while keeping hot/cold drafts out. Insulated enclosures can be heated and cooled easily.
- Noise reduction – Shutting out exterior noises from traffic, neighbors, etc. creates a quieter space.
- Security – Lockable doors and windows keep out intruders for enhanced safety and privacy.
- Aesthetic appeal – The right enclosure can greatly improve the look of your home both inside and out.
Whether you want an extra family room, sunroom, office, or storage space, enclosing your porch can add valuable square footage without the high cost of a major home addition. Careful planning allows you to do this affordably.
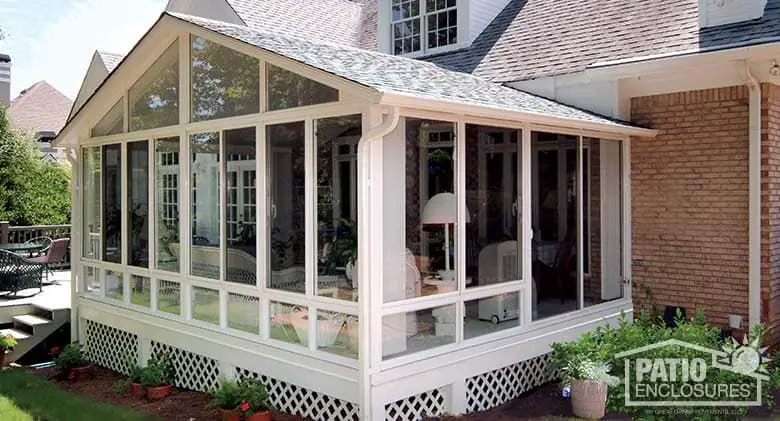
What Type of Enclosure is Right for Your Porch?
There are several basic types of porch enclosures to consider:
Screened Enclosures
Screened enclosures allow air flow through mesh screening on the walls and ceiling. Screen sections often have movable parts to provide adjustable ventilation.
Pros:
- Allows natural breezes and light through.
- Keeps out bugs, debris, etc.
- Can be opened up partially or fully.
- Typically the lowest cost option.
Cons:
- Minimal insulation value – not suitable for all climates.
- Less noise reduction and privacy than other options.
3-Season Porches
3-season porches have significant windows and insulation, allowing use for much of the year aside from winter in colder climates.
Pros:
- Allows in natural light.
- Insulated walls and ceiling for moderate climate control.
- More decorative options with various window styles.
Cons:
- Typically more expensive due to insulation and window costs.
- Not suitable for harsh winters.
4-Season Enclosures
4-season enclosures are fully insulated and climate controlled, with fewer windows. Electrical and HVAC systems allow full integration into the home’s systems.
Pros:
- Comfortable use year-round.
- Great noise reduction.
- Adds significant resale value.
Cons:
- Higher upfront costs for insulation, utilities, etc.
- Low natural light without skylights.
- Can alter the architectural look significantly.
Sunrooms
Sunrooms have large window sections on multiple sides to maximize natural light exposure. Insulation varies.
Pros:
- Abundant natural light.
- Outdoor views on multiple sides.
- Flexible usage for plants, seating, etc.
Cons:
- Can overheat easily – requires shading solutions.
- Higher glass costs.
- Minimal insulation without upgrades.
Consider your climate, budget, and intended use when deciding on an enclosure style. An attached sunroom may make sense for a breakfast nook, while a 4-season conversion may be preferable for an extra family room.
How to Frame the Enclosure
Framing is the basic skeletal structure that enclosures are built upon. Here are some pointers for framing a porch enclosure:
– Check local building codes for any requirements in your area, and get a permit if needed.
– Decide on a wall height that matches up with the existing structure. Standard wall heights are 8 or 9 feet.
– Use pressure-treated lumber rated for outdoor exposure for all framing members. Common dimensions are 2x4s and 2x6s.
– Match the framing spacing of your home, typically 16 inches on center.
– Include headers sized appropriately above all doors and windows.
– Frame corners using overlapping studs for strength.
– Include framing crossbraces on walls over 8 feet tall for reinforcement.
– Install solid blocking within the walls to anchor drywall or paneling.
– Use metal brackets and clips to integrate new framing with existing home structure.
– Build a sloped roof with rafter framing if possible to allow rain runoff.
Take time to frame the enclosure up properly, as this supports the entire structure. Using warped wood or failing to anchor framing adequately can cause major issues down the road.
Choosing Enclosure Wall Materials
For screened enclosures, the primary wall material is mesh screening. Fiberglass or vinyl screening provides good durability and visibility. Aluminum screen frames allow easy DIY installation and removable panels.
More permanent enclosures have numerous siding and wall options:
– Vinyl siding – inexpensive, durable, low maintenance exterior siding. Easy to install.
– Wood siding – natural look, available in different styles. Requires more maintenance over time.
– Fiber-cement siding – concrete-based panels give a wood look with less maintenance. Withstands moisture well.
– Brick or stone veneers – high-end natural look. Higher material costs but experienced DIYers can install over existing walls.
– Drywall – inexpensive interior wall surfacing. Easy to paint and remodel over time. Requires insulation.
– Plywood paneling – budget-friendly wood interior walls. Provides a natural look.
– Beadboard paneling – classic interior wall with a beaded groove pattern. Comes in wood, MDF, and PVC versions.
Consider factors like your climate, budget, and design style when selecting enclosure wall materials. Balance durability, insulation, and installation costs.
Choosing Enclosure Windows and Doors
Windows and doors are important considerations when planning a porch enclosure. Here are some key factors to weigh:
– Glass type – Multiple glazing panes and low-emissivity coatings provide better insulation. Laminated glass enhances safety and security. Consider tinted or reflective glass to control heat/glare.
– Frame material – Vinyl frames insulate well and need little maintenance. Wood provides a natural look but requires more upkeep. Aluminum is lightweight and durable but conducts heat more.
– Operating style – Casements allow good ventilation. Sliders and French doors maximize opening space. Hinged doors provide easy access.
– Size and placement – Follow building codes for emergency egress window size and height. Place windows/doors appropriately for lighting, views, furniture layout, etc.
– Energy efficiency – Look for ENERGY STAR certification and low U-factors (rate of heat conduction). ENERGY STAR windows must meet climate-specific efficiency guidelines.
– Budget – Basic vinyl windows and steel doors offer an affordable option. Wood, fiberglass, and aluminum cost more but provide additional benefits.
– Installation – Hiring a professional ensures proper installation and flashing to prevent leaks. Factor this labor into your budget.
Take time to select the right windows and doors to meet your needs and design goals. Durability, ease of use, energy efficiency, and cost are key considerations. Proper installation is critical.
Insulating the Enclosure
Insulation is what turns an enclosed porch into a comfortable, energy-efficient space. Here are insulation options to consider:
Fiberglass Batt Insulation
Fiberglass batts or rolls are the most common insulation choice. Pros include:
– Low cost material, readily available.
– Sized to fit between wall studs and roof rafters.
– Good sound dampening.
– Allows moisture evaporation if wall leaks occur.
Cons:
– Can sag and reduce effectiveness over time.
– Loose fiberglass can be irritating to skin, eyes, and lungs during installation.
Spray Foam Insulation
Spray foam forms an air-tight seal and expands to fill gaps completely. Pros:
– Expands to fill and seal odd-shaped areas.
– Prevents moisture buildup and air leaks.
– Provides very good insulation value per inch.
Cons:
– More expensive upfront cost.
– Off-gassing during installation requires masks/ventilation.
Rigid Foam Insulation
Rigid foam panels (XPS or EPS) have high insulation ratings. Pros:
– Lightweight panels are easy to install.
– Moisture resistant material.
– High insulation value per inch.
Cons:
– Can deteriorate if exposed to sunlight.
– Seams between panels require sealing.
– Not intended for open wall cavities.
Reflective Insulation
Reflective foils or radiant barriers have metallic surfaces that reflect heat. Pros:
– Works for both heating and cooling seasons.
– Very thin and lightweight material.
Cons:
– Primarily suited for attic installation, not walls.
– Lower insulation value than other types per inch.
– Surface must face open air space to reflect heat.
Use the right type of insulation for each part of the enclosure and install it carefully according to instructions. This can make a huge difference in energy costs and comfort.
Heating and Cooling the Enclosed Porch
To make the most of your enclosed porch, you’ll need to add heating and cooling:
Heating Options
– Electric wall heaters – Affordable and easy to install on any interior wall. Provide adequate heat for well-insulated small spaces.
– Electric baseboard heaters – Longer heating units distribute warmth evenly along the floor. Hardwired units are more powerful than plug-in.
– Electric radiant heaters – Ceiling panels or in-floor systems provide even warmth. No moving parts. Requires professional installation.
– Forced air system – Tie into your existing HVAC system and add ductwork vents. Provides consistent comfort and humidity control.
– Hydronic radiant heat – Heated water pipes or electric wires in the floor. Very even and comfortable but requires new plumbing lines.
– Gas space heaters – A vented gas heater can warm a large area. Must be safely vented and linked to gas supply lines.
Cooling Options
– Window air conditioners – Quick plug-in installation in most windows. Lowest upfront cost but inefficient, noisy, and block outdoor views.
– Mini-split ductless systems – Energy efficient and quiet. The compressor mounts outside while the evaporator unit goes inside.
– Ceiling fans – Affordable way to circulate and spread cool air. Most effective in combination with an AC unit.
– Attic fans – Pull hot air from the enclosure through attic vents. Requires adequate attic ventilation.
– Whole house fans – Exhaust hot air from home into attic and draw in cool air from outside. Useful for shoulder seasons when AC isn’t needed.
For maximum comfort, install both heating and cooling linked to a central thermostat. Mini-split units provide an efficient ductless option.
Adding Plumbing to the Enclosure
If you’ll be adding features like a wet bar, bathroom, or hot tub to your enclosed porch, plumbing installation will be required:
Water Lines
Run CPVC, PEX, or copper piping from the main home supply lines. Use insulated pipes in unconditioned spaces to prevent freezing. Install shutoff valves to isolate enclosure plumbing.
Drain Lines
PVC is the most common material for drain pipes. Sloping 1/4 inch per foot allows proper drainage. Vent pipes prevent sewer gas buildup. Tie into existing drain line stubs if possible.
Natural Gas
Install black steel gas pipes to fuel appliances like heaters, stoves, or fireplaces. Run horizontal pipes with a slight slope. Have utility company inspect lines and leak test before use.
Considerations
– Get all required permits and have work inspected.
– Hire a professional if you lack plumbing expertise. Mistakes can lead to leaks or fire.
– Include stub outs for future fixtures if doing a rough-in stage.
– Insulate pipes wherever they pass through unheated areas.
– Include shutoff valves for each water supply line.
– Anchor pipes securely to framing to prevent movement.
Adding Electricity to the Enclosed Porch
Expanding the electrical system is key to powering the enclosed porch:
Electrical Panel
Determine amperage needs for lighting, outlets, appliances, etc. Upgrade the main panel if needed to support the additional load.
Wiring
Run wiring from the panel through attic, crawl space, or basement rather than exterior walls. Use NM cable for indoor runs, UF cable for outdoor. Match wire gauge to circuit amperage.
Outlet Spacing
Include adequate outlets spaced every 6-12 feet around the perimeter following code. Have receptacles within 6 feet of door openings. Install weatherproof covers on exterior outlets.
Lighting
Hardwire interior fixtures or hang pendant lights from the ceiling. Exterior lighting by doors provides safety and visibility. Use fixtures rated for wet locations outside.
Grounding/Bonding
Properly connect new metallic fixtures, metal conduit, and feeder wires to the grounding system for safety.
GFCI Protection
Install GFCI outlets or circuit breakers anywhere near water sources like wet bars or hot tubs as electrical shock protection.
An experienced electrician can safely tie the addition into your home’s existing wiring. Don’t attempt major electrical work yourself unless very experienced.
Finishing Touches for an Enclosed Porch
Once structural, insulation, plumbing, and electrical work is complete, the fun part begins – putting on the finishing touches:
Interior Finishes
Choose lighting, wall finishes like paint or paneling, trim, and flooring to match your style. Tile, laminate, or vinyl plank flooring all work well. Add baseboard trim for a polished look.
Furniture
Configure furniture to match your intended use, whether a lounge area, dining room, or family room. An enclosed porch is a great place for rattan, wicker, or weatherproof patio furniture.
Window Treatments
Add curtains, blinds, or shutters to control privacy and light. Automated smart shades are convenient if windows are hard to reach.
Heating/Cooling Fixtures
Select thermostats, wall-mounted or baseboard heaters, mini-splits, or ceiling fans to provide comfort year-round.
Exterior Touches
Tie the enclosure into your home’s look with siding, trim details, or by painting the exterior. Add outdoor lighting beside doors. Plantings, rock features, or a patio extend living space outdoors.
With some thoughtful finishing touches, your enclosed porch can provide the look and feel of an integrated addition to your home. Enjoy your brand new living space!
Conclusion
Enclosing your porch to add valuable living space is a home project with big rewards. Following local building codes and getting required permits ensures the structure will meet regulations in your area.
Decide which enclosure design makes sense for your climate and intended usage. Frame the walls securely, insulate well, and add comfortable heating and cooling systems. If adding plumbing or electrical, hire licensed pros to do this work safely.
The ultimate cost depends on the size of the porch, the quality of finishes and fixtures you select, and if you do the labor yourself or hire it out. Often the greatest expenses are in new roofing, windows, and wiring. However, enclosing a porch still remains one of the most cost-effective ways to gain living space that blends seamlessly with your home’s existing architecture and layout.
With proper planning and sequencing of construction, even homeowners with basic DIY skills can enclose a porch successfully over a series of weekends. Take time to finish out the interior attractively to get an indoor room that your whole family can enjoy year-round!