Page Contents
What causes a staircase to squeak?
A squeaky staircase is usually caused by loose joints or improper installation. As you step on the stairs, your weight causes the wood to bend slightly. This flexing can cause the joints or nails to rub against each other or against the framing members, creating a squeaking sound. Here are some of the most common causes of a squeaky staircase:
- Loose joints – If the joints between the stair treads and risers are not tight, it can create squeaks and creaks when you walk across them.
- Improper installation – If the staircase was not installed properly or nails were not driven in all the way, it can lead to loose joints and squeaking.
- Loose nails – Over time nails can become loose due to the repeated flexing of the stairs, allowing squeaks and creaks.
- Dry wood – As wood dries out and contracts, it can shrink away from nails and joints, creating gaps that cause noise.
- Misaligned stringers – If the stringers (side boards) are warped or misaligned, it can twist the staircase and lead to squeaks.
- Worn out tread brackets – Metal tread brackets underneath the stairs can wear out over time and become noisy.
- Loose tread covers – A loose tread cover over the nose of the stair tread can vibrate and squeak.
So in most cases, squeaks are caused by gaps opening up between the components of the staircase due to repeated use over time. Focusing on tightening up joints and fasteners is key to eliminating the noise.
How can you locate the source of the squeak?
Finding exactly where a staircase is squeaking can take some detective work. Here are some tips for locating the source of the squeak:
- Walk up and down the stairs while someone listens below – Having someone underneath the stairs as you walk can help pinpoint the location.
- Isolate treads – Sit your weight on each individual tread to see if you can reproduce the squeak from a certain step.
- Tap with a hammer – Use a hammer or mallet to lightly tap suspicious areas, like where the tread meets the riser, to isolate the noise.
- Sprinkle powder – Sprinkle baby powder or chalk dust along the joints and steps, then walk across and look for movement that leaves powder trails pointing to the source.
- Look for gaps – Visually inspect for any gaps between steps and framing that could be causing noise when flexed.
- Remove tread covers – Removing any loose tread covers can reveal gaps at the nose of the tread.
- Go under the stairs – Climb under the stairs with a flashlight to look for obvious gaps, twisted stringers, or worn metal tread brackets.
Isolating the specific location of the squeak will make it much easier to determine how best to fix it. Take your time applying a few different methods to pinpoint the exact problem area.
What are some common solutions for fixing a squeaky staircase?
Here are some of the most effective solutions for eliminating squeaks and creaks in a staircase:
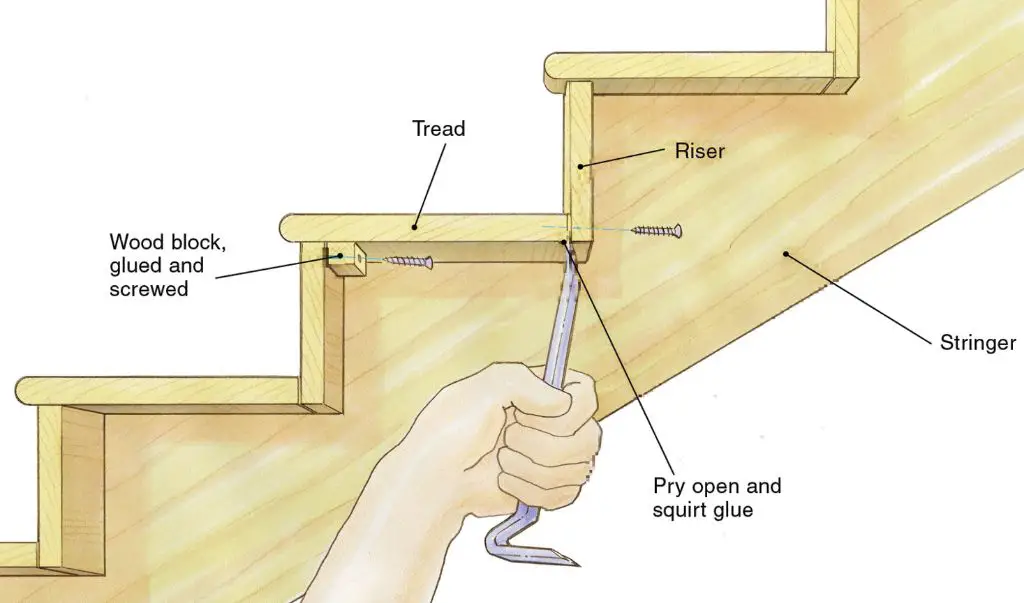
Tighten the Joints
Often the source of the squeak is a loose joint between a tread and riser or where the treads meet the stringers.
- Add wood glue and tight clamp the joint until dry to pull it tight.
- Drive in surface fasteners like deck screws into the joints to pull them tighter together.
- Inject wood glue into the gap and force sawdust in after to form a solid plug.
Tightening and reinforcing the joints eliminates movement that can cause squeaks.
Re-nail Loose Boards
Over time, nail heads can loosen up or even pop through the wood, leaving a joint loose.
- Reset any popped nails with a nailset tool.
- Drive in finish nails next to existing ones to cinch joints tighter.
- Predrill holes through the back of the tread above and toenail at an angle into the tongue of the tread below.
Doubling up on fasteners keeps the treads firmly attached.
Add Screws
Screws driven into the right spots grab better than nails and cinch joints tight.
- Angle screws up through the nose of the tread into the riser above.
- Toenail screws at an angle into the stringers where the treads rest.
- Add screws at the miter joints where tread meets riser.
The right screw placement can practically eliminate any flex or movement.
Shim Gaps
Visible gaps between stair components can be shimmed tight.
- Glue small wooden shims into gaps and sand or chisel flush.
- Pack gaps with wood putty or plastic wood filler to create a tight fit.
- Tap small wooden dowels into drilled holes to span a gap.
Filling gaps limits the movement that causes noise.
Lubricate Squeaks
For metal-on-metal squeaks, lubrication can eliminate noise.
- Apply wax, silicone, or lubricating oils to quiet metal tread bracket squeaks.
- Rub paraffin wax or bar soap along the joints to lubricate wood-on-wood squeaks.
Lubrication allows components to slide quietly rather than scraping noisily.
Replace Worn Parts
In some cases, certain components may just need replacement:
- Replace any visibly split or cracked wood treads or risers.
- Swap worn metal tread brackets for new ones.
- Add new tread covers over damaged ones.
Replacing damaged parts provides a permanent fix.
Step-by-Step Instructions for Fixing a Squeaky Staircase
Now that we’ve covered some of the most common solutions, here is a step-by-step guide to tackle a squeaky staircase:
1. Locate the Squeak
Use the isolation methods above like tapping or powder to pinpoint the exact location of the squeak. Focus on a few inches around the noisy spot.
2. Inspect the Area
Look closely for any visible gaps, warped boards, cracked wood, popped nails, or worn metal. Diagnose what might be causing the noise.
3. Prep the Area
Vacuum up any dust and debris. Have a strong flashlight handy. Remove any tread covers or trim in the way.
4. Tighten Joints
Clamp, glue, screw, or shim joints at the suspected squeak location to pull them snug. Be patient while glue dries.
5. Add Fasteners
Secure boards with additional nails or screws at angles into the framing. Predrill holes to prevent splitting wood.
6. Lubricate
Rub wax or soap over metal-on-metal squeaks. Spray silicone lubricant into wood joints to allow quieter movement.
7. Replace Parts
If necessary, swap out any damaged treads, risers, or tread brackets for new replacement parts.
8. Reassemble
Replace any trim pieces and tread covers. Carefully hammer down or cut off any protruding fasteners.
9. Test Results
Walk up and down the stairs, bouncing up and down to check for noise. Mark any lingering squeaks and repeat the process to fix them.
Tips for Preventing Stair Squeaks
To help prevent squeaks in future:
- Use construction adhesive when installing treads and risers.
- Secure treads into the stringers with 2-3 screws near each end.
- Glue and screw risers into the tread above and below.
- Install newel posts and brackets tightly.
- Maintain humidity levels in the house to prevent excessive wood drying.
- Lubricate stairs annually with wax to keep wood moving quietly.
Proper installation and regular maintenance are key to having permanently quiet stairs.
When to Call a Professional
While many squeaks can be fixed with simple carpentry, it may be wise to call in a professional if:
- The source of the squeak can’t be found after thorough inspection.
- The stairs feel loose, sagging, or structurally unsound.
- The required repairs are outside your skill level.
- There are complex custom finishes that must be matched.
- The staircase needs extensive repairs or complete refinishing.
A good carpenter can diagnose and fix even the trickiest staircase squeaks. Their experience and tools may provide a more seamless and lasting repair.
Conclusion
Fixing a squeaky staircase often just requires some basic carpentry skills, patience, and a methodical approach. By taking the time to isolate and diagnose the cause of the noise, you can apply the right solution to eliminate it. And preventative maintenance like lubrication and added fasteners can keep stairs quiet for years to come. But for extensive repairs or complex projects, don’t hesitate to hire a professional for top quality results. With the right knowledge and techniques, you can successfully banish those bothersome staircase squeaks for good.