An outside shower can be a great addition to any home, providing a convenient way to rinse off after using the pool or getting dirty while gardening. However, in order to work properly, an outdoor shower needs proper drainage so water doesn’t pool around the base. Installing a drain for an outdoor shower is a straightforward project that can typically be completed in an afternoon.
Page Contents
Things You’ll Need
- Shovel
- Hacksaw or pipe cutter
- Exterior caulk
- PVC primer and cement
- 2″ PVC pipe and fittings
- Gravel or small rocks
- Landscape fabric
- Concrete (optional)
The main components needed are PVC pipe and fittings to create the main drain line. You’ll also need basic tools like a shovel, hacksaw, and caulk. Gravel and landscape fabric help create a French drain to move water away from the shower area. Concrete is optional for constructing a drainage basin under the shower.
Choosing a Drain Location
When deciding where to place your outdoor shower drain, consider the following:
- Slope of the land – The drain should be located where water will flow downhill and away from the foundation of your home.
- Proximity to sewer/septic – If possible, locate the drain closer to existing plumbing so the run to reach it is shorter.
- Privacy – Try to avoid areas in direct view from neighbors or the street.
- Convenience – You want the drain to be close to the shower while still allowing space for showering.
- Aesthetics – Choose a location that fits in naturally with your landscape design.
Ideally, the shower drain will sit at least 5-10 feet away from the home’s foundation and drain downhill to an area with vegetation to absorb runoff.
Installing the Main Drain Line
Once you’ve selected an appropriate location, start by digging a 6-12 inch wide trench from the planned shower site to where the main drain line will outlet. The depth should be at least 18 inches.
Follow these steps:
- Cut a piece of 2″ PVC to run from the shower drain location to the outlet. Use couplings and elbow fittings as needed to fit your specific site.
- Lay the PVC pipe in the trench, fitting the pieces together. Slope the pipe at least 1/4″ per foot.
- Glue the PVC joints using primer and cement per the manufacturer’s instructions. Allow to fully cure.
- Drill holes along the length of the pipe to allow water to drain into the gravel trench.
- Backfill the trench with gravel, covering the pipe. Pack down with the shovel.
- Cover the gravel with landscape fabric to prevent dirt from clogging the gravel.
- Fill in the remainder of the trench with dirt.
This creates a French drain that will carry shower water away underground.
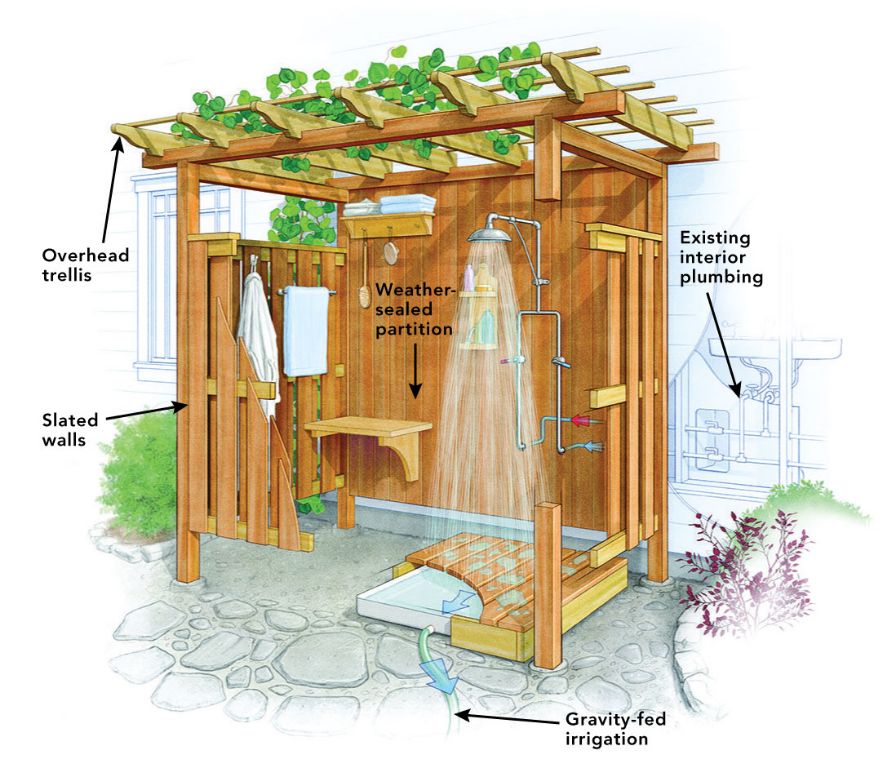
Installing the Drain Basin
For the drain right under the shower head, you have two main options:
Gravel basin
- Dig a basin approximately 12-18 inches deep and slightly wider than your planned shower area.
- Fill the basin with gravel, mounding it slightly at the center.
- Install a drain grate or flange at the center of the basin at ground level.
- Connect the drain grate to the PVC outlet pipe you installed previously.
The gravel allows water to quickly collect and drain away under the shower. The drain grate prevents loose rock from going down the pipe.
Concrete basin
- Dig out a basin as described above.
- Lay down wire mesh to reinforce the concrete.
- Use moveable forms or pavers to create the mold.
- Pour a 2-3″ thick layer of concrete over the whole basin.
- Once dried, use a concrete bit to drill a drain hole.
- Install a threaded drain flange in the hole.
The concrete basin creates a sturdier shower pan that holds up over time. Cut the drain hole so it lines up with the underground PVC pipe.
Finishing Touches
Once your drain system is installed, add the final touches:
- Attach the shower fixtures like the shower head, handles, and water supply lines.
- Consider using river rock or pea gravel around the shower instead of plain dirt.
- Apply exterior caulk around the drain flange for a watertight seal.
- Arranging decorative rocks or plants around the shower can add visual interest.
Make sure to direct the shower head so water flows into the drain basin. Test run the shower and check for any leaks or issues with drainage before continuing use.
Maintaining Your Outdoor Shower Drain
Like any outdoor plumbing system, your new shower drain will require occasional maintenance:
- Check for standing water or slow drainage, which indicate clogs.
- Use a drain snake periodically to clear out any debris.
- Add more gravel if the basin seems to be draining slowly.
- Watch for leaks at fittings and re-caulk as needed.
- Make sure the drain pipe is clear and not blocked by roots or sediment.
Taking steps to prevent clogs, like using a drain cover and limiting hair/debris going down the drain, can also extend the life of your system.
Conclusion
Installing drainage for an outdoor shower is a doable DIY project. Following the steps here to create an underground French drain line and a gravel or concrete basin will allow shower water to quickly drain away from the foundation of your home. Place the shower in a convenient spot that is also considerate of your lawn and landscaping. Maintaining the drain with periodic cleaning will prevent water pooling issues. With a properly draining outdoor shower, you’ll be able to enjoy quick clean-ups for years to come.