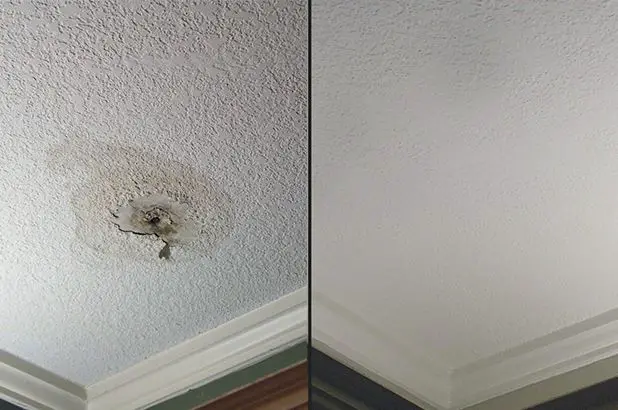
Patching a small hole in a textured ceiling can seem daunting, but it’s actually a pretty straightforward process if you have the right materials and follow some simple steps. In this comprehensive guide, we’ll walk you through everything you need to know to patch a small hole in a textured ceiling, from prepping the area to matching the texture.
Page Contents
What You’ll Need
Before you start patching, make sure you have the following materials on hand:
- Drywall joint compound (also called mud)
- Joint tape
- A 6-inch drywall knife
- A 12-inch drywall knife
- Sandpaper
- A texture spray can or paint roller and texture mix
- Paint to match the ceiling
- Eye protection, gloves, and a face mask
The process involves applying joint compound over the hole, embedding joint tape for strength, applying additional layers of compound, matching the texture, and painting over the patch to blend it with the rest of the ceiling. Let’s look at each of these steps in more detail.
Prepping the Hole
Before applying any joint compound or texture, you need to make sure the hole is clean and ready for patching. Here are the steps for proper prep:
- Use a utility knife to cut away any loose drywall or paper around the edges of the hole. Cut at a 45-degree angle to create a bevel.
- Brush or vacuum away any dust or debris inside the hole and on the ceiling surface.
- If there is a nail or screw hole, sink the fastener head slightly below the surface using a hammer. Fill deeper holes with a bit of joint compound.
- For larger holes, cut a drywall patch a few inches wider than the hole so it spans two joists. Secure with drywall screws.
Prepping provides a clean surface for the joint compound to adhere to. Now let’s look at applying the first layer.
Applying the First Coat
With the hole clean and ready, you can start applying joint compound:
- Use a 6-inch drywall knife to apply a thin layer of joint compound over the entire hole, extending a few inches beyond the edges. Press firmly to work the compound into the drywall paper.
- Center joint tape over the hole and embed it into the wet joint compound. Smooth over the tape with your drywall knife to eliminate wrinkles and air bubbles.
- Apply a second thin layer of joint compound over the tape, feathering the edges where it meets the existing ceiling. Let the compound dry completely.
The joint tape provides strength and prevents cracks. Letting each coat dry before applying the next is crucial. Expect the first coat to take at least 24 hours to dry completely.
Second and Third Coats
Once the first coat has dried, follow the same process to apply a second coat:
- Lightly sand any ridges or high spots left from the first coat.
- Apply another thin layer of joint compound, extending slightly beyond the first coat.
- Feather out the edges to create a smooth transition.
- Let the second coat dry completely, then sand lightly if needed.
The goal with the second coat is to cover the tape and continue smoothing and leveling the patch area. For small holes, a third coat is optional. But for larger patches, apply a third coat the same way:
- Sand any ridges or highs spots.
- Apply a thin final coat, feathering the edges where it meets the existing ceiling.
- Let the joint compound dry fully before sanding and texturing.
Matching the Texture
Matching the texture is the trickiest part of patching a textured ceiling. There are a few different ways to replicate the texture:
- Spray texture – Hold a texture spray can about 12 inches from the ceiling and apply light, even coats over the patch until it matches the existing texture.
- Pre-mixed texture – Use a paint roller to stipple on layers of pre-mixed texture compound until the texture matches.
- Make your own – Mix joint compound with water and a little paint to create DIY texture mix. Roll or spray it on to match the ceiling.
Applying the texture takes some practice and trial and error. Go slowly and work in layers until the patch blends with the surrounding ceiling. Let the texture dry fully before moving on to painting.
Painting the Patch
The final step is to paint over the textured patch to blend it with the rest of the ceiling:
- Lightly sand the textured patch to smooth any high spots or ridges.
- Carefully wipe or vacuum away all dust and debris.
- Paint the patch using a small trim brush or mini roller, feathering the fresh paint into the existing ceiling paint.
- Apply a second coat if needed to make the color match exactly.
Take your time with the painting to fully integrate the patch into the ceiling. Once dry, your repair should be barely noticeable!
Tips for Patching Textured Ceilings
Follow these handy tips for great results patching textured ceilings:
- Make sure each coat of compound is completely dry before applying the next.
- When sanding, use light pressure and wipe away dust to prevent scuffing.
- Apply texture in thin layers until the match is perfect.
- Get color match right by painting a bigger area than just the patch itself.
- Consider hanging a picture or light fixture over the repaired area to draw the eye away from any imperfections.
Take your time with the project and don’t get discouraged. With some practice and patience, you can make ceiling hole repairs practically disappear.
When to Call a Professional
For small holes less than 6 inches wide, DIY patching is probably fine. But for large holes, significant water damage, or very complicated ceiling textures, you may want to call in a drywall pro to ensure quality results. Professionals have the right tools and experience to make repairs look seamless.
Frequently Asked Questions
Here are answers to some common questions about patching textured ceilings:
What type of joint compound should I use?
Use lightweight, pre-mixed vinyl or all-purpose joint compound for small DIY repairs. Avoid heavy compounds like Durabond, which dry too quickly.
Should the patch be primed before painting?
Priming isn’t usually necessary for small patches. Just be sure to feather the paint well from the patch into the existing ceiling paint.
How long does it take for joint compound to dry?
Drying times vary based on temperature, humidity, ventilation, and number of coats. In general, expect each coat to take 24 hours to dry fully.
What do I do if the texture doesn’t match perfectly?
Keep applying thin coats of texture compound until you get a close match. An imperfect match with slight texture variations is hard to notice once painted.
Can I patch without turning off the power?
Yes, you can safely patch small holes without shutting off the power. Just be cautious not to touch any wires inside the hole.
Conclusion
Patching drywall is a handy DIY skill that can give you the freedom to repair minor ceiling damage on your own time. With the right materials and techniques, you can blend repaired areas seamlessly into your existing textured ceiling. Just take your time applying smooth joint compound coats, match the texture carefully, and integrate the paint colors. Pay attention to detail and you can achieve professional-looking results. Patching textured ceilings may take some practice, but it’s a rewarding project that will leave your ceiling looking flawless.