Vinyl boat seats are a popular choice for many boat owners. Vinyl is durable, easy to clean, and provides a sleek look. However, vinyl can become damaged over time from UV rays, friction, cracking, and more. Thankfully, many vinyl boat seat repairs can be done yourself at home. This article will provide tips on how to repair rips, cracks, fading, and other common vinyl boat seat damage.
Page Contents
- 1 Assessing the Vinyl Boat Seat Damage
- 2 Cleaning and Prepping the Surface
- 3 Repairing Small Rips and Tears
- 4 Patching Larger Holes and Tears
- 5 Repairing Seam and Stitching Damage
- 6 Fixing Cracked or Peeling Vinyl
- 7 Recoloring Faded Vinyl
- 8 Preventing Future Vinyl Damage
- 9 Knowing When to Professionally Reupholster
- 10 Finding the Right Vinyl for Reupholstering
- 11 Upholstery Shop Selection Tips
- 12 Conclusion
Assessing the Vinyl Boat Seat Damage
Before starting a vinyl repair project, thoroughly examine the seat to understand the full extent of the damage. Look for rips, tears, cracking, peeling, fading, and more. Pay special attention to high wear areas like the seat cushion, backrest, armrests, and seams. Identify each area of damage and determine the necessary steps and materials for repair.
It’s also important to understand what caused the vinyl damage. Typical causes include:
- UV damage from sun exposure
- Friction, abrasion, and wear and tear
- Exposure to chemical cleaners or environmental factors
- Cracking from age or temperature extremes
- Cuts, tears, or punctures
Pinpointing the cause will allow you to not only repair the current issue but prevent future damage. For example, fixing UV fading and then using a UV-protectant vinyl conditioner to prevent future fading.
Cleaning and Prepping the Surface
Proper cleaning is crucial before starting vinyl boat seat repairs. Any dirt, debris, mold, or mildew needs to be removed to allow adhesives and new vinyl to properly bond. Here are step-by-step cleaning tips:
- Vacuum the seat to remove loose dirt and debris.
- Mix a solution of mild soap and warm water. Avoid harsh detergents.
- Use a soft bristle scrub brush to gently clean the entire seat surface.
- Rinse thoroughly with clean water to remove all soap residue.
- Allow the seat to fully air dry before beginning repairs.
Once cleaned, inspect for any remaining flaws that may affect adhesion like peeling, cracking, residue, or imperfections. Sand and smooth areas as needed with fine grit sandpaper. Wipe with a vinyl cleaner and allow to fully dry before repairing.
Repairing Small Rips and Tears
Small tears less than 2-3 inches are the simplest vinyl boat seat repairs. Follow these steps:
- Clean and prep the damaged area thoroughly.
- Apply a thin layer of vinyl adhesive to the underside of the tear.
- Clamp the tear together tightly for 2-4 hours to allow it to bond. Wipe away any excess adhesive.
- Once bonded, apply a thin layer of adhesive on top of the repair for additional strength.
- Allow to fully cure for 12-24 hours before use.
Liquid vinyl repair adhesives specially formulated for vinyl work best. Avoid super glue, which can become brittle. Apply adhesive sparingly for best results.
Patching Larger Holes and Tears
For larger rips or holes wider than 3 inches, a vinyl patch is necessary. Here’s how to complete the repair:
- Thoroughly clean the damaged area and 6 inches surrounding it.
- Cut a vinyl patch 2 inches wider than the hole in all directions.
- Round the patch corners to prevent peeling.
- Apply adhesive to the boat seat surface and vinyl patch.
- Position the patch over the hole and press firmly for 30-60 seconds.
- Use a roller over the surface to secure a tight bond.
- Clamp the patched area for at least 2 hours.
- Allow a full 24 hours to cure before using the seat.
When choosing patch vinyl, match the original seat vinyl color, thickness, and texture as closely as possible. If the seat has graining, make sure the patch matches the grain pattern.
Vinyl Patch Adhesion Tips
- Ensure both surfaces are clean and dry before applying adhesive.
- Use a vinyl adhesive formulated for marine vinyl repair.
- Apply an even adhesive layer, avoiding globs or dripping.
- Allow adhesive to become tacky before applying patch.
- Work out air bubbles between the patch and seat.
- Clamp tightly and uniformly over the patch area.
Repairing Seam and Stitching Damage
Over time, vinyl seat seams and stitching can tear and come undone. To fix:
- Inspect the seam damage and determine how much needs to be repaired.
- Use a seam ripper tool to remove remaining loose stitching.
- Thoroughly clean the seam and surrounding 4-6 inches.
- Re-sew the seam using marine-grade vinyl thread.
- Apply vinyl adhesive along the restitched seam.
- Allow the repair to cure for 24 hours before using.
When restitching, match the original stitch length and spacing. Use a tight, reinforced straight stitch or box stitch. Knot securely at the start and end.
Fixing Cracked or Peeling Vinyl
Cracked or peeling vinyl typically results from damage to the adhesive beneath. To fix:
- Use a utility knife to completely remove all loose vinyl pieces.
- Sand cracked edges to create a smooth surface.
- Clean and solvent wipe the area to remove residue.
- Apply a thin adhesive layer and allow to become tacky.
- Adhere the loose vinyl piece back into place.
- Clamp for at least 2 hours for full bonding.
- Fill any gaps between vinyl pieces with additional adhesive.
- Allow the repair to cure for 24 hours before using the seat.
Be extremely careful when using a knife to pry up cracked vinyl. Work slowly to avoid damaging good vinyl sections. Repair cracks as soon as possible to avoid further peeling.
Recoloring Faded Vinyl
Vinyl boat seats often fade and discolor from sun exposure. Luckily, vinyl recoloring kits can restore a rich, uniform color. Typical steps include:
- Clean the seat surface thoroughly and allow to dry.
- Sand vinyl lightly to rough up the surface.
- Wipe away all sanding dust.
- Mask off any areas you don’t want recolored.
- Apply recoloring compound in smooth, even coats.
- Allow to fully dry between coats, typically 30-60 minutes.
- Apply 2-3 coats until the desired color is reached.
- Remove masking and apply vinyl protectant/conditioner.
When choosing a recoloring product, closely match the seat’s original color. Test a small inconspicuous area first. Apply recoloring in a well-ventilated, dust-free area for best results.
Tips for Even Vinyl Recoloring
- Thoroughly clean and prepare the vinyl surface first.
- Use long, smooth strokes and maintain consistent pressure.
- Work in small sections for most even coverage.
- Apply lighter coats rather than one thick, heavy coat.
- Blend recoloring into surrounding areas to avoid blotchiness.
- Maintain a wet edge as you go to prevent lap marks.
Preventing Future Vinyl Damage
Completing vinyl boat seat repairs also provides an opportunity to implement prevention tactics. Consider these proactive steps:
- Use UV-protective vinyl conditioner: Regularly apply vinyl UV protectant to resist sun damage and fading.
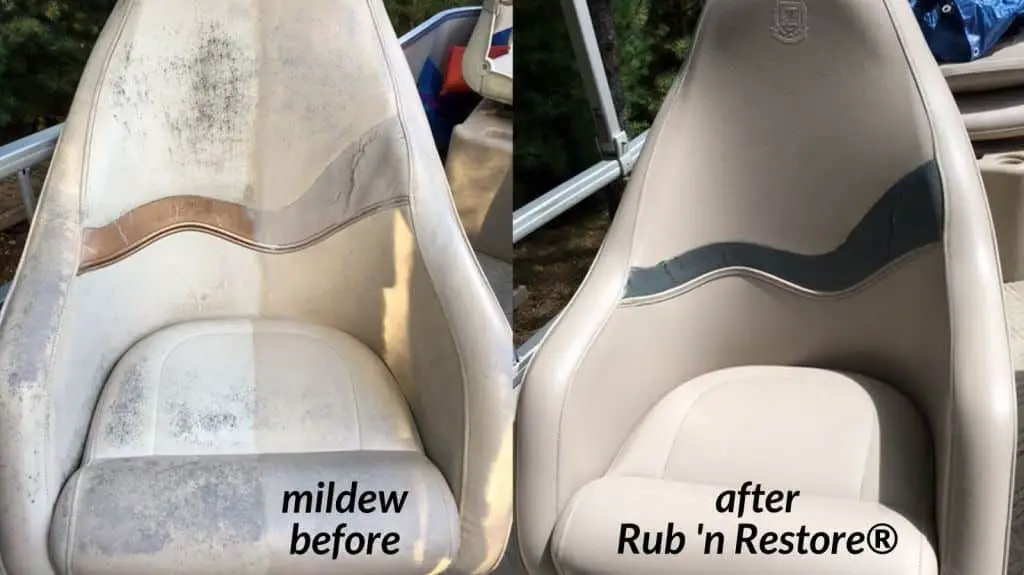
- Stain guard the vinyl: Stain guard treatments help vinyl resist mold, mildew, spills, and stains.
- Avoid harsh cleaners: Only use vinyl-approved soaps and cleaners. Avoid bleach, ammonia, and other harsh chemicals.
- Implement sun covers: Use seat covers, bimini tops, boat covers when not in use to limit UV exposure.
- Address friction points: Apply patches or guards to high friction areas like seat edges and backrests.
- Check vinyl Fit: Ensure vinyl is well-fitted to prevent excessive rubbing and wear.
address any underlying causes of damage as well like chemical exposure, improper cleaning practices, lack of boat cover use, etc.
Knowing When to Professionally Reupholster
While many vinyl repairs can be done at home, extensive damage requires professional marine upholstery services. Consider reupholstering when:
- Entire vinyl sections are cracked, peeling, or torn beyond repair
- Foam cushioning is damaged beneath the vinyl
- Frame attachments are broken
- Seat pan is cracked or broken
- Repairs would be largely visible and unsightly
- The fabric has become very thin, brittle, or dried out
- A completely new seat look and finish is desired
Reupholstering costs vary widely depending on the seat size, materials, and shop location. Expect to invest $200-$1000 or more for professional vinyl boat seat reupholstering.
Finding the Right Vinyl for Reupholstering
When reupholstering boat seats, marine-grade vinyl is an absolute must. Here are key factors to consider when choosing new vinyl:
- Thickness – Typically 15 mil or 20 mil. Thicker vinyl lasts longer.
- Coated or Uncoated – Coated vinyl has a top finish that maintains color and resists staining.
- Color Fastness – Look for vinyl rated for excellent color fastness and UV resistance.
- Marine Grade – Vinyl designed explicitly for marine use. Avoid standard upholstery vinyl.
- Patterned or Solid – Match existing seat pattern and colors or customize with new choices.
- Graining – Some vinyl has leather-like graining for an upscale look.
Work closely with your upholstery shop to source high quality, marine-grade vinyl that provides both functionality and aesthetics.
Upholstery Shop Selection Tips
Choosing the right upholstery shop is key to achieving excellent results from your vinyl boat seat reupholstering project. Consider these tips when researching and selecting a shop:
- Review online galleries of the shop’s previous marine vinyl work.
- Ask about their specific experience with boat seats and marine fabrics.
- Inquire if they work directly with certain vinyl suppliers.
- Request photos and references from past customers if possible.
- Compare services and prices from at least 2-3 upholstery shops.
- Look for shops that offer marine-specific services like on-site work at marinas.
- Ask about warranties on vinyl, workmanship, and turnaround time.
Taking the time to find an experienced, reputable upholstery shop for your boat seat reupholstering will provide satisfying, lasting results.
Conclusion
With some vinyl adhesive, a few common tools, and proper techniques, many vinyl boat seat repairs can be completed at home. But for more extensive damage or reupholstering needs, seek out a professional marine upholsterer. By understanding vinyl repair techniques, preventing future damage, and taking your seats to a qualified shop when needed, you can keep your boat seats looking and functioning like new for years of boating enjoyment.