Replacing a 2 handle shower faucet with a single handle faucet can seem intimidating, but it’s actually a straightforward DIY project that most homeowners can tackle in a few hours. The key steps involve turning off the water supply, removing the old faucet, installing new valves and supplies, and then installing the new single handle faucet.
With some basic plumbing skills and the right tools, you can upgrade from a dated 2 handle shower to a sleek, modern single handle design. Going with a single handle shower faucet improves the look of your bathroom and also makes adjusting water temperature easier since you only have one lever to work with.
In this comprehensive guide, we will walk through the entire process in 9 easy steps:
Page Contents
- 1 Step 1: Turn Off Water Supply
- 2 Step 2: Remove Old Faucet Handle and Cover Plate
- 3 Step 3: Detach Shower Head and Arm
- 4 Step 4: Remove Retainer Nuts and Cartridge
- 5 Step 5: Detach Valve Bodies
- 6 Step 6: Install New Valve Assembly
- 7 Step 7: Connect Supply Lines
- 8 Step 8: Install Decorative Trim
- 9 Step 9: Attach Shower Head
- 10 Helpful Tips for Easy Installation
- 11 Advantages of Upgrading to Single Handle Faucet
- 12 Supplies Needed for Replacement Project
- 13 Step-By-Step Instructions
- 14 Potential Issues and Solutions
- 15 Conclusion
Step 1: Turn Off Water Supply
Before removing your old shower faucet, you need to shut off the hot and cold water supply lines. This prevents water from spraying everywhere when you detach the plumbing connections. Start by locating the shut-off valves for the hot and cold water lines under the sink or near the water heater.
Turn the hot water valve clockwise all the way until it stops. Do the same for the cold water valve. To be extra safe, you can also turn off the main water shut-off valve for the entire house. Test the shower faucet to confirm the water is completely off. If the valves are stiff, spray some penetrating oil on them beforehand to loosen them up.
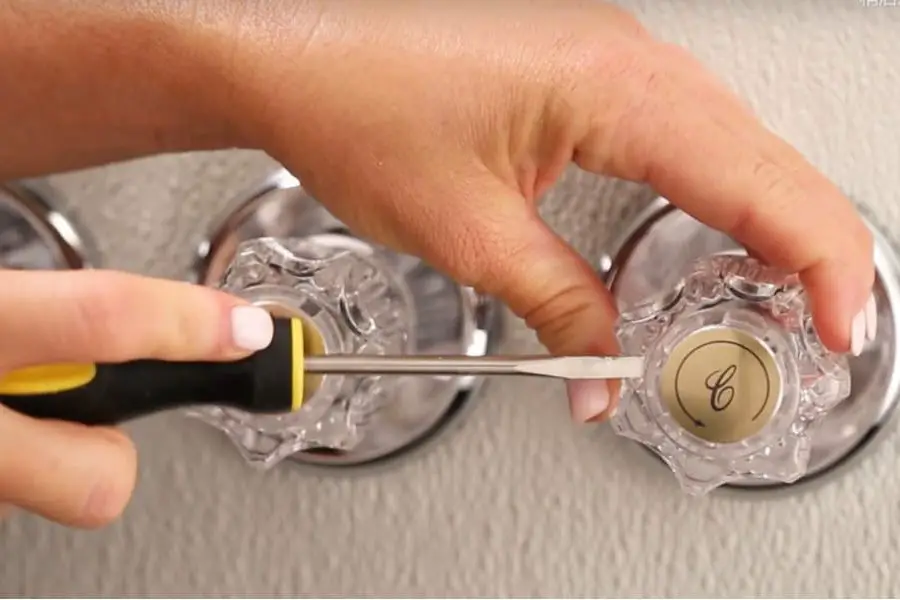
Step 2: Remove Old Faucet Handle and Cover Plate
With the water supply shut off, start disassembling the old shower faucet. Remove the handle cover plate, usually held on with a set screw on the side or back. Use a Phillips or flat head screwdriver to loosen the screw and take off the decorative plate.
Underneath you’ll find the screw that holds on the old hot and cold faucet handles. Remove the screw and pull off the handle. Some handles will slide right off while others need some wiggling back and forth first. Repeat this process to remove the other handle.
Step 3: Detach Shower Head and Arm
While you have the faucet exposed, go ahead and detach the shower head and arm so it’s out of your way while working. Unscrew the connector swivel nut where the arm attaches to the faucet body with adjustable pliers or a wrench.
You should be able to twist off the connector by hand once the nut is loosened up. Be careful not to let the arm drop and damage the shower floor when it detaches. Place a towel down below to protect the tub.
Step 4: Remove Retainer Nuts and Cartridge
At this point, the faucet handles and cover plate should be completely removed. Now you need to extract the cartridge assembly before taking off the valve bodies. Look for a retainer nut holding the cartridge in place on each valve.
Use a wrench to turn the retainer nut counter-clockwise which will loosen it up. Pull the cartridge straight out once the nut is detached. Set the cartridges aside and keep track of which one is hot vs cold.
Step 5: Detach Valve Bodies
With the cartridges out, all that should remain on the wall is the two valve bodies for hot and cold water. These are attached to the shower plumbing with supply lines. Use a wrench or pliers to disconnect the hot and cold supply lines from the valves.
Unscrew the compression nuts where the lines connect to the valves. Push the valve bodies back into the wall slightly to loosen them up once disconnected. Then gently wiggle and pull the hot and cold valves straight out from the wall. Keep the supply lines nearby since you will reuse them.
Step 6: Install New Valve Assembly
Now the messy demolition work is done! It’s time to install your streamlined single handle faucet. Start by sliding the new valve assembly into the holes in the wall. Push it tightly against the shower surface so the gasket forms a seal.
From the back side, hand tighten the retaining nut on the valve assembly so it’s snug against the wall. Don’t overtighten or you can crack the shower surface. The valve body should be centered and perpendicular to the wall.
Step 7: Connect Supply Lines
With the new valve secured, connect the hot and cold water supply lines using the compression nuts and sleeves you removed earlier. Hot water connects to the left inlet, cold to the right.
Make sure the supply lines are fully inserted into the connector ports. Tighten the compression nuts with a wrench to form a snug seal. Don’t overtighten or you can damage the valve ports. Turn on the water briefly to check for leaks before moving on.
Step 8: Install Decorative Trim
If your new faucet came with decorative trim and handle components, it’s time to install them. Slide the escutcheon trim plate over the valve assembly until it sits flush to the wall. If included, install the handle base ring next.
Put the handle mechanism into place and secure with the set screw. Make sure it moves smoothly into the open and closed positions. Push the handle cover on last, lining up the ridge with the opening on the handle.
Step 9: Attach Shower Head
The last step is to install your shower head and connect the arm. Place a bead of plumber’s tape around the threads on the shower arm. Screw the arm into the upper outlet on the faucet body and hand tighten until secure.
Wrap plumber’s tape around the shower head inlet threads as well. Screw the head onto the arm and hand tighten. You can adjust the ball joint on the arm to your desired angle. Turn on the main water supply and test the new faucet for proper hot and cold flow as well as leaks.
Helpful Tips for Easy Installation
– Turn off main water supply for the entire house before starting as an extra precaution
– Place a towel in the tub to protect against dropped parts
– Label hot and cold valves and supply lines to avoid mixing them up
– Use plumber’s tape on all threaded connections for water tight seal
– Adjust valves to limit handle rotation from all hot to all cold for safety
Advantages of Upgrading to Single Handle Faucet
– Easier temperature adjustment with one lever vs two
– Sleek, minimalistic contemporary style
– Improved flow rate compared to older faucets
– Enhanced control of water pressure and temperature
– Additional features like handheld showerheads
– Widespread model provides flexible installation
– Allows for coordinating faucets throughout the bathroom
Supplies Needed for Replacement Project
Here are the supplies you will need to complete this project:
| Single handle shower faucet |
| Pipe wrench |
| Adjustable pliers |
| Channel locks |
| Phillips screwdriver |
| Plumber’s tape |
| Cloth towel |
| Bucket |
| Safety goggles |
Having all these tools and materials ready beforehand will allow you to swap out the faucets quickly and efficiently. Purchase a high quality, brand name faucet and valve for best results and longevity.
Step-By-Step Instructions
Here is a quick summary of the key steps involved:
1. Turn off main water supply
2. Remove old faucet handles and cover plate
3. Detach shower arm and head
4. Extract old cartridges and valve bodies
5. Install new single handle valve assembly
6. Connect hot and cold supply lines
7. Attach decorative trim and handle
8. Install shower head and arm
9. Turn water back on and test for leaks
Potential Issues and Solutions
While installing your new shower faucet, you may encounter a few common issues. Here are some tips for overcoming them:
Difficulty removing old faucet – If the old valves won’t budge, spray them generously with penetrating oil, let it soak in for 15 minutes, and try again. Rotating the valve back and forth can help break the seal.
Leaks from valve body – Make sure the gasket is in place and the retaining nut is tightened just enough to form a seal but not overtightened. Wrap plumber’s tape around valve threads for a watertight connection.
Cross-threaded connections – If you have trouble getting fittings to screw together, the threads may be cross-threaded. Unscrew, realign properly, and try again. Go slowly and keep things straight.
Supply line leaks – These seals just need hand tightening plus a quarter turn with a wrench. Make sure the cone washer aligns inside the nut. Wrap threads with plumber’s tape.
No hot water flow – Check that the supply lines are not reversed. Hot should go to the left inlet, cold to the right. The cartridges must also be reinstalled correctly.
Conclusion
Upgrading from a 2 handle to single handle shower faucet provides both style and functionality benefits. The key is taking your time, following directions, and having the proper tools on hand. Stick to the steps above, avoid common mistakes, and you’ll have an easier, hassle-free installation.
While it takes a bit of effort, the end result is well worth it. You’ll gain a much nicer looking, sleek new fixture and better control over your water temperature and pressure. Just think of the ease of use and cleaner look you’ll enjoy every morning in the shower!