The coolant temperature sensor is an important component in a vehicle’s cooling system. It monitors the temperature of the coolant and sends signals to the engine control unit (ECU). The ECU uses this information to regulate the fuel mixture, ignition timing, and cooling fan operation. A faulty coolant temperature sensor can lead to poor fuel economy, engine performance issues, and even overheating. Knowing how to properly replace a coolant temperature sensor is an essential maintenance skill for any DIY mechanic. In this comprehensive guide, we will cover everything you need to know about replacing a coolant temperature sensor.
Page Contents
- 1 What is a Coolant Temperature Sensor?
- 2 Symptoms of a Faulty Coolant Temperature Sensor
- 3 How Long Does a Coolant Temperature Sensor Last?
- 4 How to Test a Coolant Temperature Sensor
- 5 How to Replace a Coolant Temperature Sensor
- 6 Cost to Replace a Coolant Temperature Sensor
- 7 FAQs – Replacing Coolant Temperature Sensor
- 7.1 Is it safe to drive with a faulty sensor?
- 7.2 Where is the coolant temp sensor located?
- 7.3 Can I replace it myself? Yes, most coolant temp sensors can be changed easily with basic hand tools. No special skills are required for DIY replacement in most cases. How do I know which sensor to buy?
- 7.4 Should I use sealant on the sensor threads?
- 8 Conclusion
What is a Coolant Temperature Sensor?
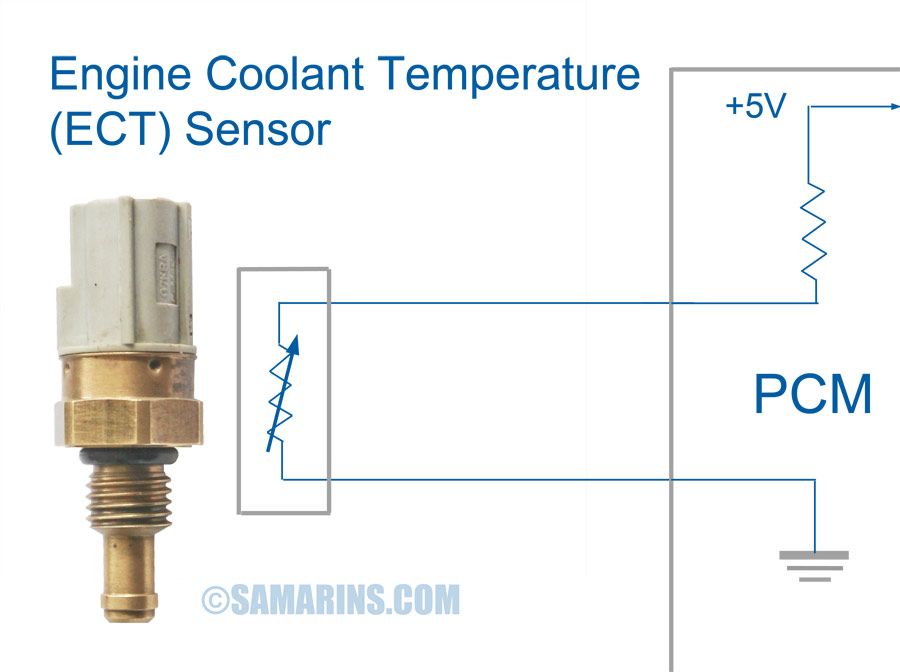
The coolant temperature sensor, also known as an engine coolant temperature (ECT) sensor, is typically located in the engine coolant passageway. It contains a temperature-sensitive resistor that changes resistance based on the temperature of the engine coolant.
As the coolant heats up, the resistance of the sensor decreases. Conversely, as the coolant cools down, the resistance increases. This change in resistance signals the ECU to make adjustments to the air/fuel mixture, ignition timing, and operation of the radiator cooling fan.
Most coolant temperature sensors either screw or clamp into the coolant passage housing. Common locations include the thermostat housing, cylinder head, cylinder block, or intake manifold. The sensor tip is immersed in the coolant flow to obtain an accurate reading.
Types of Coolant Temperature Sensors
There are two main types of coolant temperature sensors:
1. NTC (Negative Temperature Coefficient) Sensor
NTC sensors are the most common type of coolant temperature sensor. As mentioned earlier, NTC sensors decrease in resistance as the temperature increases. NTC sensors typically contain a thermistor – a temperature sensitive resistor enclosed in plastic housing.
2. PTC (Positive Temperature Coefficient) Sensor
PTC sensors operate in the opposite way of NTC sensors. Their resistance increases as the sensed temperature increases. PTC sensors are less common than NTC sensors.
Both types of sensors accomplish the same task of monitoring coolant temperature. The main difference is whether resistance increases or decreases with temperature.
Symptoms of a Faulty Coolant Temperature Sensor
Some common signs and symptoms that point to a faulty coolant temperature sensor include:
- Check Engine Light comes on – Trouble codes related to the coolant temperature circuit are stored.
- Poor fuel economy – Incorrect fuel mixture due to bad temp sensor readings.
- Difficulty starting – Engine does not start or cranks longer than normal.
- Engine overheating – ECU not activating cooling fan due to incorrect readings.
- Rough idle – Irregular idle and stalling due to improper fuel mixture.
- Poor acceleration – Sluggish performance and lack of power.
If your vehicle is exhibiting any of these symptoms, it’s a good idea to test or replace the coolant temperature sensor. Allowing it to fail completely can lead to serious engine damage.
How Long Does a Coolant Temperature Sensor Last?
The average lifespan of a coolant temperature sensor is 60,000 – 100,000 miles. However, that can vary greatly depending on factors like:
- – Vehicle make and model
- – Operating conditions – short trips, extreme hot/cold weather, towing, stop-and-go traffic
- – Quality of sensor – cheap aftermarket sensors may fail sooner
- – Maintenance – flushed/changed coolant, no overheating incidents
Following the manufacturer’s recommended maintenance schedule is the best way to maximize the life of the coolant temp sensor. Sensors that are exposed to accumulated sludge in old coolant or overheating episodes tend to fail sooner.
How to Test a Coolant Temperature Sensor
Here are some simple steps to test your coolant temperature sensor at home:
Tools/Materials Needed:
- Digital multimeter
- Shop rag
- Glass cleaner or brake parts cleaner
Directions:
- Locate the coolant temperature sensor. It’s often on the engine near the thermostat housing.
- Disconnect the sensor wiring harness.
- Clean the sensor contacts using a shop rag and glass cleaner.
- Set multimeter to Ohms setting. For an NTC sensor, the resistance should be low when engine is warm. For a PTC sensor, resistance is high when warm.
- With the key OFF, measure resistance between the sensor signal and ground contacts.
- Start the vehicle and let it reach operating temperature.
- Measure the resistance again and compare to specs in your repair manual.
- Turn OFF ignition before disconnecting multimeter.
If the resistance values do not match the required specifications, the coolant temperature sensor needs to be replaced.
How to Replace a Coolant Temperature Sensor
Replacing a faulty coolant temperature sensor is a straightforward DIY repair on most vehicles. Here are the key steps:
Materials Needed:
- – Replacement coolant temperature sensor
- – Shop rags
- – Drain pan
- – Glass cleaner or brake parts cleaner
- – Coolant (if needed)
Steps:
- Disconnect the negative battery cable – This allows safe sensor removal and prevents computer issues.
- Locate and clean the sensor – Find the sensor and use shop rags and cleaner to remove dirt and oil.
- Drain some coolant – Use the drain pan to catch lost coolant when removing the sensor.
- Unplug sensor wiring harness – Depress release tab to detach electrical connector.
- Remove old sensor – Use proper socket to unscrew faulty sensor. Caution: may still be hot!
- Install new sensor – Screw in new sensor by hand until snug. Do not over tighten.
- Reattach wiring harness – Make sure connection is secure.
- Refill coolant – Top up coolant to proper level and bleed air from system.
- Reconnect battery cable – Restore power and test sensor operation.
Some tips for safe, hassle-free coolant temp sensor replacement:
– Allow engine to fully cool before starting work.
– Refer to repair manual for proper sensor torque specs.
– Make sure to use new coolant sensor gasket/o-ring.
– Thoroughly bleed air to avoid overheating issues.
Cost to Replace a Coolant Temperature Sensor
The cost to replace a faulty coolant temperature sensor can range from $80-$250. Here are some of the factors that affect the overall replacement cost:
- – Cost of replacement sensor – $20-$150+
- – Labor costs if hiring a mechanic – $60-$150 per hour
- – Any additional gaskets or seals needed – $5-$20
- – Shop fees for supplies, disposal, etc. – Varies by shop
- – Lost coolant that needs to be replaced – $10-$30
DIYers can save on labor costs by doing it themselves. The sensor itself and any incidentals are usually pretty affordable. Scheduling preventative coolant system flushes helps minimize premature sensor failure and added expenses.
FAQs – Replacing Coolant Temperature Sensor
Is it safe to drive with a faulty sensor?
It’s not recommended to continue driving with a confirmed bad coolant temperature sensor. This can allow your engine to overheat and cause permanent damage. Replace the sensor as soon as possible.
Where is the coolant temp sensor located?
Common coolant temperature sensor locations include the thermostat housing, cylinder head, cylinder block coolant passage, or intake manifold. Check your repair manual.