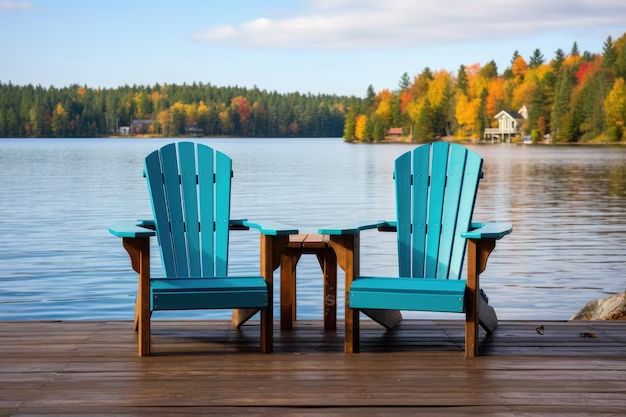
With their sloped seats and wide armrests, Adirondack chairs are a classic backyard staple for relaxing outdoors. But before popping open your wallet to pick up a set of “adirondacks” from your local hardware store, you may want to consider whether it’d actually be cheaper – and more rewarding – to build your own.
In this article, we’ll compare the costs, tools, and time required to build Adirondack chairs from scratch versus buying pre-assembled ones. We’ll also touch on some of the other factors, like customization and quality, that may impact your decision. Read on to figure out if a DIY Adirondack chair project makes sense for your needs and skill level.
Page Contents
The Costs of Materials
One of the biggest considerations when deciding whether to build or buy adirondack chairs is the cost of materials. If you were to build your own chairs, you would need to purchase all of the necessary wood, hardware (screws, bolts, etc.), and tools. This can add up quickly, especially if you opt for higher quality woods like cedar, redwood, or teak.
Here’s a rough breakdown of material costs for a single, basic Adirondack chair:
- Wood (1x4s, 2x4s, plywood) – $30 to $50
- Cushions/hardware – $20 to $30
- Paint/stain/finish – $10 to $20
So you’re looking at around $60 to $100 in materials per chair. If building two chairs, that bumps up to $120 to $200 total. Now let’s compare that to buying pre-built chairs…
For mass-produced Adirondack chairs from big box stores, prices typically range from about $100 to $300 per chair. Higher end, handcrafted timber chairs can cost $500+, but those are an exception. In general, expect to pay:
- Resin adirondack chairs – $100 to $200 per chair
- Cedar/pine adirondack chairs – $200 to $300 per chair
So when comparing just wood and material costs, building your own Adirondack chairs is generally going to be cheaper than buying pre-made chairs of comparable quality.
Cost Savings from DIY
By building your own adirondack chairs, you can save about $50+ per chair compared to buying pre-assembled. And if you use lower grade wood or minimal finishes, the cost savings are even greater. Just keep in mind that the tradeoff may be somewhat shorter lifespan compared to pricier woods like cedar.
Factor in Tools and Hardware
The material costs above don’t factor in any tools, equipment or hardware that you may need to purchase if taking on an Adirondack chair building project.
At a minimum, you’ll need basic tools like:
- Circular saw
- Jigsaw
- Sander
- Drill
- Hammer
- Tape measure
- Level
- Clamps
And you’ll need various hardware items like:
- Screws
- Bolts
- Nuts
- Washers
If you’re an avid DIYer, chances are you already own many of these tools. But if not, you may need to budget another $200-$300 to equip your workshop with the necessary gear. Buying cheaper used tools can help reduce this cost.
You can use wood glue instead of some hardware to save on costs. But you’ll still need a decent amount of exterior-rated screws and bolts to construct the chair frames sturdily.
Tool Rental as an Option
Rather than buying tools, another option is to rent them as needed from your local hardware store. Daily or weekly rental fees add up cheaper than purchasing tools outright. Just make sure to plan your project timeline accordingly.
A circular saw, jigsaw, sander, and drill can all be rented affordably. You may also be able to borrow basic tools from friends and family.
Time Investment for DIY
In addition to the material and tool costs, you also need to account for the time investment required to build Adirondack chairs from scratch. While you save money upfront on materials, you pay for it with your time and effort instead.
It typically takes 8-12 hours for an experienced DIYer to build one Adirondack chair. As a beginner, expect it to take even longer as you learn techniques and make some mistakes along the way. That time is broken down roughly as:
- 2-3 hours for design plan
- 2 hours to cut wood
- 3 hours to sand parts
- 3-4 hours to assemble chair
- 2 hours finishing
Building two chairs? Double those time estimates. You can shave off some hours once you get the basic construction down after the first chair. But expect the initial one to be quite time consuming.
Valuing Your Time
When weighing the time investment, think about how you value your spare time on weekends or after work. Those 10-15 hours spent building chairs could be 10-15 hours spent on other projects, hobbies, or simply relaxation. Everyone will value their leisure time differently in this equation.
Additionally, consider whether you actually enjoy the woodworking process or not. If you get satisfaction from building something with your own two hands, that’s a perk that offsets some time spent. But if you dread the thought of hours sanding and assembling chairs, outsourcing the labor might be worthwhile if you can afford it.
Cost of Mistakes
Even skilled woodworkers make mistakes occasionally, and beginners tend to make many more. One mis-cut piece of wood can ruin an entire board. A drill hole placed an inch off can mean starting the piece over.
Mistakes aren’t a huge deal on a single project. But if building 5+ Adirondack chairs for your back patio, repeated errors will quickly balloon both your budget and timeline. Be prepared for some trial and error as part of the process.
Factor in Redo Time
When estimating your DIY timeline, budget in some extra hours for re-work when pieces don’t come out perfectly. You don’t want to end up short on time right as company is coming over to try out your new chairs!
Having extra wood and hardware materials on hand also gives you margin for error. So don’t buy the exact amounts listed on your plan.
Skill Level Required
How experienced of a woodworker do you need be to take on an Adirondack chair build? The short answer is that a beginner can do it with proper plans and patience. But some prior woodworking knowledge will definitely help.
Some key skills that will help ensure success include:
- Accurate cutting with power saws
- Drilling straight holes
- Sanding evenly
- Staining and finishing
- Using a plan as a guide
And understanding basics like wood joinery, clamping, adhesives, and fastener options will also make the process smoother.
Again, as a total beginner you can learn these skills as you build your first chair. But expect the project to take longer and have more frustrations without experience.
Consider a Woodworking Class
If you’re feeling daunted by the prospect of building an Adirondack chair as your first real woodworking project, take a class first! Introductory woodworking courses at local home improvement stores, woodcraft studios, or community colleges are a great way to gain experience before trying to build furniture at home.
Even just a basic 2-3 hour class can give take away valuable tips and prevent beginner mistakes later on.
Customization Options
One of the best perks of building your own Adirondack chair vs buying is the ability to fully customize your design.
Some ways you can personalize DIY chairs include:
- Painting or staining a favorite color
- Adding custom stencils or routered patterns
- Burning names/dates into the wood
- Choosing unique wood species like cedar or redwood
- Incorporating reclaimed wood
- Adding shelves, ottomans, wheels, or other features
Store-bought chairs have very limited customization beyond choosing from a few stain colors or attached accessories. So if you want chairs that reflect your personal style and space, DIY provides a lot more freedom.
Make Them Your Own
You can add plenty of personal touches without complicating the core chair construction too. Small details like fun paint colors, carved designs, monograms, or name plates can express your style without advanced woodworking skills.
So embrace your creative freedom on a DIY Adirondack build. They’ll mean that much more as chairs you lovingly designed and crafted yourself.
Quality of Materials
When comparing DIY versus store-bought adirondack chairs, quality of the materials is another consideration.
With commercial chairs, quality varies widely depending on where and what you buy. Big box store chairs tend to use decent but unremarkable wood species and hardware. More expensive artisan chairs may boast premium woods like acacia or teak, but those prices are outliers.
With DIY chairs, you control the material quality directly. At the low end, basic pine or whitewood will get the job done. For better weather-resistance and longevity, choose pricier cedar, redwood, or cypress instead.
Hardware quality is also controllable with DIY chairs. Opt for thicker gauge metals and exterior-rated screws to prevent fasteners from degrading too quickly outside.
Factor In Your Climate
Your specific climate should inform wood choice for DIY chairs. In wet regions, moisture-resistant species like cedar or composite materials like Trex will hold up best. In arid climates, less expensive pines and whitewoods work fine.
No matter your location, applying a UV-protective sealant minimizes sun damage to any wood type. So don’t skip that finishing step!
Durability Over Time
You want your Adirondack chairs to last for many years, whether you build or buy them. So how do DIY and store-bought chairs compare in terms of longevity?
For store-bought chairs, expected lifespan is heavily dependent on chair quality. Basic big box pine chairs may only last 2-3 years before splintering or cracking. Mid-range oiled cedar chairs can get 5+ years of use. And the most high-end teak or composite options last 10 years or more.
With DIY Adirondack chairs, you also get out what you put in:
- Cheap wood & hardware means 2-4 years max
- Medium-quality materials = 5-8 years
- Premium woods, skilled craftsmanship, and upkeep = 10+ years
The key advantage of DIY is control. You choose how long-lasting you need the chairs to be based on skill, materials, and upkeep.
Maintenance Is Crucial
No matter if store-bought or DIY, maintaining Adirondack chairs is vital for prolonging their lifespan. Applying protective outdoor sealant every 1-2 years will impede weathering and rot. Tightening loose bolts and hardware also prevents structural issues.
Storing adirondack chairs tipped downward in winter helps moisture run off instead of pooling. And keeping wood free of soil contact prevents premature decay at the base.
With proper maintenance and storage, even low-cost DIY chairs can achieve 5+ years of enjoyment.
Satisfaction of Building
Beyond the logistics of cost and time, an intangible benefit of DIY Adirondack chairs is the pride and satisfaction of constructing your own furniture.
Taking raw lumber and transforming it into a functional, beautiful backyard chair rewards you with a deep sense of personal accomplishment.
The feeling of satisfaction comes not just from the end result, but from the journey of learning and improving woodworking skills along the way.
Store-bought chairs may save time upfront. But the tradeoff is missing out on the meaningful DIY experience and the story behind the chair.
Enjoy the Process
If you approach an Adirondack chair build as just a means to an end, you’ll probably get frustrated. The hours of work feel more rewarding when you enjoy the incremental accomplishments from starting as a pile of boards to completing the last coat of stain.
So be sure to pause and celebrate milestones like finishing your cutting, sanding, assembly, etc. The finished chairs will mean that much more as reminders of the effort you put in.
Conclusion
So should you DIY or buy your Adirondack chairs? The answer depends on your budget, skillset, and patience for taking on a weekend to medium-sized woodworking project.
If cost is your main driver and you have access to tools, building your own chairs from lumber for about $100-150 per chair can yield significant savings over buying pre-made chairs in the $200-300 range.
However, factor in another $200+ if you need to purchase all the necessary tools and hardware to complete the project as a first-timer. And be conservative in estimating the 10-15 hours of DIY labor required for someone with beginner to intermediate woodworking skills.
The main advantages of buying pre-made Adirondack chairs are saving on time and labor. But the tradeoffs are higher upfront cost and lack of customization compared to DIY options.
Whichever route you choose, proper maintenance and storage will be key to getting the most longevity out of your chairs. And take pride in creating comfortable backyard seating you’ll enjoy for years to come!