Replacing the inner workings or “guts” of a toilet is a straightforward home improvement project that most DIYers can tackle. The key requirements are having the right replacement parts, basic tools, and following proper safety precautions. In most cases, replacing toilet guts takes 1-3 hours and can be done without fully removing the toilet. This prevents the extra work of having to detach and reseat the toilet. As long as you have a little mechanical aptitude, replacing worn-out or malfunctioning toilet guts is an accessible way to restore your toilet’s flushing performance.
Page Contents
What are toilet guts?
Toilet guts refer to the internal components that allow your toilet to function. These include:
- Flush valve – Located in the tank, the flush valve seals the water into the tank and releases it when you flush. It consists of the overflow tube, flush valve seal, and flapper.
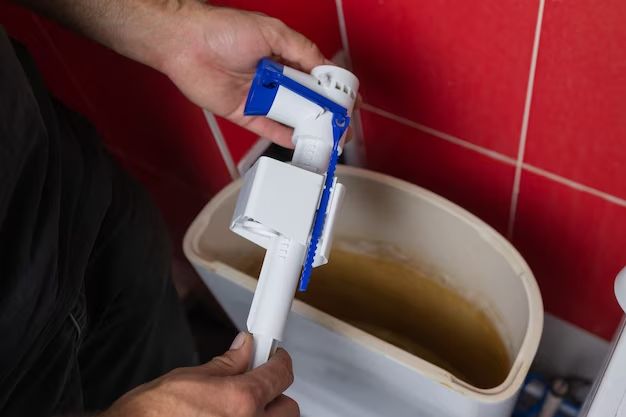
- Fill valve – Also located in the tank, the fill valve refills the tank with water after flushing. It consists of the ballcock and float.
- Flush valve seat – This is the opening at the bottom of the tank that seals with the flapper.
- Drain assembly – Located under the bowl, the drain assembly is connected to the trapway and waste pipe. It consists of the drain elbow and mounting bolts.
Additional related parts include the tank to bowl gasket and bowl wax ring. As you can see, toilet guts comprise all the mechanical pieces that allow water to flow in and out of the toilet bowl correctly. Problems with any of these components can lead to leaks, weak flushing, water waste, and other toilet malfunctions. Replacing the guts restores them for proper operation.
Signs You Need New Toilet Guts
Here are some common signs that your toilet may need new guts:
- Weak, sluggish, or incomplete flushing
- Toilet takes multiple flushes to clear bowl
- Toilet runs constantly
- Water leaks into tank or bowl
- Flapper doesn’t seal tightly
- Fill valve turns on/off improperly
- Drain clogs frequently
- Bowl rocks or isn’t securely mounted
- Seal at tank/bowl connection fails
- Toilet no longer flushes/operates at all
Any of these problems typically indicate wear, mineral buildup, or damage to one or more toilet guts components. Catching them early and replacing worn parts prevents more severe leaks or flooding down the road.
Preparing for the Project
Replacing toilet guts is manageable for DIYers but does require proper preparation. Here are some tips for getting set up beforehand:
- Turn off the toilet’s water supply and flush to empty the tank.
- Purchase a compatible toilet guts kit with all required parts.
- Have a bucket, towels, adjustable wrench, screwdriver, pliers, etc. on hand.
- Read through the full directions before starting.
- Watch online video tutorials for guidance.
- Clear your schedule in case the project takes longer than expected.
- Be prepared in case complications arise and professional help is needed.
Taking the time to gather supplies and understand the process will make the repair much smoother. Since toilets are used frequently, give yourself adequate time so you can replace the guts successfully in one shot with minimal downtime.
Step-by-Step Guide
Once prepped, here is an overview of the toilet guts replacement process:
- Turn off water supply – Locate the shutoff valve behind or near the toilet and turn it clockwise to shut off water to the toilet.
- Flush toilet and empty tank – Flush the toilet to empty the tank. Soak up remaining water with a sponge or towel.
- Disconnect water supply line – Use pliers to unscrew the flexible supply tube from the toilet fill valve. Set this aside to reuse.
- Remove old parts – Remove flapper, float, fill valve, bolts, wax ring, etc. Inspect each part and clean mineral deposits as needed.
- Install new fill valve – Slide gasket over shank, insert new fill valve into tank hole, and tighten nut below.
- Install new flapper – Hook chains through flapper ears and connect to flush lever.
- Install tank components – Put in new bolts, gasket, washers if needed. Reconnect water supply line.
- Install new wax ring – Turn toilet on its side and replace old wax ring with new one.
- Reseat toilet – Set toilet back atop flange and press down firmly to adhere wax ring.
- Reconnect supply – Open shutoff valve to supply water. Test for leaks and flush several times.
Follow instructions specific to your toilet make and model. Having all the correct replacement parts makes installation much simpler. Changing the wax ring usually requires temporarily unseating the toilet. Take care not to crack the bowl.
Troubleshooting Common Problems
Despite best efforts, here are some common troubleshooting issues when replacing toilet guts:
- Toilet leaks – Ensure connections are tight. Check washers and gaskets. Tighten nuts under tank. Make sure wax ring has good contact.
- Weak flush – Check that flapper chains have enough slack. Adjust water level if needed. Make sure valves are open fully.
- Runs continuously – Adjust flapper chain length so flapper seals tightly. Make sure flapper and flush valve seat are clean.
- Loose bowl – Confirm bolts are tight and wax ring is pressed firmly in place. Shim under toilet if rocking.
- Clogs persist – May need drain auger to clear clog further down pipe. Install an in-line filter to prevent future clogs.
Carefully inspecting connections, stabilizing the toilet, and adjusting parts often resolves initial issues. For ongoing problems, there may be an underlying problem requiring professional drain cleaning or replacement services.
Cost to Replace Toilet Guts
For DIYers, replacing toilet guts costs between $20-60 typically. Parts like fill valves, flappers, and wax rings cost $5-20 each. Kits with all guts components may run $30-60. Hiring a plumber averages $180-350, including labor and service fees. Whole toilet replacement ranges $150-600. Overall, replacing just the guts is an affordable fix that restores toilet function.
Conclusion
Replacing worn-out or faulty toilet guts is a worthwhile DIY project for homeowners. As long as you have some plumbing knowledge and the proper replacement parts, the process is fairly straightforward. Following safe practices like turning off water, having a spill bucket, and wearing gloves reduces mess and accidents. Patience is key when uninstalling stuck old components and reinstalling the new guts. Taking your time helps ensure everything fits and works correctly. Investing a few hours into replacing leaky, inefficient toilet guts can save hundreds of dollars down the road before major leaks or water damage occur. With the right preparation and tools, refreshing your toilet guts boosts performance for years to come.