Page Contents
Quick Answer
The most common angle used for cutting french cleats is 45 degrees. This allows the two boards to fit flush against each other and hold securely using the force of gravity. Most french cleats are cut at precisely 45 degrees to maximize strength and ease of installation.
What is a French Cleat?
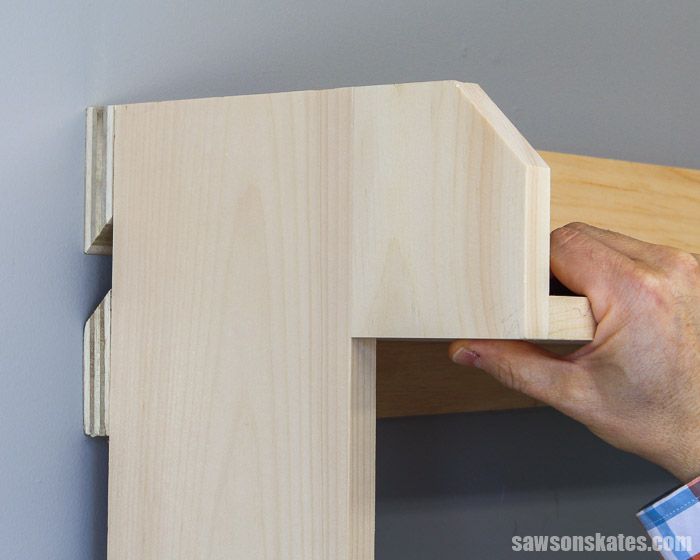
A french cleat is a simple yet effective system used to hang cabinets, shelves, and other items on a wall. It consists of two boards, each cut at a 45 degree angle along the top edge. One board is mounted securely to the wall. The other is attached to the back of the cabinet or shelf to be hung.
When the two angled edges are fit together, the board on the wall supports the weight of the cabinet or shelf in a secure, non-slip manner. The force of gravity and the 45 degree angle wedge the two boards tightly together.
French Cleat Basic Design
The basic design of a french cleat utilizes two boards or strips of wood, cut to the same length. Each board is cut at a precise 45 degree angle along one edge. This creates the wedge shape that is key to the functionality of the cleat.
One board is securely fastened to the wall, either using screws through the middle of the board or with wood glue and finish nails along the edges. The other board is attached to the back of the cabinet, shelf, or other item to be hung.
Installing a French Cleat
To install a french cleat:
- Cut two boards to the same length at a precise 45 degree angle. The angle is critical for proper function.
- Mount one board securely to the wall, keeping it level. Screw through the center or use construction adhesive and nails along the edges.
- Attach the matching angled board to the back of the item to be hung, keeping the bottom edge aligned.
- Hang the item on the wall by fitting the two angled boards together. The 45 degree angle wedges the boards tightly.
- Add trim pieces along the bottom or sides of the hanging item to finish the look if desired.
The wedging action of the boards under the force of gravity keeps the cabinet or shelf securely in place on the wall. No other hardware or fasteners are necessary.
What Angle to Cut French Cleats
The standard angle for cutting french cleats is 45 degrees. This has proven over time to be the optimal angle to produce a tight wedge between the wall board and the cabinet board when fitted together.
The 45 degree angle maximizes strength and holding power while still allowing for easy installation and adjustment. Changing the angle even slightly from 45 degrees will compromise the functionality of the connection.
Why Use a 45 Degree Angle?
There are a few key reasons why 45 degrees is the standard french cleat cutting angle:
- Creates a wedge shape that locks together under force of gravity
- Provides the highest holding strength
- Allows for easy installation and adjustment
- Accounts for variance in wood thickness
- Offers aesthetic appeal
Cutting the cleats precisely to 45 degrees optimizes all of these factors. Smaller or larger angles may be too weak or too difficult to install smoothly.
Cutting a 45 Degree Angle
To cut a 45 degree mitered edge on a board for french cleats, you can use:
- Miter saw – set the miter angle to exactly 45 degrees
- Table saw – use a miter gauge and tilt the blade to 45 degrees
- Hand saw – use a miter box with a 45 degree angle slot
- Router – use a 45 degree chamfer bit
The most precise and efficient way is to use a power miter saw set to 45 degrees and make the full length cut in one pass. Clamp a stop block in place to cut multiple boards to the exact same length.
When cutting, go slowly and carefully to ensure the 45 degree angle is accurate along the full length of the board. Even small variations can impact the strength of the connection. Test the fit between the boards and use a belt sander to tune the angle if needed for a flush fit.
How Strong is a 45 Degree French Cleat?
A french cleat cut precisely to 45 degrees on both boards creates an incredibly strong hanging system capable of supporting very heavy weights.
The wedging action of the mitered edges under force presses the boards tightly together, creating ample friction and mechanical resistance. This makes the cleats able to handle heavy static and dynamic loads in many residential and commercial applications.
Weight Capacities
In general, a properly constructed french cleat made from 3/4″ thick lumber can support:
- 175+ lbs per linear foot when screwed into wall studs
- 75+ lbs per linear foot when attached to drywall alone using toggle bolts
For additional strength, thicker lumber can be used or cleats can be doubled up. Using hardwoods like oak or maple is preferable over softer woods like pine for maximum strength.
Advantages Over Other Hanging Methods
French cleats offer strength advantages over other hanging techniques:
- More secure than nails, screws, or brackets alone
- Holds heavier items than floating wall shelves
- Easier to install than complex rail systems
- Allows easy repositioning not possible with adhesives alone
The angled wedging effect resists pulling and downward forces better than typical 90 degree joints or flat hanging brackets. Yet the system remains easy to install and adjust as needed.
Tips for Hanging Heavy Items on French Cleats
Here are some tips to follow when using french cleats to hang heavy mirrors, cabinets, TVs, or shelves:
Mount into Studs
Whenever possible, secure at least one end of the wall-mounted french cleat directly into a wall stud. Use long wood screws threaded into the stud to support the load. Toggle bolts spaced along the cleat into drywall can also provide adequate strength for many situations.
Use Thicker Stock
For heavy loads, use 3/4″ or even 1″ thick lumber to construct the cleats rather than thinner 1/2″ stock. The thicker material minimizes sagging, bowing, and flexing under load. Hardwoods like oak are ideal for added strength when hanging heavy objects.
Run Cleats Longer than the Item
Cut the wall-mounted french cleat several inches longer than the cabinet or shelf being hung. This allows fastening multiple screws across wall studs for increased support. It also provides room for side-to-side adjustment during installation.
Double Up Cleats
For extremely heavy loads like large tool chests or cabinets, use two sets of french cleats. Mount one set high and one low to distribute the weight. Or space matching pairs of cleats every 16-24 inches along the mounting surface.
Add Side Support Brackets
Supplement the main hanging cleats with triangular side support brackets for wide shelving units or cabinets. This prevents sideways racking and provides additional strength. The triangular shape wedges against the wall like the cleat.
Disadvantages of a 45 Degree French Cleat
While french cleats provide a very strong and versatile hanging method, there are a few potential disadvantages to consider:
Visible 45 Degree Cut
The obvious 45 degree angle along the upper edge is aesthetically less appealing than more hidden hanging methods. The joint can be concealed after installation with trim pieces if desired.
Possible Loosening Over Time
If not properly constructed and mounted, the cleat system can loosen gradually over time. Using a single long screw or adhesive at the lower end can prevent slipping while still allowing easy removal.
Difficult to Install on Uneven Surfaces
Any unevenness or gaps along the mounting surface can prevent the two cleat pieces from fitting tightly together. The installation surface must be flat and even for the system to work properly.
Not Great for Heavy Side Loads
While excellent for vertical loads, french cleats are not ideal for cabinets or shelves that experience very heavy side-to-side forces. The angled connection allows some racking which can loosen or detach the unit.
Wood Can Swell or Contract
Swelling, shrinking, or warping of the wood over time due to humidity changes can alter the fit and wedge angle. Using properly dried lumber and allowing wood to acclimate minimizes this issue.
Conclusion
A 45 degree cutting angle is the standard for french cleats, as it creates the strongest wedge shape and most secure joint. Carefully cutting both cleat boards to exactly 45 degrees ensures a tight connection that can support heavy hanging loads, while still allowing for easy installation and periodic adjustment. Minor variations from 45 degrees will compromise the strength and function of a french cleat hanging system. When constructing french cleats and other angled joints, a high quality miter saw and careful angle setup is a must. With attention to detail, 45 degree french cleats can safely and securely hang a wide range of items on your workshop or home walls.