A circular saw is an essential power tool for many DIY projects, but it can be tricky to make perfectly straight cuts without a guide. A guide gives you an edge to follow, helping ensure your cuts are straight and accurate. There are many options for DIY circular saw guides to help you get professional results.
Page Contents
- 1 What is a Circular Saw Guide?
- 2 Benefits of Using a Circular Saw Guide
- 3 What Can Be Used as a Circular Saw Guide?
- 4 Choosing a Circular Saw Guide
- 5 Setting Up and Using a Circular Saw Guide
- 6 Types of Circular Saw Guides
- 7 5 Simple DIY Circular Saw Guides
- 8 Tips for Using Circular Saw Guides
- 9 FAQs
- 10 Conclusion
What is a Circular Saw Guide?
A circular saw guide is any straight edge clamped or secured to the material you are cutting that serves as a track for the circular saw to follow. This allows you to make straight cuts without the blade wandering. A guide helps improve control, precision, and accuracy when using a handheld circular saw.
Guides allow you to line up your cuts accurately and have better visibility of your cut line. They transform a handheld circular saw into a homemade table saw. Circular saw guides are easier to use than relying on the base plate edge of the saw alone.
Benefits of Using a Circular Saw Guide
There are many good reasons to use a guide with your circular saw:
- Improves cut accuracy – A guide ensures your saw follows a straight line for precise cuts
- Prevents blade wandering – Stops the spinning blade from veering off course mid-cut
- Allows perfectly straight cuts – Essential for angled cuts across sheet goods or lumber
- Increases safety – Guides give you better control over the tool and material
- Reduces waste – Straight cuts mean less wasted material from crooked cuts
- Builds skill – Helps you learn to cut straight before going freehand
- Can rip long boards – Turn your circular saw into a small portable table saw
- Versatile for all skill levels – Useful for beginners but also handy for experienced DIYers
Whether you’re a novice or a seasoned DIYer, a circular saw guide is an invaluable tool for getting straight cuts and avoiding mistakes.
What Can Be Used as a Circular Saw Guide?
Many common workshop items make great improvised circular saw guides. Here are some of the most popular homemade options:
1. Straight Board
A straight, rigid board like a 1×4 or 2×4 acts as an ideal circular saw guide. Use a piece of scrap wood at least 3 feet long. Check it with a straightedge to ensure it isn’t warped. Clamp it securely to your workpiece, allowing the saw base to ride along the board edge.
2. Aluminum Bar
An aluminum bar or straight edge clamped to your work surface makes a good instant circular saw guide. Aluminum is light but very rigid. Use a bar at least 36″ long so it extends beyond your workpiece on both sides.
3. Plywood Strip
For a disposable option, a plywood strip cut parallel to the factory edge works well. Use a half or quarter sheet of plywood at least 20″ wide. Cut a 6″ wide strip off the long factory edge. Clamp the straight plywood edge to your material.
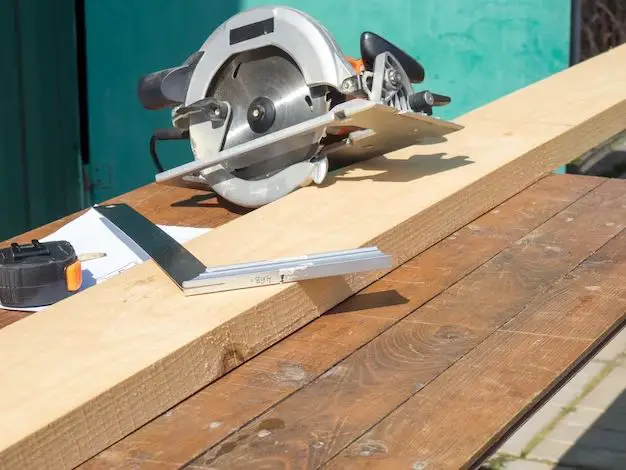
4. T-Square
A classic carpenter’s T-square makes an accurate reusable circular saw guide. Look for one at least 36″ long. Make sure the head is exactly perpendicular to the blade. Clamp the head to your workpiece with the blade extending.
5. Drywall Square
For a budget-friendly guide, you can use an aluminum drywall square. These 3-4 foot metal squares have one edge that’s slightly longer than the other. Use the factory-cut long edge as your straight guide.
6. Framing Square
The longest edge of a framing square or steel square also works. Position the square so the longest edge runs along your cut line and clamp it down securely. Use the edge as a guide for your circular saw.
7. Straight Piece of Tile
For a perfectly straight portable guide, use a 12 inch tile square. The precise machine-cut edges make an ideal guide. Lay the tile on your work so the cut line runs along one edge. Make sure the tile is held securely.
8. Long Level
A 3-4 foot level or ledger can be clamped down as an improvised saw guide. Use a sturdy aluminum level. Verify the edge is straight with a straightedge before using it.
9. Edge Guide
There are also aftermarket edge guides that attach to the base plate of your saw. These provide a straight edge to follow. They’re very portable but less stable than a clamped-down guide.
Choosing a Circular Saw Guide
When selecting a homemade circular saw guide, consider these criteria:
- Material – Use a rigid, straight material like aluminum, wood, or plywood to prevent flexing
- Length – At least 36 inches long to fully support standard circular saws
- Straightness – Verify it’s straight, not warped or bent
- Stability – Choose a thick, heavy material that can clamp securely
- Durability – Reusable options like aluminum bars work for many projects
- Portability – Pick a guide that’s easy to transport between work areas
The best DIY circular saw guides balance accuracy, reliability, ease of use, and affordability. With the right guide, you can achieve professional-quality cuts.
Setting Up and Using a Circular Saw Guide
Follow these steps to properly set up and utilize a circular saw guide:
- Select a rigid, straight material at least 36 inches long to use as your guide. Verify straightness.
- Position the guide edge exactly where you want to make the cut. Use a square to align it perpendicularly if needed.
- Clamp down the guide securely. Check for any wobble or flexing.
- Set the depth of the circular saw blade just deeper than the thickness of the material being cut.
- Line up the saw base plate with the guide edge. The base plate should ride along the guide.
- Make a test cut in scrap material first to check alignment.
- When aligned, turn on the saw and begin your cut, keeping the base plate tight to the guide edge.
- Take the cut slowly and steadily without twisting the saw. Keep blade guards in place.
- Support the waste side material to prevent potential binding and kickback.
- After finishing the cut, turn off the saw and allow the blade to stop before setting it down.
Tips for Using a Circular Saw Guide:
– Wear eye and ear protection when using power tools
– Blow away or vacuum dust and cutoffs to keep your cutting line visible
– For long cuts, use supports like saw horses to prevent workpiece drooping
– When ripping long boards, use a helper handle for better saw control
– Make multiple lighter passes rather than forcing one heavy cut
Following these techniques will help you get clean, straight cuts guided by a circular saw edge guide. With practice, you can achieve expert results.
Types of Circular Saw Guides
There are many commercial and shop-built guides available offering different features and benefits:
Fixed Board Guides
These are straight boards like 1x4s screwed to sawhorses or a tool stand to act as guides. They provide an inexpensive stationary saw guide solution, but lack portability.
Removable Board Guides
Similar removable straight boards that clamp to workpieces offer more flexibility. You can transport them between job locations and tailor positioning.
Cable Guides
Metal cables or steel tapes that attach to saws using magnets provide a straightedge to follow. These magnetic guides are lightweight and portable but less rigid than boards.
Attached Base Plate Guides
Aftermarket base plate edge guides bolt onto saws to provide attached guides. They add minimal weight but may not be as stable and fixed as external guides.
Rip Fences
Bar guides that mount to circular saws like a table saw rip fence help align and feed material through as you cut. They improve long rip cutting ability.
Rail Guides
Aluminum tracks offer a precision straightedge guide that circular saws ride in. This contrasts the blade riding against a guide edge. Rails provide stability when breaking down sheet goods.
Plunge Guides
Circular saws designed to mount on straight shop-made or commercial saw rails to “plunge” into material. Allows precise guided cuts not relying on the base plate edge.
5 Simple DIY Circular Saw Guides
Here are 5 easy homemade circular saw guides you can make for under $20:
1. Scrap Wood Guide
Cut a straight 1×4 or wider scrap board to at least 36 inches long. Check for straightness and clamp it securely. Use the board edge as your inexpensive saw guide.
2. Straight Steel Bar
Buy a 36″ rigid straight steel bar or flat bar from the hardware store. At around $10 this pro-style guide will last for years. File the edges smooth.
3. Aluminum Angle Guide
A 3-4 foot aluminum angle makes an instant guide. Many home centers sell 6 foot lengths for under $10. Cut to length and align the angle’s corner along your cut line.
4. Ripped Plywood Strip
Rip a 6 inch wide strip off a plywood sheet along the factory edge. This disposable guide costs pennies but provides a straight edge for small jobs.
5. Drywall Square Guide
Use an inexpensive 3-4 foot aluminum drywall square as a portable saw guide. Verify the factory edge is straight before buying.
These simple yet effective DIY guides cost almost nothing to make and allow accurately straight cuts with a handheld circular saw. With a guide, anyone can achieve professional results.
Tips for Using Circular Saw Guides
Follow these tips when using homemade and commercial circular saw guides:
- Always verify guide straightness with an engineer’s square or known-straight edge
- Clamp guides securely leaving no wiggle room or ability to shift
- Position guide 2-3″ away from the cut line to run circular saw base plate along it
- Make several light passes rather than forcing 1 heavy cut to avoid binding
- Support large panels or long boards on both ends near the cut to prevent drifting
- Use a helper handle for improved control when ripping long stock
- Wax or lubricate aluminum rail guides to reduce friction when cutting
- Never remove circular saw’s base plate edge guide when using rail guides
- Always wait for the blade to stop before removing saw from cut or guide
With practice and patience, guides can help you get perfectly straight cuts with your circular saw. They are an essential accessory for all DIYers looking for expert-level accuracy.
FAQs
Here are answers to some frequently asked questions about using circular saw guides:
What’s the most accurate circular saw guide?
Aluminum rails and track systems provide the most precision, but require an investment. For budget accuracy, a straight 1×4 board works great.
Can I use a speed square as a circular saw guide?
The short edge of a speed square will not provide enough support. Use a framing square or longer straightedge instead.
What material works best for homemade guides?
Aluminum and hardwood boards make ideal reusable guides. Plywood and rigid plastic can also work for one-time use.
What length guide do I need?
A minimum of 36 inches provides stability and support for standard 7-1/4 inch circular saws. Longer is better for 48+ inch cuts.
Can I make angled circular saw guides?
Yes, you can use adjustable protractors and digital angle finders to create guides angled for miter cuts. Ensure angles are exactly precise.
Conclusion
A circular saw guide is an easy accessory that can take your DIY cuts to the next level. Options like straight boards, rulers, squares, and rails all transform a handheld saw into a precision cutting tool.
Guides improve safety, material use, skill building, and cut accuracy. All you need is a rigid, straightedge material secured firmly along your cut line. With a guide, perfectly straight cuts become easy for any DIYer.
Just follow standard circular saw safety protocols, take your time, and let the guide edge do the work. You’ll achieve clean, professional results helping your projects look like they were completed by a carpenter.
So use one of these circular saw guide techniques next time precision matters. Your homemade saw track will help you cut straighter and get the most from every project.