Removing existing tiles can be a daunting task for any homeowner. There are many factors to consider, from the type of tiles being removed, to the tools and equipment needed for the job. Having the right equipment is crucial to make tile removal safe and effective. The main considerations for tile removal equipment are: the strength and stability of the tiles, the type of backing or adhesive used, the layout pattern of the tiles, and access to the installation area. With some preparation and the proper equipment, removing tiles can be straightforward.
Page Contents
- 1 What Types of Tiles Will You Be Removing?
- 2 What Type of Subfloor or Backing is Under the Tiles?
- 3 What Pattern are the Tiles Installed In?
- 4 Do You Have Clear Access to the Tiled Area?
- 5 Essential Tile Removal Tools
- 6 Power Tools for Tile Removal
- 7 Specialty Removal Tools and Chemicals
- 8 Step-by-Step Tile Removal Process
- 9 Tips for Easier Tile Removal
- 10 Hiring Tile Removal Pros
- 11 Removal and Disposal Process
- 12 Conclusion
What Types of Tiles Will You Be Removing?
The type of tile greatly impacts the removal process. Natural stone, ceramic, porcelain, glass, and cement tiles all have unique characteristics.
Ceramic tiles are one of the most common types installed in homes. They are made from clay that has been fired at high temperatures. Glazed ceramic tiles have a durable, water-resistant coating. Because the body and glaze have different expansion rates, ceramic tiles can be prone to cracking and are moderately difficult to remove.
Porcelain tiles are denser and less porous than ceramic tiles. They’re very durable and stain-resistant. Porcelain has high bonding strength and can be challenging to dislodge. Specialized tools are often needed.
Natural stone tiles like marble, granite, and slate have high variation. They range from soft and porous to very dense. Natural stone has irregular backs that bond well. Removal difficulty depends on the stone and mortar.
Glass tiles have a gorgeous finish but low durability. They can crack and scratch easily. The smooth glass backs do not adhere as strongly, so glass tiles can often be removed intact.
Cement tiles are very durable but brittle. They are secured well to surfaces and can break apart when removed. Cement dust is released, requiring safety precautions.
What Type of Subfloor or Backing is Under the Tiles?
Knowing what lies beneath the tile is key in choosing proper removal methods. Common tile backings include:
- Mortar – Cement-based adhesive used frequently with ceramic and porcelain tiles. Has a very strong bond.
- Thinset – Modified mortar with polymers added to increase adhesion. Creates an extremely durable bond, especially with porcelain.
- Mastic – Pre-mixed organic adhesive used with many glass mosaics and moisture-sensitive stone. Mastic forms a moderate bond.
- Mesh-backed sheets – Many porcelain and glass tiles come mounted on mesh sheets for installation. The mesh can tear off in sections.
- Wood subfloor – Natural stone or ceramic tiles are sometimes direct-bonded to plywood or OSB wood panels. This may damage the wood when removed.
- Concrete backerboard – Cement boards like Durock provide stable and moisture-resistant surfaces under tiles, forming a strong bond.
Identifying what type of backing was used is the best way to determine what removal methods will be most effective and safe for the subfloor underneath.
What Pattern are the Tiles Installed In?
Tile layout patterns impact removal difficulty as well. Small pieces in a mosaic pattern have more grout lines and individual tiles must be chiseled out carefully. Square or rectangular tiles in a basic grid may come up more in full sheets. Diagonal patterns make prying up rows difficult. Irregular patterns have less continuity for taking up full sections. Knowing the tile pattern allows choosing tools that can work around and through grout lines efficiently.
Do You Have Clear Access to the Tiled Area?
Can the tools and equipment reach the tiles easily? Tiles on floors, walls, countertops, and backsplashes each have their own access considerations:
- Floors – Clear any furniture and obstructions and evaluate if the flooring continues into closets or covered alcoves. Lifting and manipulating tools requires room.
- Walls – Outlets or switches may be in the way. Protrusions like shelves and cabinets need to be removed. Use dropcloths to protect.
- Countertops – Appliances and plumbing fixtures will need disconnecting to fully access the surface. SDS hammer drills can’t be safely used overhanging the edges.
- Backsplashes – The ceiling or cabinetry may limit swing clearance for hammers and pry bars. Protect surfaces from debris.
Restricted access requires using smaller hand tools and extending reach with attachments. Having an unimpeded work area makes tile removal far easier.
Essential Tile Removal Tools
With the tiles and installation area fully evaluated, you can assemble the best equipment for the removal job. The basic tile removal toolkit consists of:
Pry bar – A sturdy pry bar provides the essential leverage for lifting tiles and prying off layers. A 10-14 inch length allows good upward force.
Shovel – A compact shovel scoops up debris and can work as a pry bar. The rounded edge prevents gouging.
Cold chisels – Specialized masonry chisels cut through mortar lines and wedge under tiles. The cutting edge loosens adhesion.
Grout rake – This multi-tined rake digs down into grout joints to scrape adhesion and make prying easier.
Hand scraper – A 3-4 inch floor scraper quickly cleans thinset, mastic, and old backing off the subfloor after removal.
Eye protection – Safety glasses prevent flying shards and dust getting in eyes when force is applied.
Knee pads – Knee pads cushion and support working on hands and knees to scrape floors.
Work gloves – Gloves provide grip and protect hands from sharp broken tiles when removing debris.
Dust mask – A basic dust mask or respirator prevents inhaling fine particulates during removal.
Ear protection – Ear plugs or muffs safeguard hearing from equipment noise.
With just these basic manual tools and safety gear, you can tackle many tile removal jobs. Certain tiles like porous natural stone are gentle enough to pry up using just a few flat pry bars. Watch for cracking or crumbling stones.
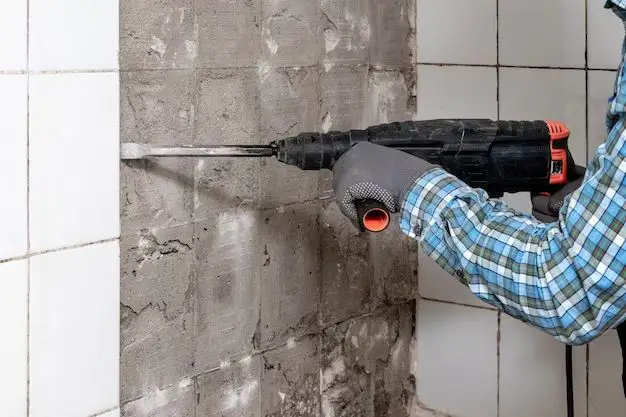
Power Tools for Tile Removal
Some tile materials and mortar beds require powered equipment to dismantle efficiently. Common power tools include:
SDS Rotary Hammer – The hammering action chips through cementitious grout and backing. Get a bulldog style with flat chisel. Use water to control dust.
Circular saw with masonry blade – Adjust to cut just through tiles and backing without damaging the subfloor. Leave plastic spacers in expansion joints.
Pneumatic chisel – Powerful compressed air hammering breaks tile adhesion. Lighter than electric tools but very noisy.
Oscillating multi-tool – The rapid oscillating head equipped with a grout blade or scraper loosens tiles and cleans floors. More maneuverable option.
Angle grinder – With a diamond tile blade, it cuts precise outlines in the mortar bed to free tiles. Creates substantial dust requiring containment.
Always wear appropriate respiratory, hand, eye and ear protection when using power tools. Have a shop vacuum ready to control dust and debris. Use tools correctly to avoid damaging the underlying surface. Power tools speed up removal for more durable tile materials with stronger bonding.
Specialty Removal Tools and Chemicals
Glass Tile Nippers
Small nipper pliers can grasp and tweak delicate mosaic glass tiles to pop them off gently. The dual plier design provides control. Nippers minimize glass splintering or cracking.
Paint Stripper Chemicals
Dimethyl glutarate (DMG) based paint strippers help soften mastics or thinset adhesives to allow scraping off tiles more easily. Apply a thick coating according to directions. Wait 15-30 minutes before scraping up tiles. Use gloves, mask, and ventilation.
Heat Gun
A heat gun applying 900-1100°F temperatures can soften mastics for removal. Apply heat in sweeping motions until adhesive starts bubbling, then lift tiles carefully with a putty knife. Avoid heating limited areas which can damage the subfloor.
Tile Release Powders
Perforated paper or mesh sheets are coated with a release powder like talc or boron nitride. Laid over tiles, they allow residues to be peeled off easily. Limit dust from the dry powders.
Specialized tools like nippers, chemicals, heat, and powders help make stubborn types of tile removal more doable. Always follow safety guidelines using these additional products. Personal protective equipment prevents respiratory and skin irritation during the removal process as well.
Step-by-Step Tile Removal Process
Once you have the right equipment, follow these basic steps to dismantle tile flooring or walls:
- Carefully cut perimeter outline – Use an angle grinder or circular saw to cut through grout and backing around fixed elements like cabinetry, plumbing, or lightswitches. Avoid cutting into subfloor.
- Undercut tiles – Use a grout saw with carbide or diamond blade to slice into edges of tiles and underlying thinset or mortar.
- Shovel out loose debris – Remove the cut out grout, drywall, or other freed materials from the perimeter sections.
- Drill holes in tiles – Make holes centered in tiles with a hammer drill and masonry bit to weaken their structure.
- Split tiles with chisel – Position cold chisels in drilled holes or mortar joints. Pound gently with hammer to split tiles.
- Lift tiles with pry bar – Slide flat pry bar gently under split tiles, lift up and work side-to-side to break adhesion.
- Clean floor with scraper – Use a manual scraper or oscillating tool to remove all old thinset, adhesive, or backing from the exposed subfloor.
- Remove and discard debris – Carefully pick up all broken tile pieces and old flooring materials and place in a covered bin.
Follow safety procedures and work carefully under tiles that will remain to avoid damaging them. Thoroughly clean the floor and you will have an ideal surface for new tile installation.
Tips for Easier Tile Removal
Here are some additional pointers to help make taking up tile floors and walls easier:
- Wet mortar and concrete materials slightly before removal – reduces dust generated.
- Start removal in less visible utility or closet spaces – provides experience before tackling main rooms.
- Use an oscillating multi-tool to slice around fixtures – avoids damaging counters or cabinets.
- Lay rosin paper over subfloor before prying – prevents gouging soft pine or OSB boards.
- Watch for asbestos in vinyl tiles or mastic – requires abatement procedures.
- Carefully pry under corners of wall tiles – lift off vs. hammering to avoid drywall damage.
- Remove toilets or pedestal sinks first – permits access to all flooring for complete removal.
- Use chisels and hammer near walls – prevents damaging drywall or base trim with pry bars.
- Score glazed ceramic in grid pattern – creates breaking points to pry up in sections.
Patience and thorough preparation are also crucial for smooth tile removal. When done carefully, you can take out most types of tile without harming the underlying surface.
Hiring Tile Removal Pros
In some situations, it pays to have professional tile removal done rather than taking on a DIY project. Consider hiring contractors for:
- Large tile jobs of over 400 sq.ft. – Tile removal over big areas is exhausting and tough on the body.
- Tiles in a complex or decorative pattern – Intricate designs require extra care and skill to dismantle.
- Natural stone flooring – Marble, slate, and travertine often crack or shatter when removed.
- Small mosaic tiles – Difficult to pry these tiny tiles off successfully without damaging.
- Outdoor tile patios or steps – Outdoor thinset and mortar bonds tenaciously to pass freeze-thaw testing.
- Asbestos vinyl tiles – Hazardous material requires certified asbestos abatement technicians.
- Tiles set in reinforced mortar – Takes power tools and experience to remove reinforced underlayment.
Look for tile setters or flooring contractors experienced in tile removal for sensitive jobs. Expect to pay $3-$7 per sq.ft. or more depending on tile type and subfloor conditions.
Removal and Disposal Process
Tile materials, backing layers like mastic, and mortar debris require careful handling and disposal. Here are some removal and disposal tips:
- Inspect tiles for indications they contain asbestos before removal – Asbestos requires containment.
- Wear PPE when handling removal debris – Dust mask, gloves, goggles and coveralls reduce contact hazards.
- Place tiles and debris into heavy plastic bins, bags or sheet plastic – Contain shards, dust and particles from scattering in work area.
- Seal bins or double-bag debris tightly – Prevents exposure to dust and fibers during transport.
- Check if waste can be disposed as standard construction debris – Some landfills require separate handling of tile and mastic wastes.
- Make sure to specify if waste contains asbestos – Asbestos disposal requires special procedures for safety.
Careful removal and disposal protects your health and prevents hazardous tile materials from becoming an environmental problem. Check local regulations for correct tile debris and asbestos waste handling in your region.
Conclusion
From pry bars and chisels to powered cutting and drilling, having the right tile removal tools makes a big difference in results. Evaluate the tile type, bonding materials, layout, and access thoroughly first when planning removal. Follow safety procedures and dismantle tiles carefully to avoid damaging the underlying surface. While a determined DIYer can handle many tile removal jobs with proper preparation, some specialized materials like natural stone or asbestos tiles benefit from experienced contractor services. With caution and the right equipment, removing existing tiles refreshes the area for new beautiful floors and walls in your home.