Drywall installation is an important step in home construction and remodeling projects. Properly installed drywall provides a smooth and durable surface for walls and ceilings. One of the keys to achieving a high quality drywall installation is using the right screw pattern. Understanding drywall screw patterns and codes allows installers to securely fasten drywall panels while preventing common problems like pops, cracks, and nail pops.
Page Contents
Drywall Basics
Drywall, also known as wallboard, plasterboard, or gypsum board is a panel made of gypsum plaster sandwiched between two thick sheets of paper. Drywall panels are manufactured in standard sizes, typically 4 feet by 8 feet or 4 feet by 12 feet, in thicknesses ranging from 1/4 inch up to 5/8 inch. Thicker, fire-resistant drywall panels are also available.
To install drywall, panels are cut to size and fastened to wood or metal framing using nails or drywall screws. Screws are generally preferred as they form a tighter bond and are less likely to pop over time. Drywall joints between panels are covered using paper tape and joint compound to create a seamless surface ready for priming and painting.
Drywall Screw Patterns
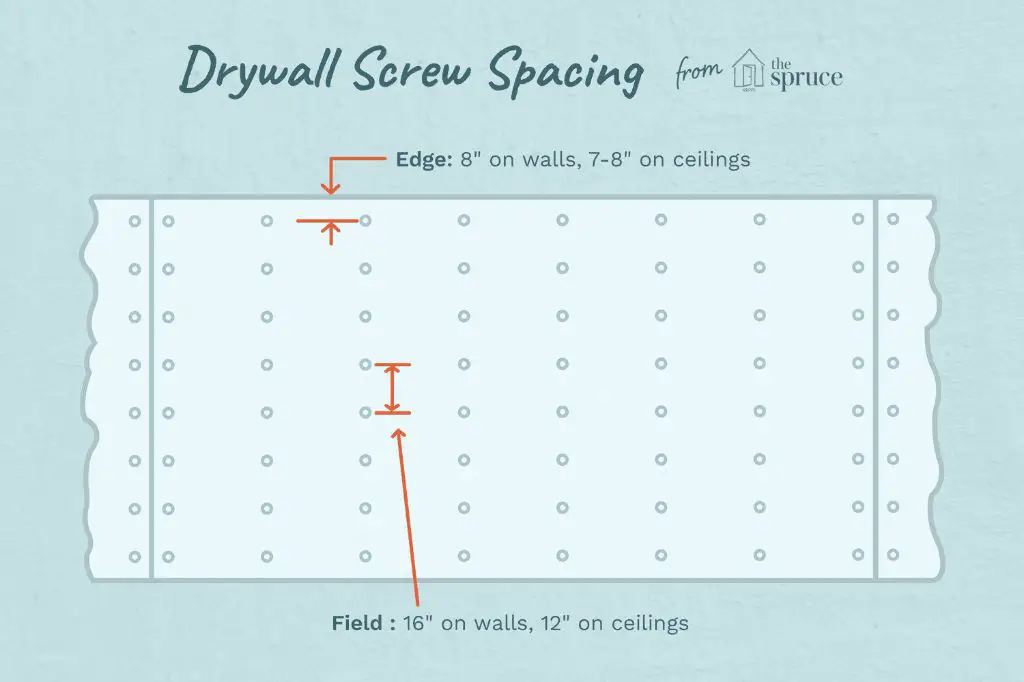
For a secure drywall installation, screws must be applied in the correct locations and spacing. The main codes and standards for drywall screw patterns are:
- Field Screws – Applied to the center “field” of the panel, usually 12 inches apart in a grid pattern
- Edge/Border Screws – Applied along the perimeter edges, spaced 7 inches apart
- Corner Screws – Applied where sheets meet at corners, no more than 8 inches apart
In addition to these basic patterns, there are more detailed specifications:
International Building Code (IBC)
The IBC includes the following drywall screw requirements:
- Field screws – Max 12 inches on center
- Drywall edges – Max 7 inches on center
- Vertical joints – Max 7 inches on center
- Corners and openings – Max 8 inches on center
ASTM C840 Standard
The ASTM C840 standard has guidelines for drywall screw spacing and placement, including:
- Field – Max 12 inches on center
- Vertical edges – Max 7 inches on center
- Horizontal edges – Max 7 inches on center
- Around openings – Max 7 inches on center
- Corners – Max 8 inches on center
ASTM C840 also specifies drywall fastener type, length, and diameter for different drywall thicknesses and framing materials.
Gypsum Association GA-216 Standard
Key drywall screw guidelines from the GA-216 standard are:
- Field – Max 12 inches on center
- Ceilings – Max 7 inches on center
- Corner bead – Max 6 inches on center
- Trim – Max 8 inches on center
GA-216 includes more detailed specifications for factors like framing spacing, board orientation, and fastener size.
Typical Drywall Screw Patterns
While code minimums must be met, installers typically use more screws than required for maximum strength and drywall integrity. Here are some typical screw spacing patterns:
Walls
| Location | Screw Spacing |
| Field | 8 inches on center |
| Vertical edges | 6 inches on center |
| Top & bottom plates | 8 inches on center |
| Around openings | 6 inches on center |
Ceilings
| Location | Screw Spacing |
| Field | 7 inches on center |
| Edge joints | 4 inches on center |
| End joints | 4 inches on center |
For fire-rated ceiling assemblies, screw spacing may need to be reduced to 4 inches on center throughout.
Drywall Screw Types
The right screw type is also key for proper drywall attachment. The most common types are:
- Bugle head screws – Best for attaching to wood framing. Bugle head provides holding power while taper below head countersinks screw.
- Sharp point screws – Designed for 20+ gauge steel framing. Sharp point penetrates steel.
- Needle point screws – Used for heavier gauge steel framing. Extra sharp point for penetration.
- Thread cutting screws – Form their own threads in framing for very secure grip.
- Hi-low screws – Special deep/shallow threads grip steel or wood framing.
Matching screw length to framing material and drywall thickness is also important. Common lengths are 1″, 1-1/4″, 1-5/8″, and 2″.
Proper Drywall Screw Driving
Properly driving screws is just as crucial as layout. Best practices include:
- Set clutch setting correctly for consistent depth control without stripping screw heads.
- Drive screws perpendicular to the framing, avoiding angles that weaken the connection.
- Seat screw heads just below drywall surface without breaking paper surface of board.
- Take care not to overdrive screws which can damage framing connections.
- In steel framing, do not cross-thread screws which substantially reduces holding strength.
Meeting Fire Resistance Ratings
For fire-rated assemblies, drywall application must also conform to the specific design qualifications. This usually includes closer screw spacing, particular drywall types and thicknesses, and sealants at joints.
Common Drywall Screw Issues
When drywall screw spacing and installation is improper, some common problems can occur:
- Pops – Drywall fastener heads pushing through paper surface due to framing movement or improper drive depth.
- Blisters – Drywall surface being pushed out from trapped air, water, or adhesive.
- Ridging – Visible ridges along drywall seams, often due to improper screw placement.
- Nail pops – Similar to screw pops but caused by nails pushing through as wood framing shrinks and swells.
- Cracks – Fractures in drywall surface that can run through joints, corners, openings, and field areas.
Careful adherence to best practices for drywall screw patterns, installation, and driving can help avoid these problems.
Locating Wall Studs
When attaching drywall directly to wood framing, proper screw placement requires locating wood studs concealed behind drywall. There are several techniques for finding studs:
- Use an electronic stud finder which detects density changes where studs are located.
- Knock along the wall and listen for changes in sound over wood studs.
- Check for raised drywall seams which often indicate stud locations.
- Measure and mark stud spacing based on standard 16″ or 24″ on center framing.
- Use a thin nail to penetrate drywall and find stud edges.
Carefully marking stud locations is key for aligning field screws and ensuring secure drywall attachment.
Drywall Screw Guns
Electric screw guns make drywall installation much faster and easier compared to hand driving each screw. Key features to look for include:
- Adjustable clutch – Limits screw depth for consistent countersinking.
- RPM range – Higher RPMs drive screws faster but can damage heads and frames.
- Torque settings – Match power to screw size to avoid stripping.
- Depth settings – Allow precise screw countersink depth.
- Bit tips – Magnetic tips hold screws firmly during driving.
- Balance – Even, comfortable weight distribution reduces fatigue.
- Handles – Pistol grip or D-handle for comfort and control.
- Cordless option – No cord for easier overhead use.
Investing in a high quality drywall screw gun makes projects faster and easier.
Automated Drywall Fastening
While most drywall is installed manually, some automated fastening systems are available:
- Screw guns with depth locators – Attach to drywall and automatically drive screws at preset spacing when moved along framing.
- Self-feeding screw systems – Feed strip screws automatically for consistent fastening.
- Robotics – Automated robotic arms able to fasten drywall to walls and ceilings.
Automated systems provide more consistent screw patterns and help reduce worker fatigue. However, they involve a significant equipment investment and currently have limited use on complex jobs.
Conclusion
In summary, proper drywall screw spacing, length, type, and installation are critical for achieving secure, long lasting finished walls and ceilings. Code standards provide minimum requirements but typically more fasteners are used. Matching the right fasteners to framing material and taking care during driving avoids many common drywall problems. While automation is available for some aspects of drywall fastening, most installers continue to rely on skilled manual installation following the proper drywall screw patterns.